New documents that you create in Microsoft Word either won’t have any columns or will only have one column, depending on how you look at it.
But you may be trying to figure out how to make columns in Word Office 365 if you are using that version of the application and need a document with two or three columns.
Luckily, this is something that you can adjust from the Layout tab at the top of the window, which we will discuss in our tutorial below.
How to Add Office 365 Word Columns
- Open your Word document.
- Click the Layout tab.
- Click the Columns button.
- Choose the number of columns.
Our guide continues below with additional information on how to make columns in Word Office 365, including pictures of these steps.
Many of the documents created in Microsoft Word are perfectly fine using the default formatting and layout settings you get with any document that uses the Normal template.
Whether it’s a paper you are writing for school or a report for work (or collaboration with others where you may need to hide the comments when you print), you may only need to change a couple of formatting settings for the content you add to the document.
But certain types of documents will need to utilize columns for their layout, which you may have trouble adding if you haven’t had to use them before.
You can add a new column if you have only one column in your Microsoft Word document (or add another column to a two column document) by going to Layout > Columns > then choosing a number of columns.
Fortunately adding a second column to a document in Microsoft Word is fairly simple, and existing content in the document will automatically be reformatted to fit into the columns.
Find out how to get character count in Word if you need to know the exact number of letters and numbers in your document.
How to Split a Document Into Two Columns in Word for Office 365 (Guide with Pictures)
The steps in this article were performed in Microsoft Word for Office 365, but will also work in other versions of Word as well.
We are going to be focusing specifically on making the document into two columns, but you can add more if you wish.
These steps will show you how to make columns in Word office 365.
Step 1: Open your document in Microsoft Word.
Open the Word document.
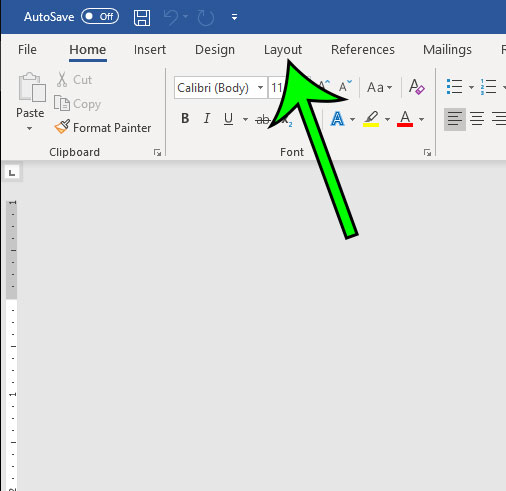
Step 2: Select the Layout tab at the top of the window.

Click Layout.
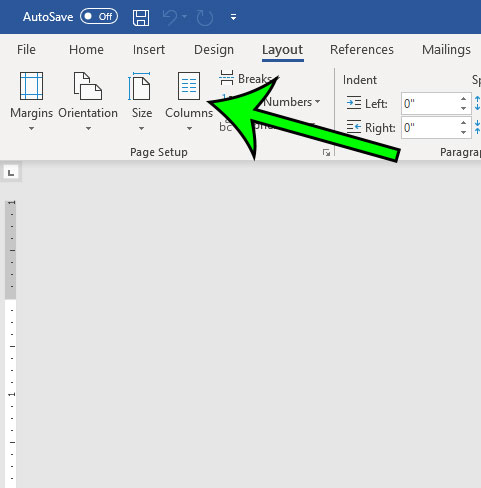
Step 3: Click the Columns button in the Page Setup section of the ribbon.

Click Columns.
Note that there is also a Breaks button in the Page Setup group that you can select and choose the Column Break option when you want to use column breaks to control which column your content appears in.
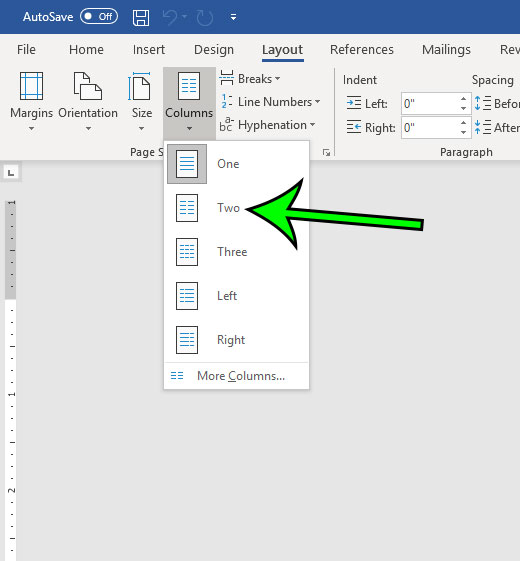
Step 4: Select the Two option to split the document into two columns, or choose one of the other options if you prefer.

Choose the desired number of columns.
Note that you can use the More Columns option if you want to create more than three columns in your document.
When you create columns using that option you can include a surprising amount of columns in your existing document, but you might need to switch the page orientation or use a larger paper size since a lot of columns will end up being pretty thin.

Now that you know how to make columns in Word Office 365 you will be able to add and remove columns from your documents as needed.
If you are looking to restore your Word documents to the single column format rather than adding columns, then you simply need to select the One option after you click the Columns button.
Our tutorial continues below with additional discussion about adding multiple columns to your existing columns in a document.
More Information on How to Insert Columns or Use a Column Layout in a Microsoft Word Document
Hopefully, the steps above have provided you with guidance on how to convert a one column document to multiple columns that split the entire document into two or more columns.
By default, the columns that you add from the Page Layout tab are going to be of equal column width.
However, if you select the More Columns option at the bottom of the Columns drop-down menu you are going to open the Columns dialog box, where there are a number of ways that you can format columns.
Here you can add columns to the document, as well as set different column widths and change column spacing if you uncheck the Equal column width box.
We mentioned briefly above that you can add column breaks to your document by going to Layout > Breaks > Column Breaks.
Note that this is going to force content to the next column after the point where your cursor was when you added the column break, so you might need to redo a column break several times before you get the layout that you wanted.
Do you need to change something in Word to a physical size, but you’re having trouble getting it right? Find out how to display the ruler in Word so that you can see how large a document’s elements will be when it’s printed.
Frequently Asked Questions About Word Doc Columns
How do I insert column breaks in a Word document?
When you start adding column breaks to a document that already has columns, it will force the content to the start of the next column.
This works similarly to how a page break would work, just slightly different because the content is going to stay on the page as long as there is another column to go to.
You can insert an MS Word column break by positioning your mouse cursor at the point in the column where you want to set the break, then you can click the Layout tab, then click the Breaks button, then choose the Column option.
How do I add Microsoft Word Online columns?
If you are working with the online version of Microsoft Word then, unfortunately, you aren’t able to add columns to your document.
If you need to create a document with columns in a free Web-based word-processing application, then I would recommend using Google Docs.
Once you have a document open there you can go to Format > Columns > and choose the desired number of columns for your document.
Where can I find the column formatting options in Microsoft Word?
Once you have added columns to your document you may want to change some of the elements of those columns.
By going to Layout > Columns > More Columns you can open a Columns dialog box, where you will find various options that allow you to change the direction of the columns, set individual width and spacing for them, or include a vertical line between each of the columns.
How do I add a vertical line between columns in my Word document?
If you would like to see some visual separation between the columns in your document, then Word has an option that you may find useful.
Select the Layout tab, click the Columns button, then choose the More Columns button at the bottom of the dropdown menu.
You can then check the box to the left of Line between to include a vertical line between your document columns.

Matt Jacobs has been working as an IT consultant for small businesses since receiving his Master’s degree in 2003. While he still does some consulting work, his primary focus now is on creating technology support content for SupportYourTech.com.
His work can be found on many websites and focuses on topics such as Microsoft Office, Apple devices, Android devices, Photoshop, and more.