To reduce the size of an Excel file, first find out what is making it big, then remove that one thing. The usual culprits are formatting that stretches far past your data, large pictures, pivot tables that save a copy of their source data, and old sheets or links nobody uses. Fix those, then save the workbook as an Excel Binary Workbook (.xlsb) if you still need it smaller. Most bloated files shrink a lot from one or two of these fixes.
Applies to: Excel for Microsoft 365 (Windows and Mac), Excel 2024, Excel 2021, Excel 2019 and Excel 2016. Picture compression and Inquire are desktop-only features. The core fixes match Microsoft’s Reduce the file size of your Excel spreadsheets page.
Before you start: save a copy of the workbook (File > Save As, add “backup” to the name). Several fixes below, such as breaking links or cleaning formatting, can’t be undone once you save.
Check the size and find the cause
Write down the current size so you can tell which fix worked. In File Explorer, right-click the file and choose Properties, or in Excel select File > Info and look for Size under Properties. Then run these checks:
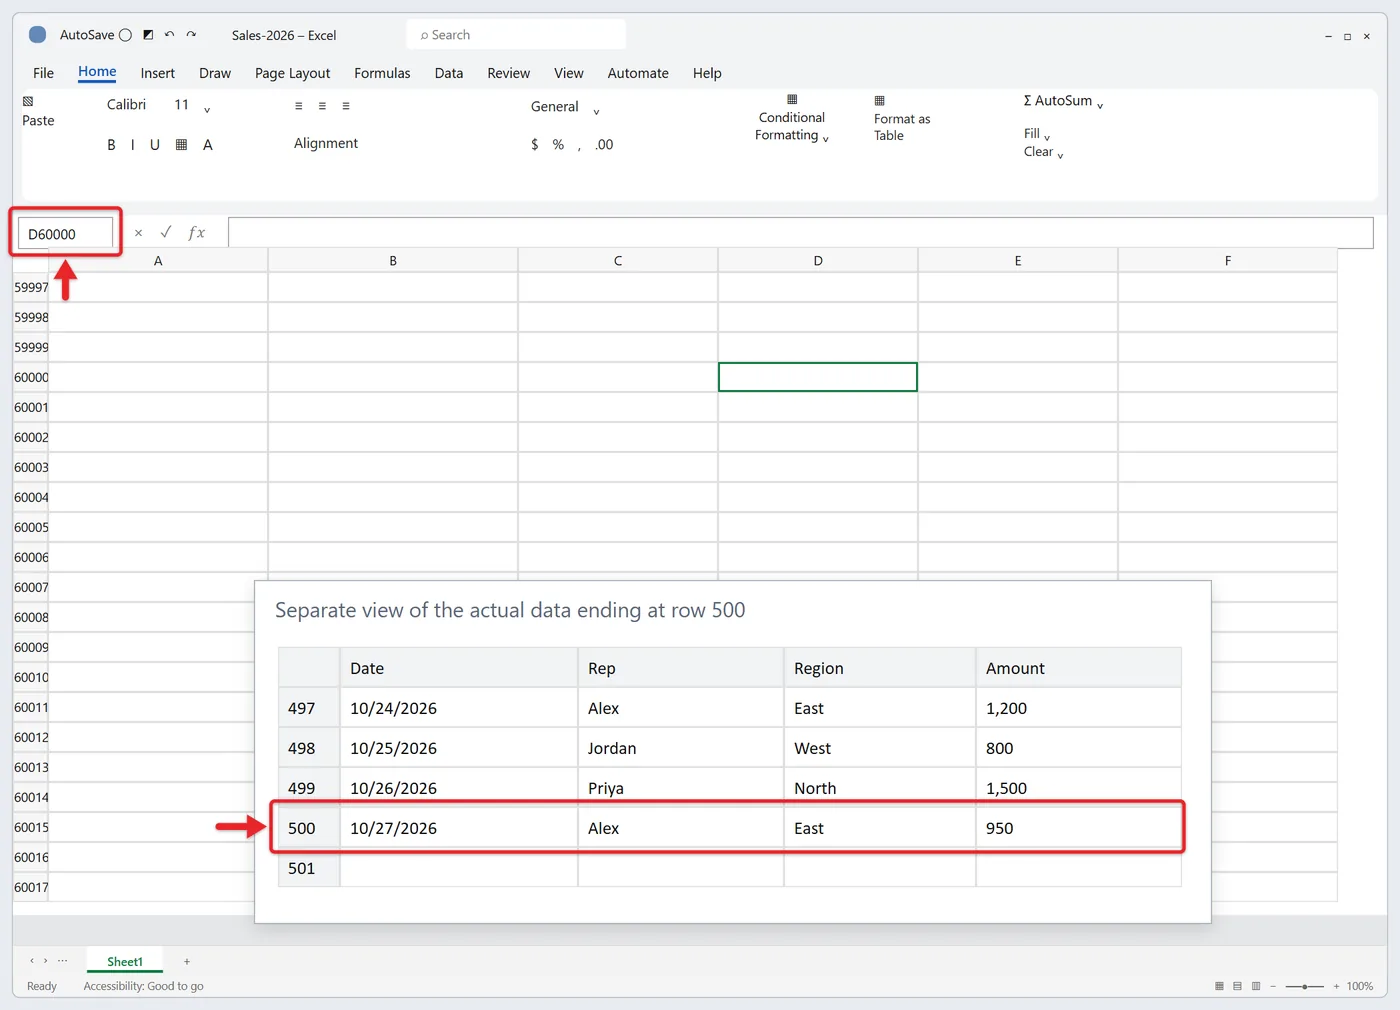
- Find the last cell Excel thinks you use. Click any cell on a sheet and press Ctrl + End. Excel jumps to the last cell that contains data or formatting. If it lands at row 1,048,576 or column XFD while your data ends at row 500, formatting in empty cells is inflating the file. You can also use Home > Find & Select > Go To Special > Last cell, which is also on the Home tab in Excel for Mac.
- Look for pictures and shapes. Press F5, select Special, choose Objects and select OK. Every picture, shape, chart and text box on the sheet is selected, including tiny or hidden ones pasted in by accident.
- Count the sheets. Right-click any sheet tab. If Unhide is available, the workbook has hidden sheets.
- Check for pivot tables and links. Pivot tables store their own copy of the data, and links to other workbooks bring in extra information. Both are covered below.
Still not sure which sheet is the problem? Work on the backup copy: delete one sheet, save, and check the size. The sheet whose removal makes the biggest drop is the one to fix in the original.
Advanced check: an .xlsx file is a ZIP package. Make a second copy, change its extension from .xlsx to .zip, and open it in File Explorer. Large files under xl\media mean pictures, under xl\worksheets mean sheet data or formatting, and under xl\pivotCache mean pivot caches. Delete this copy when you’re done; never rename the original.
Which fix to try first
| What you found | Fix | Keeps your data? |
|---|---|---|
| Ctrl + End lands far past your data | Delete unused rows and columns | Yes |
| Photos, logos or screenshots | Compress pictures | Yes (lower image quality) |
| One or more pivot tables | Stop saving the pivot cache | Yes |
| Lots of raw data, nothing obviously wrong | Save as .xlsb | Yes |
| Old sheets, names or links to other files | Remove hidden sheets, names and links | Only what you delete |
| Thousands of formulas or formatting rules | Trim formulas and conditional formatting | Values stay; formulas you convert stop updating |
Delete unused rows and columns
If someone once formatted entire columns, or pasted data that was later deleted, Excel keeps tracking those cells. Deleting them resets what Microsoft calls the last cell. Microsoft’s Locate and reset the last cell on a worksheet page notes that this extra formatting increases file size and can add blank printed pages.
- Find the last row that really contains data, then click the row number just below it. For example, if your data ends at row 500, click the 501 row heading.
- Press Ctrl + Shift + Down Arrow. Every row to the bottom of the sheet is selected.
- Right-click the selected row headings and choose Delete. Use Delete, not Clear Contents; clearing contents leaves the formatting behind.
- Click the column letter just right of your last data column and press Ctrl + Shift + Right Arrow, then right-click and choose Delete.
- Repeat on each sheet where Ctrl + End jumped too far.
- Save the workbook, close it and open it again. Press Ctrl + End: it should now land on your last real cell.
Microsoft’s own method selects the same empty rows and columns and uses Home > Clear > Clear All instead of Delete. Either works. If formulas elsewhere refer to whole columns, check them after deleting.
Seeing blank rows that won’t select? Hidden rows can sit in that range. Unhiding all rows and columns first shows you what you’re about to delete.
Clean excess formatting on every sheet at once
If you have Excel for Windows with Microsoft 365 Apps for enterprise (or an equivalent business edition), the Inquire add-in can clean every sheet in one step.
- Select File > Options > Add-ins.
- In the Manage box, choose COM Add-ins and select Go.
- Check Inquire and select OK. An Inquire tab appears on the ribbon.
- Select Inquire > Clean Excess Cell Formatting, then choose the active sheet or all sheets.
- Select Yes when asked to save.
Microsoft’s Clean excess cell formatting page warns that the change can’t be undone, that conditional formatting applied to whole rows or columns may be removed beyond your last data column, and that in some cases the file can end up larger. Work on a copy and compare sizes. If you don’t see Inquire in the COM add-ins list, your edition doesn’t include it; use the manual steps above.
Compress pictures
Photos taken on a phone or pasted screenshots are often far larger than they need to be on a worksheet. Compressing them lowers the stored resolution and can delete the hidden parts of cropped pictures.
On Windows
- Click any picture in the workbook. The Picture Format tab appears.
- In the Adjust group, select Compress Pictures. On a narrow window it may show only as an icon.
- Clear Apply only to this picture to compress every picture in the workbook.
- Check Delete cropped areas of pictures.
- Under Resolution, pick a lower setting. Web (150 ppi) keeps pictures readable on screen; E-mail (96 ppi) gives the smallest result but can look soft when printed.
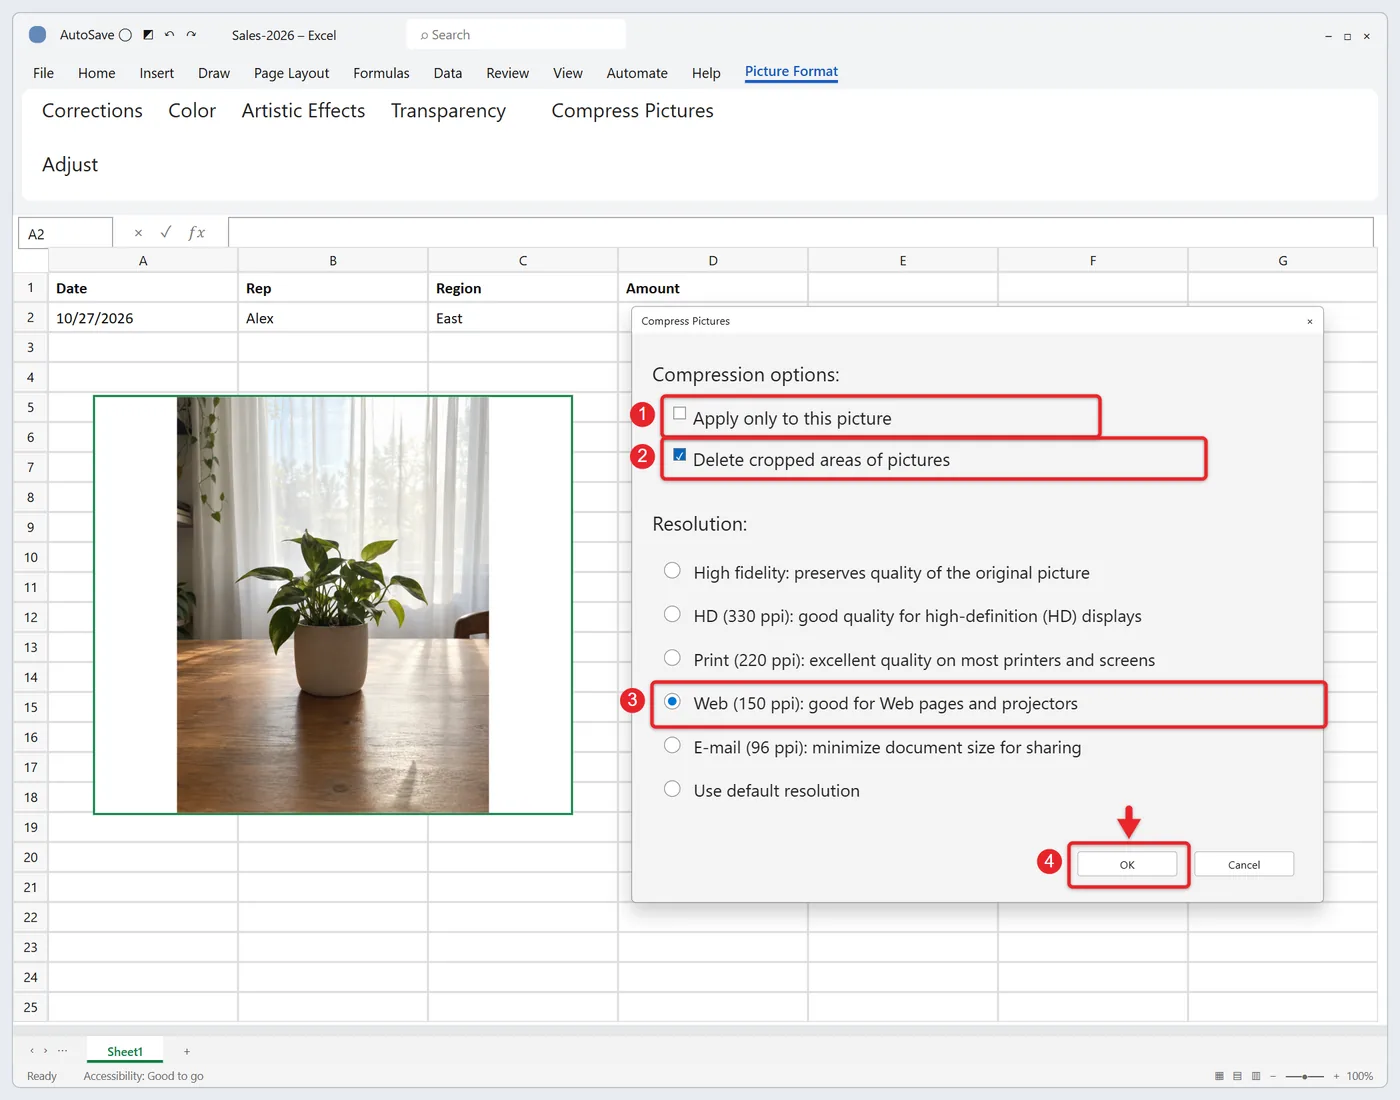
- Select OK, then save the workbook.
If a picture looks worse, press Ctrl + Z before saving. Once saved, deleted cropped areas and discarded detail can’t be restored, so reinsert the original picture if you need it back.
On a Mac
- To compress every picture, select File > Compress Pictures (some versions show File > Reduce File Size). To do only some, Shift-click the pictures and select Picture Format > Compress Pictures.
- Choose a setting in the Picture Quality box.
- Check Delete cropped areas of pictures, choose Selected pictures only or All pictures in this file, and confirm.
Keep new pictures small
On Windows, go to File > Options > Advanced and scroll to Image Size and Quality. Check Discard editing data, leave Do not compress images in file unchecked, and set Default resolution to 150 ppi or lower. The Microsoft 365 default is 220 ppi. The steps are on Microsoft’s Reduce the file size of a picture page, and the dialog is identical in PowerPoint, where you can compress all the pictures in a presentation at once.
Excel for the web can’t compress pictures. Open the file in the desktop app to use these steps.
Stop saving the pivot cache
When you create a pivot table, Excel stores a copy of the source data called the pivot cache. With a large source range, that copy can add nearly as much as the data itself. You can tell Excel not to save it and rebuild it when the file opens instead.
- Click any cell inside the pivot table.
- Select PivotTable Analyze > PivotTable > Options.
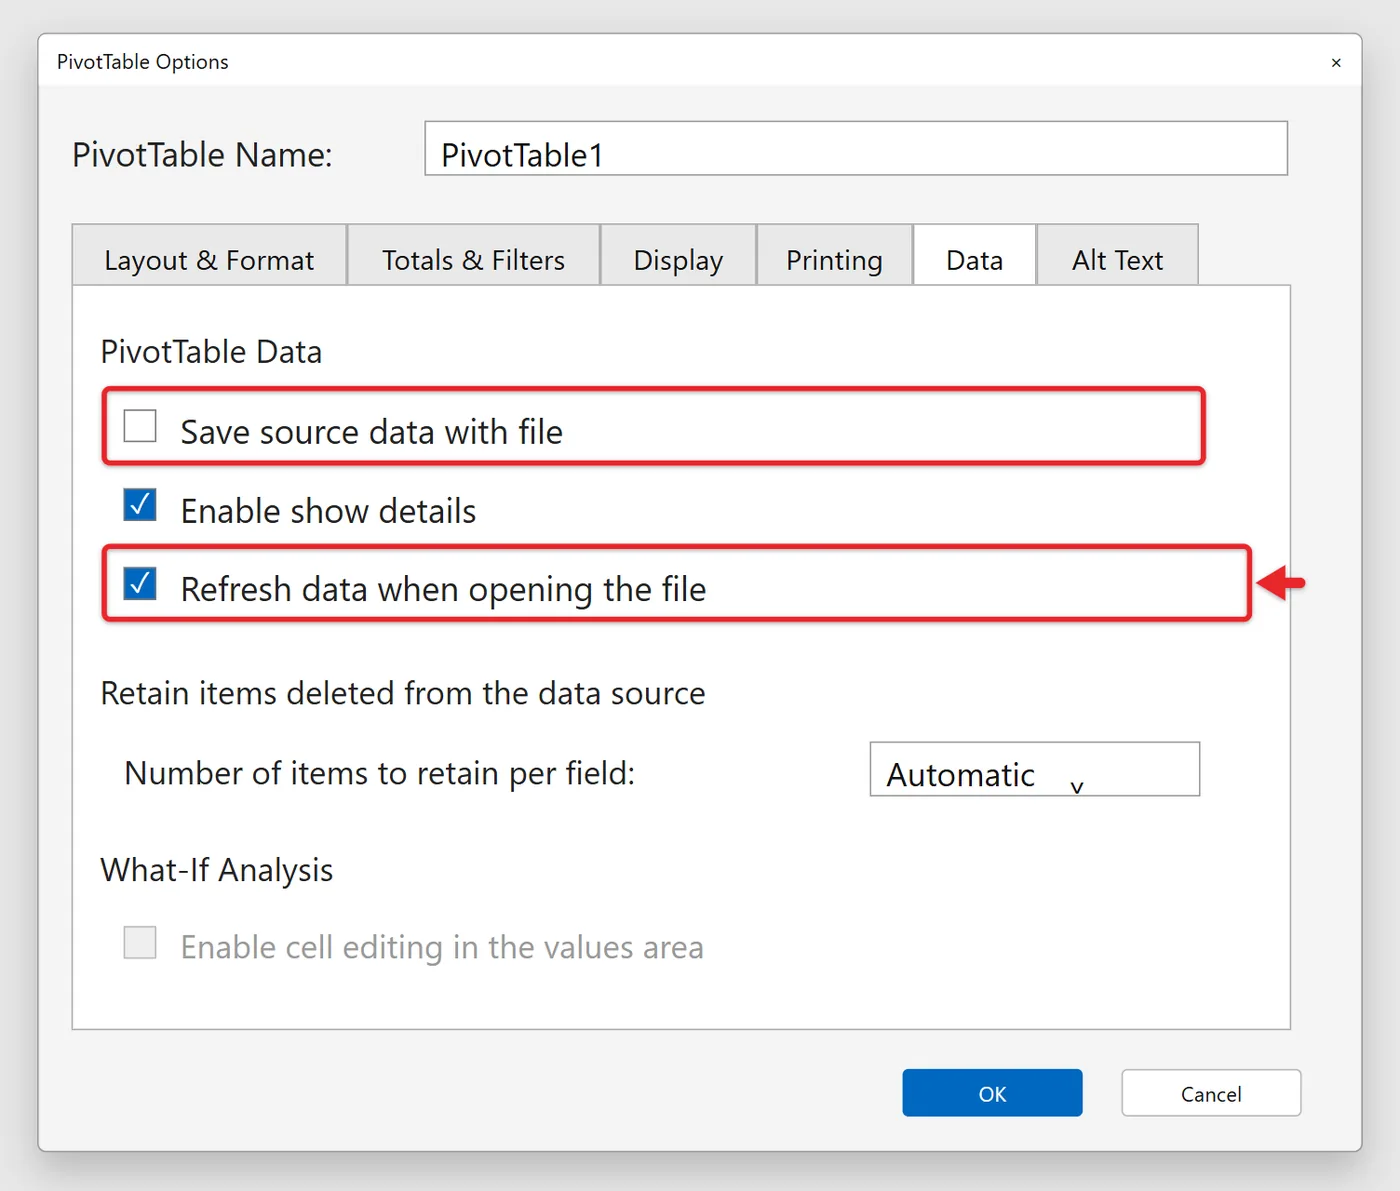
- Open the Data tab and clear Save source data with file.
- Check Refresh data when opening the file, select OK, then save.
The trade-off: the source data must still be available when the file opens, and the workbook may take a moment longer to open while the cache rebuilds. Until it refreshes, you can’t filter or rearrange the pivot table. You can also refresh the pivot table by hand with Alt + F5.
If you have several pivot tables built on the same data, make sure they use the same source range so they share one cache instead of storing several copies. The source is chosen when you create a pivot table Copying an existing pivot table and changing its fields generally keeps the shared cache too.
Save as an Excel Binary Workbook (.xlsb)
The .xlsb format stores the same workbook in a binary format instead of XML. It keeps your formulas, formatting, pivot tables and macros, and for workbooks with a lot of data it’s often noticeably smaller and quicker to open and save. For a small file the difference may be minor.
- Select File > Save As and choose a location (select Browse or More options if you don’t see the full dialog).
- Open the Save as type list and choose Excel Binary Workbook (*.xlsb).
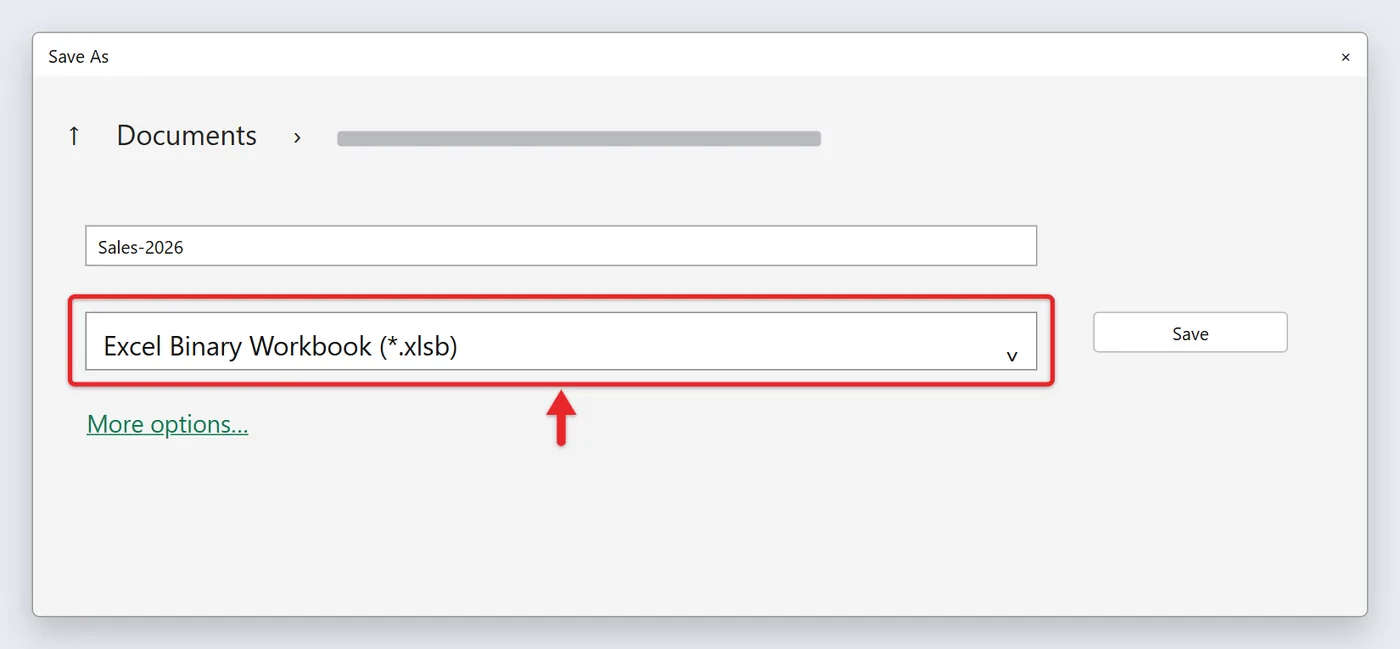
- Select Save. Your original .xlsx stays where it was, so compare the two sizes.
To make .xlsb the default for new saves, go to File > Options > Save and change Save files in this format to Excel Binary Workbook. Excel for Mac also lists Excel Binary Workbook in its File Format menu.
When not to use .xlsb:
- Some third-party apps, scripts and online services read .xlsx but may not read .xlsb. Check with whoever receives the file.
- An .xlsb file can contain macros, and unlike .xlsm the name doesn’t tell you. Open .xlsb files from others with the same care as any macro-enabled file.
- If the workbook lives in a SharePoint library, Save As may not be available. Save a local copy as .xlsb, then upload it in place of the original.
Hidden and unused sheets. Right-click a sheet tab and choose Unhide to see what’s hidden. Before deleting any sheet, check that no formula uses it: select Formulas > Trace Dependents on key cells, or press Ctrl + F, select Options, set Within to Workbook and Look in to Formulas, and search for the sheet name. Then right-click the tab and choose Delete. Deleting a sheet can’t be undone with Ctrl + Z.
Old named ranges. Open Formulas > Name Manager. Sort by the Refers To column and delete names that show #REF! or point to other workbooks you no longer use.
Links to other workbooks. In Excel for Microsoft 365, select Data > Queries & Connections > Workbook Links. In the pane, choose Break all, or use the … menu next to one workbook and choose Break links. Older versions use Data > Edit Links > Break Link. Breaking a link turns every formula that used it into its current value, and Microsoft’s Manage workbook links page warns this can’t be undone. The same page explains where else links hide: defined names, shapes, chart titles and chart series.
Embedded files. A Word document, PDF or other workbook inserted as an object adds its full size to the file. Delete objects you don’t need, or replace them with a link to the file. The difference between the two is explained in embedding a Word document in Excel.
Trim formulas and conditional formatting
Convert finished formulas to values. For results that will never change, such as last year’s totals, select the cells, press Ctrl + C, then select Home > Paste > Paste Values. To grab every formula on a sheet at once, press F5, choose Special > Formulas, then copy and paste as values. The converted cells stop updating, so leave alone any formula that still needs to recalculate. Volatile functions such as OFFSET, INDIRECT, TODAY and RAND recalculate constantly, so replacing them is often worth more for speed than for size.
Clean up conditional formatting. Select Home > Conditional Formatting > Manage Rules, set Show formatting rules for to This Worksheet, and look for dozens of near-identical rules. Copying and pasting cells often splits one rule into many small ones. Delete the duplicates and keep one rule that covers the full range. More on rule ranges is in using conditional formatting in Excel.
Remove formatting you don’t need. Cell colors and borders on a few hundred rows add little, but formatting across hundreds of thousands of rows adds up. Select the range and use Home > Clear > Clear Formats to strip it.
When the data itself is the problem
If the workbook holds hundreds of thousands of rows and you’ve tried everything above, the data simply takes space. A few structural changes help:
- Load query results to the Data Model, not a sheet. If you import data with Power Query, select Data > Queries & Connections, right-click the query and choose Load To. In Import Data, load it as a connection only or check Add this data to the Data Model instead of loading it to a worksheet table, then build pivot tables from the model. Where to find the tool in your version is covered in enabling Power Query in Excel.
- Split the workbook. Move raw data into a separate file (for example, one per year) and keep a lighter summary workbook.
- Share a link instead of an attachment. If the goal is getting the file to someone, upload it to OneDrive or SharePoint and send a link. Zipping helps little, because an .xlsx file is already compressed.
Confirm the result and undo a change
- Save and close the workbook.
- Check the size again in File Explorer (right-click > Properties) and compare it with the number you wrote down.
- Reopen the file, press Ctrl + End on each sheet, refresh pivot tables, and spot-check a few totals against the backup.
To undo, use Ctrl + Z before you save. After saving, most of these changes (deleted rows, broken links, compressed pictures, cleaned formatting) can’t be reversed, so restore the backup copy and repeat only the fixes you want.
Troubleshooting
The size didn’t change after deleting rows
Excel resets the last cell only when you save. Save, close and reopen the file, then press Ctrl + End again. Also confirm you used Delete rather than Clear Contents, and repeat the steps on every sheet, not just the one you were looking at.
Compress Pictures is grayed out
Select an actual picture first. Shapes, SVG icons and charts aren’t pictures, so the command doesn’t apply to them. In Excel for the web the command isn’t available at all.
The file got bigger after cleaning formatting
This is a known side effect of Clean Excess Cell Formatting. Go back to your backup and use the manual delete steps instead, sheet by sheet, checking the size after each one.
The pivot table is empty or won’t filter after reopening
That’s expected after you stop saving the cache: select PivotTable Analyze > Refresh. If the refresh fails, the source range or source file has moved, so update it with Change Data Source.
Someone can’t open the .xlsb file
Their app may not support the binary format. Save a copy as Excel Workbook (*.xlsx) for them, or share a PDF if they only need to read it.
Excel still feels slow even though the file is small
Slow typing or recalculating usually comes from formulas rather than file size. Try converting finished formulas to values and replacing volatile functions. Cached data in Office itself is a separate issue, covered in clearing the Excel cache.
Frequently asked questions
What makes an Excel file so large when it has little data?
Usually formatting applied to entire rows or columns, which makes Excel track a million cells instead of a few hundred. Pasted pictures, hidden sheets and pivot caches are the next most common causes. Press Ctrl + End on each sheet to spot the first one.
Does saving as .xlsb lose anything?
No. The binary format keeps formulas, formatting, charts, pivot tables and macros. The risk is compatibility with other software, not data loss, so keep an .xlsx copy if you share the file widely.
How much smaller will my file get?
It depends entirely on the cause. Removing a large pivot cache or compressing big photos can make a dramatic difference, while clearing a little cell formatting may save only a few kilobytes. That’s why measuring before and after each fix matters.
Will compressing pictures change the original photos on my computer?
No. Excel only changes the copies stored inside the workbook. The files in your Pictures folder are untouched.
Is my file too big to open in Google Sheets?
Google’s Drive file size limits allow up to 20 million cells or 100 MB for a spreadsheet converted to Google Sheets. Workbooks above that won’t convert. Shrink or split the file first, then follow the steps for opening an Excel file in Google Sheets.
Can I use an online Excel compressor?
You can, but it means handing your data to someone else’s website, and many of these tools simply recompress images or convert formulas, which you can do yourself in Excel. For anything with personal or business data, stick with the built-in steps.
Start with Ctrl + End and Go To Special > Objects on your largest sheet. In most cases those two checks point straight to the fix that matters, and you can skip the rest.

Matt Jacobs writes and maintains the guides on Support Your Tech, which he started in 2017. He spent most of his career keeping small-business PCs running and still takes the occasional consulting job, so the steps here come from fixing the same problems on other people’s computers. Every guide is checked on his own Windows 11, Windows 10, Mac, iPhone and iPad before it goes up.