Last updated on November 11th, 2026 at 06:04 pm
Windows Setup can copy and install Windows 11 with no network at all, as long as you make the USB installer on another computer. The catch is first-run setup (OOBE): Home and Pro for personal use need internet and a Microsoft account there, per Microsoft’s Windows 11 specifications. Connect for a few minutes at that screen with an Ethernet cable or phone USB tethering, finish, then go offline. Organization, Enterprise and Education PCs can use an answer file instead.
What works offline and what doesn’t
- Works offline: booting from the USB drive, choosing your language, entering or skipping a product key, deleting and creating partitions, copying the Windows files and the first restarts.
- Needs a connection (Home and Pro for personal use): the network screen, titled Let’s connect you to a network, and the Microsoft account sign-in that follows.
- Offline again after setup: once you reach the desktop you can unplug the cable or turn off Wi-Fi. Windows runs normally, but Windows Update, the Microsoft Store, OneDrive and online activation wait until you reconnect.
If you’ve read older guides that skip the network screen with a single command, those tricks have been removed from current Windows 11. The removed workarounds section explains what changed so you don’t lose time on them.
A second PC and a USB drive
- A second computer with internet to download Windows 11 and the target PC’s network driver.
- A USB flash drive of at least 8 GB. Everything on it is erased when you make the installer.
- A way to connect briefly. Plan for one of these: an Ethernet cable to your router, a USB-to-Ethernet adapter for laptops with no port, or a phone that can share its connection over a USB cable (USB tethering). A wired connection usually works without any extra driver, which makes it the safest choice.
- The network driver for the target PC. Look up the exact model on the PC maker’s support site (or the motherboard maker’s site for a custom build), download the Wi-Fi and Ethernet drivers, and extract them into a folder on the USB drive, for example a folder named Drivers. You’ll want the files that end in .inf, not only a single setup .exe.
- A backup. A clean install can erase the drive you install to. Copy any files you want to keep first.
- Your product key, if you have one. A PC that ran Windows 11 before usually has a digital license and reactivates by itself once it goes online.
- Compatible hardware. Check that the PC meets the requirements on the specifications page linked above.
Step 1: Make the installer on another PC
- On the computer that has internet, open Microsoft’s Download Windows 11 page.
- Under Create Windows 11 Installation Media, select Download Now to get the Media Creation Tool. (The Installation Assistant on the same page only upgrades the PC it runs on, so it won’t help here.)
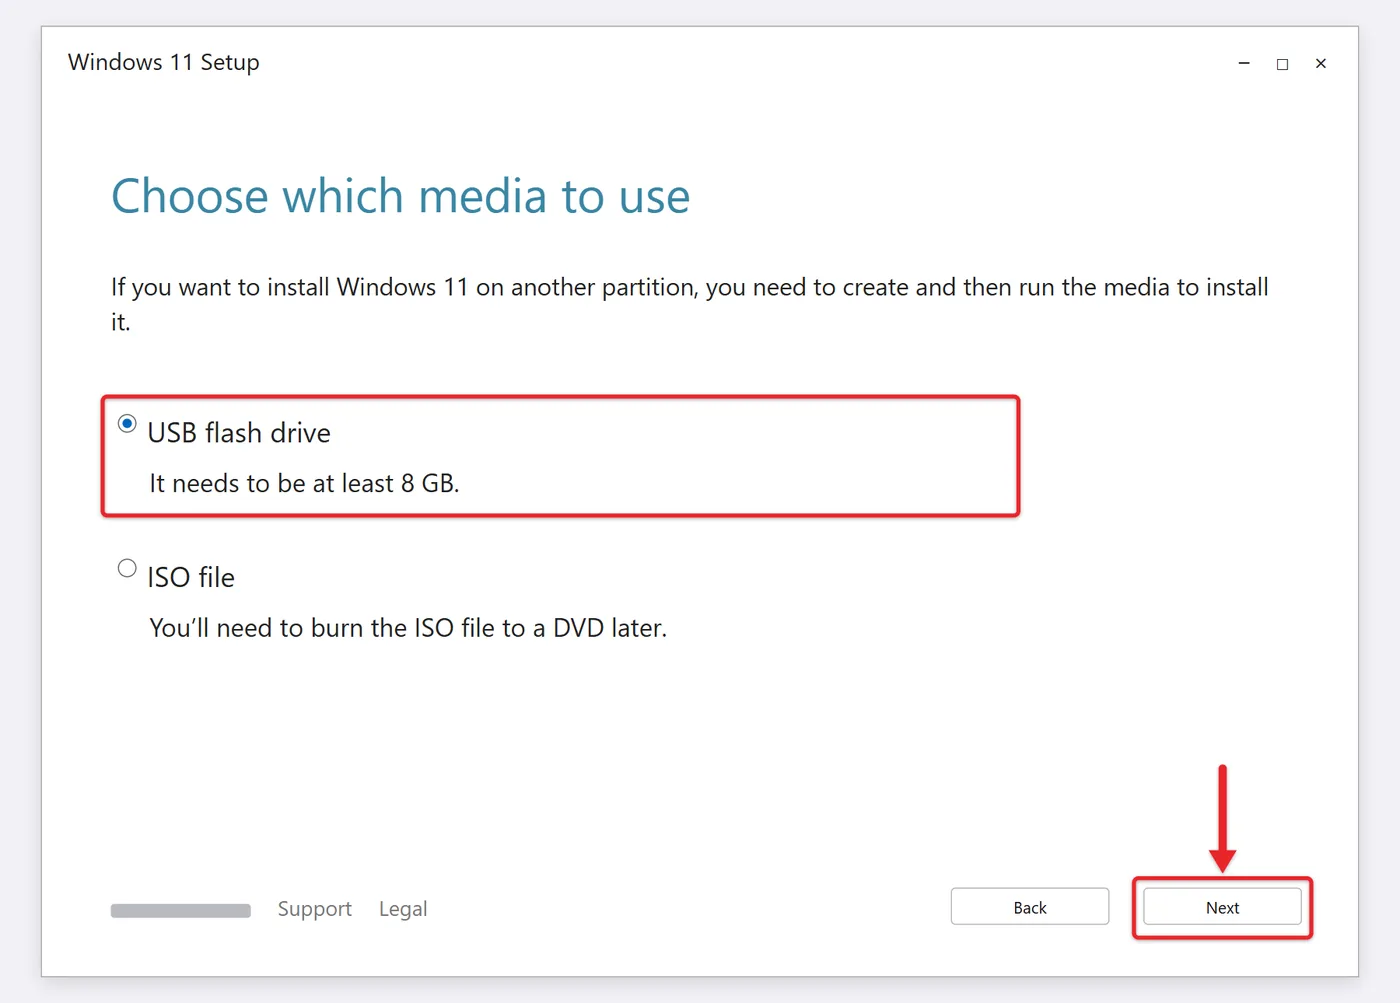
- Run the tool, accept the license, choose your language and edition, then select USB flash drive and pick your drive. The tool downloads Windows and makes the drive bootable. You’ll see a message that the drive is ready when it finishes.
- Open the USB drive in File Explorer and copy your extracted network driver folder onto it.
Prefer an ISO file? You can download the disk image from the same page and write it to the drive yourself. The full walkthrough for both options is in how to make a bootable USB for Windows 11.
Step 2: Install Windows with no network connected
- Plug the USB drive into the target PC and restart it. Press the boot menu key as soon as the maker’s logo appears (often F12, F11, F9 or Esc) and choose the USB drive. If the PC skips straight to its old system, the steps for booting from USB in Windows 11 cover boot menus and firmware settings.
- Choose your language, time format and keyboard, then select Next.
- Choose Install Windows 11 and confirm that you understand files and apps will be removed.
- Enter your product key, or select I don’t have a product key if this PC already had Windows 11 activated.
- Pick the edition that matches your license (Home or Pro) and accept the license terms.
- On the screen that lists drives and partitions, select where Windows goes. Warning: deleting a partition erases everything on it, so make sure the size and number match the drive you mean to wipe. Select Next, then Install.
- Wait while Setup copies files. The PC restarts on its own, sometimes more than once. You can leave the USB drive plugged in; you’ll need it in Step 3 if no network appears.
Nothing in this step needs a network. If you want more detail on drive choices and partitions, see the guide to doing a clean install of Windows 11.
Step 3: Get past the network screen
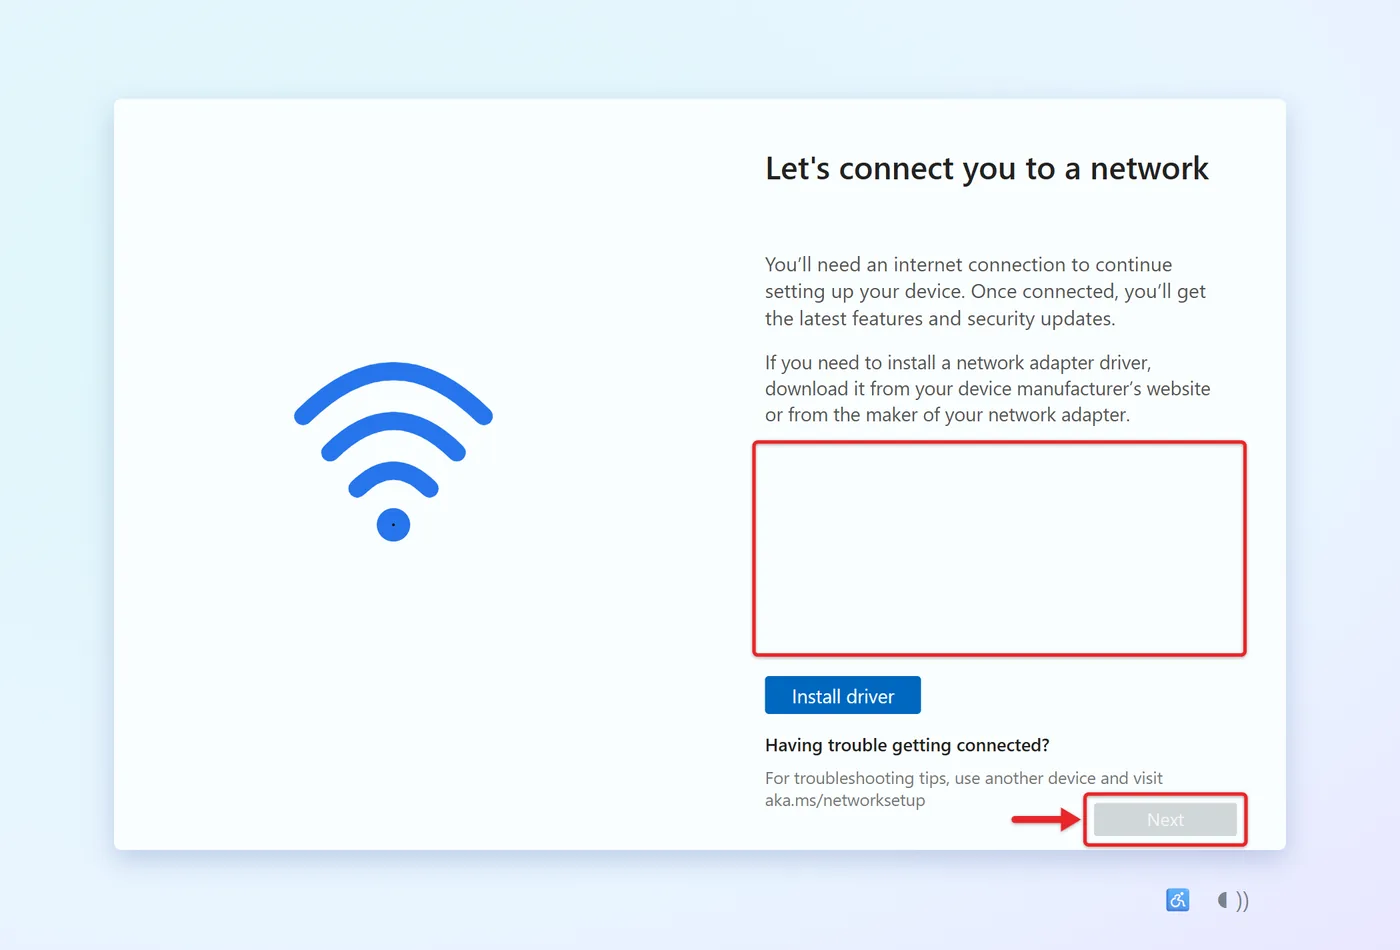
After the restarts, Windows asks for your country or region and keyboard layout, then shows Let’s connect you to a network. On Home and Pro for personal use, the Next button stays unavailable until the PC is online. Pick whichever option below fits your situation.
Option A: Connect for a few minutes
- Plug an Ethernet cable from the PC (or a USB-to-Ethernet adapter) into your router, or connect your phone with a USB cable and turn on USB tethering in the phone’s hotspot settings. Setup may download updates while connected, so watch your data plan on a phone.
- Wait a few seconds. Setup usually detects a working wired or tethered connection and moves on by itself, or it lists the connection so you can select Next.
- Setup may check for updates at this point, then asks you to sign in with a Microsoft account. Sign in or create one, and finish the privacy and setup screens.
Option B: No networks are listed? Load your driver
An empty network list usually means Windows doesn’t include a driver for the PC’s Wi-Fi or Ethernet hardware. Load the one you copied to the USB drive:
- On the network screen, press Shift + F10. On many laptops you need Shift + Fn + F10, and on a tablet you’ll need a USB keyboard. A Command Prompt window opens over Setup.
- Type diskpart, press Enter, type list volume and press Enter. Find your USB drive by its size or label and note its letter, then type exit and press Enter.
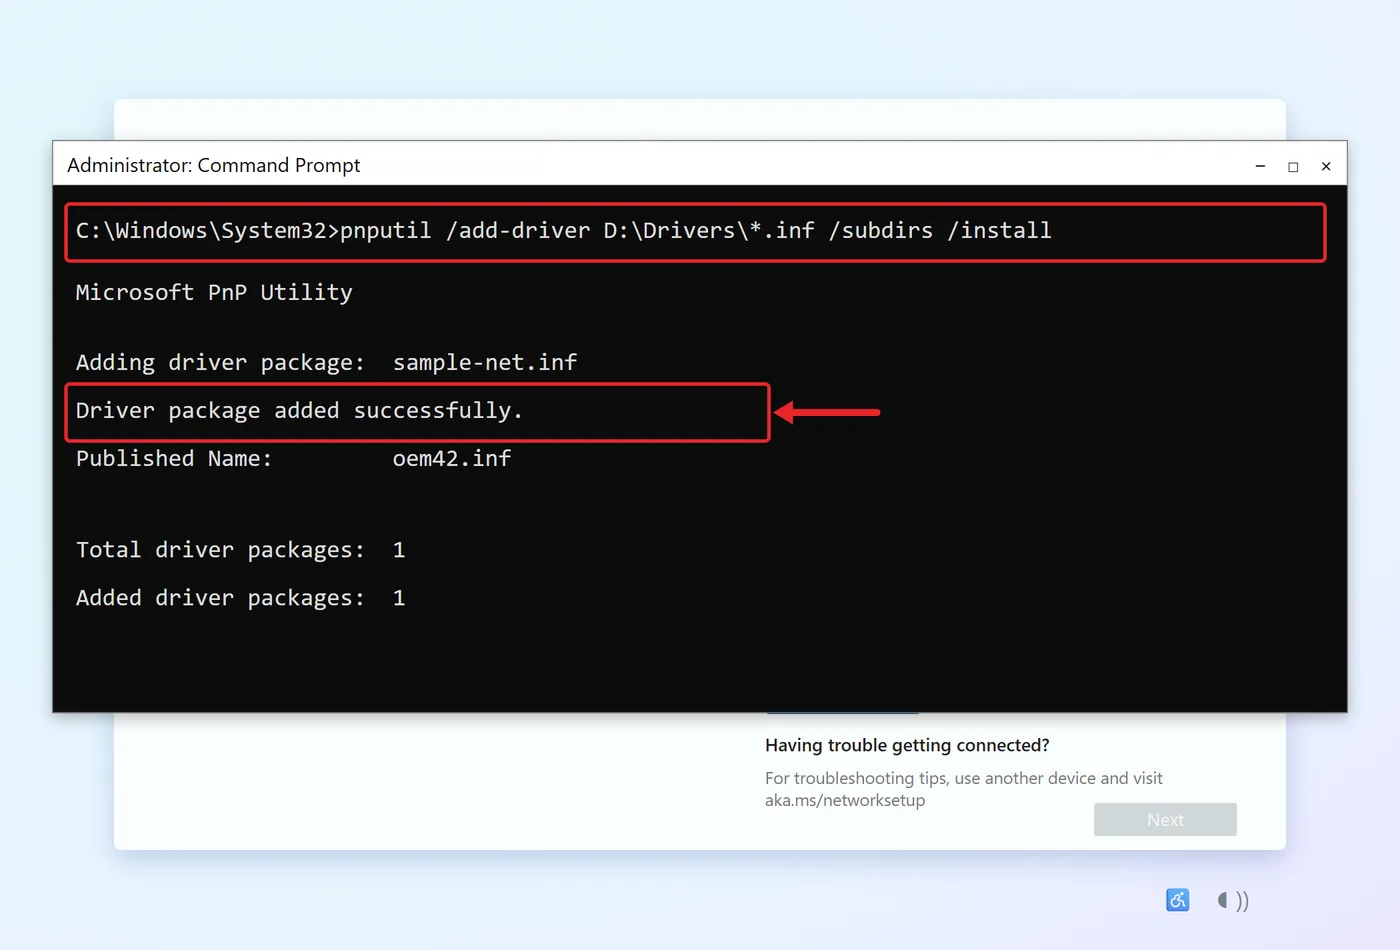
- Type the following, replacing D: with your USB drive letter and Drivers with your folder name, then press Enter:
pnputil /add-driver D:\Drivers\*.inf /subdirs /install - Look for lines saying the driver package was added. Microsoft’s PnPUtil command reference explains the switches: /subdirs searches subfolders, and /install installs the driver on matching hardware.
- Close the Command Prompt window. Within a few seconds, Wi-Fi networks or an Ethernet connection should appear on the setup screen. Connect and continue as in Option A.
If you’d rather browse to the files than type a path, typing devmgmt.msc in the same window opens Device Manager, where you can right-click the network adapter (often listed under Other devices with a warning icon), choose Update driver and then Browse my computer for drivers.
If Setup shows “I don’t have internet”
Some setup screens, depending on the edition and how the PC was configured, include an I don’t have internet link and then Continue with limited setup. If you see them, you can use them to create a local account and finish offline. Don’t count on this on current Home or Pro installs: Microsoft’s stated goal is that personal-use devices finish setup online with a Microsoft account.
Will a phone hotspot work for the network screen?
Usually. USB tethering is often the easiest because Windows tends to recognize it without the PC’s own Wi-Fi driver. A Wi-Fi hotspot only helps if Setup already lists Wi-Fi networks.
Step 4: Go offline and switch to a local account if you want one
Once the desktop appears, you can disconnect the cable, turn off tethering or switch off Wi-Fi. Before you do, it’s worth letting Windows Update run once so the PC has current security fixes and drivers.
If you’d rather not sign in with a Microsoft account day to day, Microsoft documents a supported switch: open Settings > Accounts > Your info, select Sign in with a local account instead, enter a username such as Alex, a password and a hint, then select Sign out and finish. The full steps are on Microsoft’s page about changing between a local account and a Microsoft account, and the reverse switch is on the same page if you change your mind later. More background on account choices is in whether you can install Windows 11 without a Microsoft account.

Method 2: Automate setup with an answer file (advanced and IT)
Organizations that set up PCs in bulk don’t click through these screens. They use an answer file, an XML file that tells Windows Setup how to answer each screen. This is Microsoft’s documented deployment method, so it’s the legitimate way to preconfigure an offline setup, but it takes some care.
- Where it goes: Microsoft’s Windows Setup Automation Overview says Setup looks for a file named Autounattend.xml at the root of removable media, such as your installer USB drive.
- Settings that relate to the network and account screens (all in the oobeSystem pass of the Microsoft-Windows-Shell-Setup component): HideWirelessSetupInOOBE hides the Network screen, HideOnlineAccountScreens hides the sign-in page, and UserAccounts/LocalAccounts creates local accounts during installation.
- Know the limits: Microsoft describes HideOnlineAccountScreens as primarily for enterprises, and its reference pages don’t say whether every setting is honored on a Home edition in 26H2. Treat it as a deployment tool, test it on one PC, and keep Option A as your fallback.
- Protect passwords: account passwords in an answer file are only encoded, not encrypted, and Setup caches the file on the PC. Microsoft’s automation overview warns about sensitive data and tells deployers to remove cached answer files before handing a PC over.
The third-party tool Rufus offers an option to remove the online Microsoft account requirement when it writes the USB drive. Microsoft doesn’t support it, and whether it still works can change with each Windows build. If you try it, the walkthrough on using Rufus to install Windows 11 shows where the option appears.
Joining a work or school account (Microsoft Entra ID) during setup is another organization route, but it signs in online, so it doesn’t remove the need for a connection.
Workarounds Microsoft has removed
Many guides still list commands that used to skip the network or account screens. Here’s where they stand:
- OOBE\BYPASSNRO: Microsoft’s March 2025 Windows Insider release notes announced it was removing the bypassnro.cmd script so users exit setup with internet connectivity and a Microsoft account.
- Other local-only setup commands: Microsoft’s October 2025 Insider release notes said it is removing known mechanisms for creating a local account in setup, because they can skip critical setup screens. The post doesn’t list each one, but the popular start ms-cxh:localonly command is widely reported to be among the shortcuts affected.
- Registry edits, ending setup processes in Task Manager, or pressing Alt + F4: these were never supported. Even where one still appears to work, Microsoft’s reasoning is that skipping screens can leave setup incomplete, so they aren’t worth the risk on a PC you rely on.
Microsoft’s notes don’t give a separate list for each released version, so if a command does nothing on your PC, assume it was removed and use Option A.
Next greyed out or pnputil finds no drivers
Next stays grayed out even with a cable plugged in
Check that the router has internet (try another device), reseat the cable, and try a different port. Some routers or networks with a sign-in page (hotels, campuses) block Windows from confirming the connection. Phone tethering avoids that problem.
pnputil says no driver packages were found
The folder probably contains only a setup .exe or a .zip file. Extract the download on the other PC until you see .inf files, copy that folder to the USB drive, and run the command again. Also confirm you picked the driver for the exact model and for 64-bit Windows 11 (or Windows 10, which many network drivers also support).
The USB drive doesn’t boot
Remake it with the Media Creation Tool, try a USB port directly on the PC rather than a hub, and check the firmware’s boot order. Modern PCs boot the drive in UEFI mode.
Wi-Fi still doesn’t work after setup
Once you’re at the desktop, install the full driver package from the PC maker. The steps in fixing Wi-Fi not working in Windows 11 cover driver reinstalls and adapter checks.
How to confirm it worked
- Windows is installed: you reach the desktop and Start menu. To check the version, open Settings > System > About and look under Windows specifications.
- Activation: open Settings > System > Activation. Microsoft’s Activate Windows help page explains that Windows 11 activates online automatically after installation, so a PC that has stayed offline may show as not activated until it connects.
- Account type: Settings > Accounts > Your info shows either your Microsoft account email or Local account.
Once the PC is up and running, connect it to a network whenever you can and run Windows Update so it has the latest fixes. If it will normally live on a wired connection, the guide to setting up an Ethernet connection in Windows 11 covers the settings you’ll use.

Matt Jacobs writes and maintains the guides on Support Your Tech, which he started in 2017. He spent most of his career keeping small-business PCs running and still takes the occasional consulting job, so the steps here come from fixing the same problems on other people’s computers. Every guide is checked on his own Windows 11, Windows 10, Mac, iPhone and iPad before it goes up.