You add one more column, or paste a table from somewhere else, and suddenly the right edge of your Word table sails past the margin. The last column is cut off, or its border sits somewhere you cannot click. In most cases the fix takes ten seconds: select the whole table, open the Table Layout tab, and choose AutoFit > AutoFit Window. If that does nothing, the sections below walk through the settings that block it.
Fit the table to the margins with AutoFit Window
These steps are for Word in Microsoft 365 on Windows, in Print Layout view (the default view that shows page edges). AutoFit Window tells Word to stretch or squeeze the table so it spans exactly the space between the left and right margins.
- Click anywhere inside the table. Two extra tabs appear at the right end of the ribbon: Table Design and Table Layout.
- Select the whole table. Rest the pointer over the table until the small table move handle appears at its top-left corner, then click the handle.
- On the Table Layout tab, in the Cell Size group, click AutoFit.
- Choose AutoFit Window. The right edge should snap back to the right margin.
- If some columns are now cramped while others have empty space, keep the table selected and click Distribute Columns (also in the Cell Size group) to give every column the same width.
The other choice in that menu, AutoFit Contents, sizes each column to its longest entry. It is handy for narrow tables of short values, but on a table with long sentences or URLs it can make the table wider, not narrower. Microsoft explains the difference between the two options on its resize a table, column, or row page.
Example: A Table With Fixed 1.1-Inch Columns
In Word for Microsoft 365 on a Windows 11 laptop, I inserted an eight-column table with a fixed column width of 1.1″. At 8.8″ wide it ran past the right margin, and the last column, Status, was cut off.
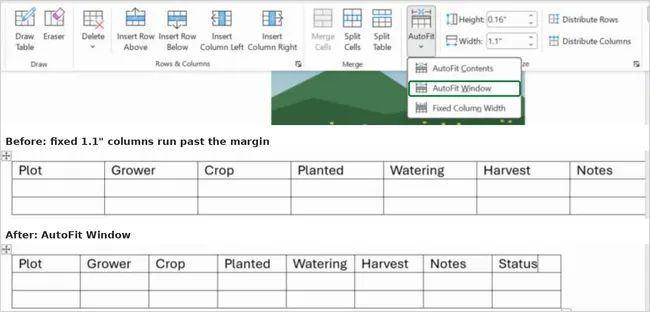
Table Layout > AutoFit > AutoFit Window pulled the whole table back inside the margins at once, and all eight headings fit on the page.
When AutoFit Window changes nothing
If the table stays where it is, one of its properties is overriding AutoFit. All of these live in one dialog: right-click inside the table and choose Table Properties.
- On the Table tab, look at Text wrapping. If it says Around, the table is behaving like a floating object that text flows around, and it can be pushed past the margin. Click None.
- Still on the Table tab, check Preferred width. A fixed width in inches that is larger than your text area keeps the table too wide. Either clear the box, or set Measure in to Percent and type 100.
- Look at Indent from left (available when alignment is Left). Any value other than 0 shifts the table sideways from the margin. Set it to 0.
- Open the Column tab. Each column can carry its own preferred width. Use Next Column to step through them and clear or lower any very large value.
- Click OK, select the table again and repeat AutoFit > AutoFit Window.
One more cause is the third AutoFit option, Fixed Column Width. Microsoft notes that it turns AutoFit off, so the columns keep the widths they had even when the table no longer fits. If someone chose it earlier, AutoFit Window resets it. The full list of options on each tab is on the set or change table properties page.
A worked example: Priya’s expense table has six columns set to 1.5 inches each, which adds up to 9 inches. On a Letter page with 1 inch margins she has only 6.5 inches of text width, so the last two columns hang off the page. Switching the preferred widths to percent, or running AutoFit Window, shares the 6.5 inches among all six columns.
Trim what is making the table wide
Sometimes the table fits the margin, but its content forces one column to stay wide. Try these in order, checking the result after each.
- Drag a column border. Point at the line between two columns until the pointer becomes a double arrow, then drag left. Hold Alt while you drag to see exact measurements on the ruler. For a precise value, type it in the Table Column Width box in the Cell Size group.
- Reduce cell margins. On the Table Layout tab, click Cell Margins in the Alignment group. In the Table Options box that opens, lowering the left and right default cell margins wins back a little space in every column.
- Break up long unbroken text. A long URL, file path or account number with no spaces cannot wrap, so the column grows to hold it. Shorten it, replace it with descriptive link text, or add a space or line break at a sensible point.
- Use a smaller font for the table only. Select the table and drop the size by a point or two. This is often enough for wide numeric tables.
- Check for oversized pictures. An image wider than its cell stretches the column. Resize the picture so it fits inside the cell.
Adding columns is a common trigger: the new column often takes space beyond the existing right edge instead of shrinking the other columns, so a table that fit perfectly can spill over after one insert. If you are about to expand a table, the tips in adding a row to a table in Word help, and running AutoFit Window afterward pulls everything back in.
Tables pasted from a web page, Excel or a PDF
Pasted tables often bring fixed pixel widths, wrapping and styles from their source, which is why they ignore the page margins. Two approaches work well:
- Paste again with different options. Undo the paste, paste again and click the Paste Options button that appears next to the content. Merge Formatting drops much of the source formatting; avoid Keep Text Only if you want to keep the table, because it turns the table into ordinary paragraphs. After pasting, run AutoFit Window.
- Clean the table you already have. Select the table, open Table Properties and apply the fixes from the previous section (wrapping None, preferred width off or 100 percent). If you want consistent borders and shading, apply a style from the Table Design tab.
If a pasted Excel range arrives as an embedded object or picture rather than a real Word table, AutoFit is not available. Click it: if the Table Layout tab does not appear, it is not a table. Resize it with its corner handles, or paste again using a table option. If the content does not really need to be a table, converting the table to text removes the width problem entirely.
Reach a column you cannot see
When the right side of the table is beyond the page edge, you cannot always grab its border. Some people find the hidden columns easier to reach in Draft view (View > Draft), which does not draw the page edges; switch back with View > Print Layout.
Or skip the dragging: AutoFit Window works on the whole selected table, including columns you cannot see.
Give a genuinely wide table more room
A table with ten columns of data may be unreadable once squeezed into 6.5 inches. In that case, give it more page instead of shrinking it.
- Turn just that page sideways. A landscape page gives a Letter page about 9 inches of width with 1 inch margins. Word needs section breaks before and after the table so the rest of the document stays portrait; the process is covered in making one page landscape in Word for a wide table.
- Narrow the margins. Layout > Margins, then a narrower preset or Custom Margins, adds width to every page. Check Print Preview afterward, because some printers cannot print close to the paper edge.
- Split the table. Put the first few columns in one table and the rest in a second table below it, repeating an identifier column (such as Name or Date) in both.
When the table runs off the bottom instead
“Off the page” sometimes means the table jumps to the next page, leaves a big gap, or splits a row in half. These are page-flow settings, not width settings. Open Table Properties and go to the Row tab.
- To let a tall row continue on the next page, select the rows and tick Allow row to break across pages. Clear it if you want each row kept whole.
- To repeat headings on every page, click in the first row only and tick Repeat as header row at the top of each page. If that box is ticked for every row, Word tries to keep the whole table together and pushes it to a new page, so clear it on all rows except the first.
- If the whole table still jumps, select it, right-click, choose Paragraph, open the Line and Page Breaks tab and clear Keep with next. Built-in heading styles include this setting, so text formatted as a heading inside a table can drag the table onto the next page.
Word for Mac and Word for the web
In Word for Mac, clicking in a table shows the Table Design and Layout tabs. The Layout tab has the column Width box and Distribute Columns, and you can also drag the table’s lower-right corner to resize it; other labels can differ slightly from Windows. Word for the web keeps advanced table settings such as cell size in the file but cannot change them, so if you cannot find a width or wrapping option there, open the document in the Word desktop app to finish the job.
Table questions that come up after the fix
Why is AutoFit greyed out?
Usually because the cursor is not in a real table. Editing restrictions can also block changes, so check Review > Restrict Editing. Click inside the table first; if the Table Layout tab never appears, the object is a picture or embedded spreadsheet.
How do I stop the table from growing again later?
Set the table’s preferred width to 100 percent. Percent widths follow the margins, so the table stays inside them even if you change margins or orientation. Avoid fixed inch widths on tables you will keep editing.
The table fits, but it sits in the wrong spot on the page. What now?
That is a position problem, not a width problem. Check the alignment on the Table tab of Table Properties, or see moving tables in Word for dragging and positioning options.
Start with AutoFit Window; if the edge does not move, open Table Properties and set wrapping to None and the width to 100 percent. Those two changes fix nearly every runaway table.

Matt Jacobs writes and maintains the guides on Support Your Tech, which he started in 2017. He spent most of his career keeping small-business PCs running and still takes the occasional consulting job, so the steps here come from fixing the same problems on other people’s computers. Every guide is checked on his own Windows 11, Windows 10, Mac, iPhone and iPad before it goes up.