Collaborating with your team on a project can be difficult. Fortunately, Google Docs comes packed with multiple features that make collaboration easier, such as changing text color or adding images within seconds.
For those who want to keep their work neat but still stand out while collaborating on a project, they can take advantage of Vertical Text, which allows for quicker reading when scrolling down through the file.
This tutorial will show you how to make text vertical in Google Docs using a handful of different options.
How to Add Vertical Text to Google Docs
- Open your document.
- Click Insert.
- Click Drawing, then New.
- Click the Text box button.
- Enter your text.
- Format or rotate the text box as needed.
- Click Save and Close.
Our article continues below with additional information on working with Google Docs vertical text, including pictures of these steps.
You may also want to know how to change paper size in Google Docs if you aren’t able to fit all of your text comfortably on the current page size or dimensions.
Why Insert Vertical Text In a Document?
Google Docs has a lot of great features that many people aren’t aware of. One of these features is a Drawing tool that makes it possible to include vertical text in the document. Not every word processing application has a feature like this, so it’s a powerful tool in the arsenal of anyone that is looking to display text vertically in a document.
Vertical text can be handy for a number of reasons, such as when you want to put two titles on one line, or if you’re working with an image and need the title to go right under it.
In the world of typography, we often use vertical text to organize words and numbers in a way that they can be read from bottom to top or top-to-bottom.
This is sometimes done by running it along the right and left margins of documents depending on preference, with the font size being larger than the rest of the document’s content (usually). These bits may also come in different fonts or colors as compared to most other parts of your page!
Find out how to draw a line through text in Word if you also work in Microsoft’s word processing application and want to use the strikethrough option.
How To Insert Vertical Text in Google Docs (Guide with Pictures)
With Google Docs, you have to add the vertical font separately. This is done by using a drawing tool on your document, which will make for some cool effects in no time!
Here is how you can use the drawing option on Google Docs.
These steps will show you how to make text vertical in Google Docs documents.
Step 1: Open your document in Google Docs.
You can also create a new document.
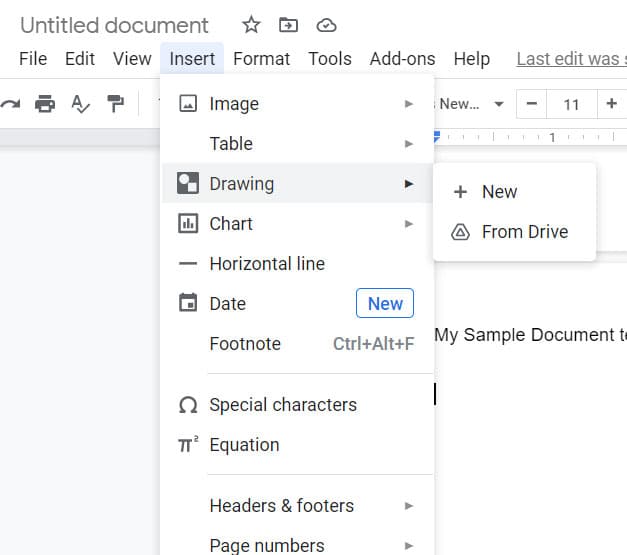
Step 2: Click on the Insert option in the menu at the top of the window.
It’s between the View tab and the Format tab.
Step 3: Choose the Drawing option from this menu, then click New.
An editing window or a pop-up window after you click on new to activate the drawing option. This window will enable you to add vertical text in Google Docs with the help of a text box.
In Google Docs, you need to use this text box to be able to insert vertical text as vertical text font is not available.
Step 4: Click the Text Box button in the toolbar above the drawing canvas.
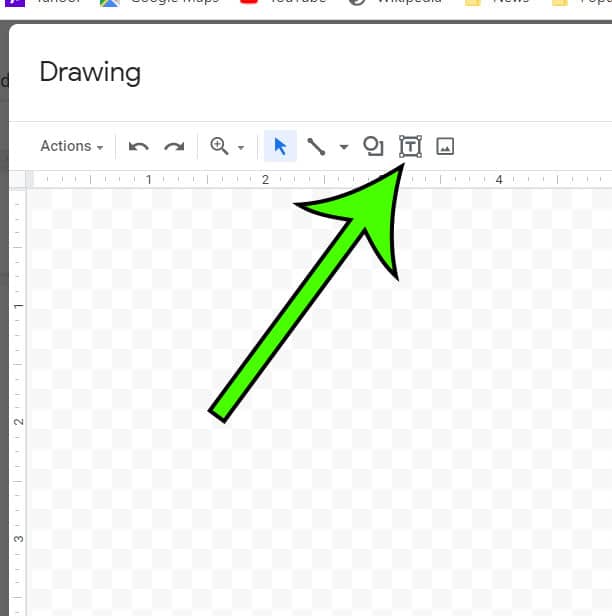
The text box icon that you need to click is the one that looks like a capital “T” inside of a square.
You will be able to draw a text box with your mouse after you have clicked on the Insert Text Box button. To draw the box you will need to click somewhere on the canvas, then hold down your mouse button and drag it to draw the text box.
To insert an empty textbox into our document, we first need to find where we want that box placed by clicking around until there is enough space for it.
Step 5: Type your text inside the blue text box.
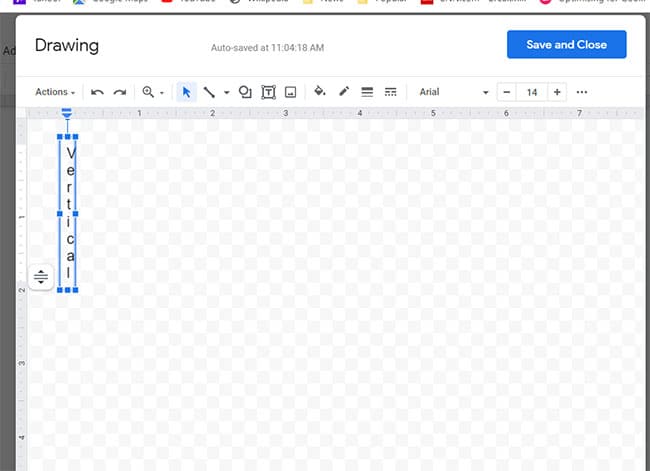
To make the text vertical you are either going to need to press “Enter” after each letter, or you are going to have to resize the text box so that it’s thin enough to only display one letter.
A blinking cursor will appear once you click inside the blue box or the rectangle.
This is where you can type in text and where your text will appear. You can fill in whatever text you would like and can also resize the text box according to your requirements.
To resize this box you need to hover over its borders and drag its edges without letting go of the left mouse button.
Supply:
- Google Docs document
Tools:
- Google Account
- Desktop or laptop Web browser
Now that you know how to make text vertical in Google Docs you may want to explore a few different options to make this type of text.
Need to make edits to your spreadsheets, too? Our guide on how to modify Google Sheets columns can show you some helpful tips.
How to Do Text Formatting in a Google Docs Drawing
Once you have added the text to the text box and put it into the desired vertical orientation, you can begin to format it so that it looks how you want it to. There are many options for styling your content in the Drawing tool, such as font style, font size, color, and more.
For example, if you want your text to make an impact with the reader, but you don’t want it to be overwhelming, try using smaller font sizes or darker colors like black. These formatting options are less noticeable at first glance, but when people take another look they might notice something different!

- Next, make sure everything looks just as you want it for this process to go smoothly. Once satisfied with how things look horizontally across the screen, click the text box. Some blue controls are going to appear around the text box, including a small blue circle at the top of the box.
- If you want vertical text but you don’t want the orientation that is provided with a single letter on each line, then you can use the blue dot to rotate the box. To perform this rotation you will need to click and hold on the blue dot, then drag it to spin the text box.

After you have made all of the necessary edits and applied your desired formatting then you can click the blue Save and Close button at the top right of the Drawing window.
When you click on Save and Close, you will see the vertical text in the document.

Vertical Text Editing in Google Docs
Hopefully, the vertical text that you have added to your document looks how you imagined it would. But we aren’t always that lucky, so it’s possible that you will need to make some adjustments or edits once you see how it looks within the context of the rest of your document.
This can be done by clicking on the vertical text to select it, then clicking on the Edit button. This is going to re-open the Drawing window. You can also open the Drawing window again by double-clicking on the vertical text.
If you are happy with how the vertical text looks, but you want to make some adjustments to how the text appears in relation to the test of the document, then you may need to choose a different text wrapping option. To view the available options click the vertical text to select it, then choose one of the options that appears in the toolbar below it. These options include:
- Edit – this is going to re-open the Drawing window.
- In line – the vertical text appears as its own line within the document.
- Wrap text – the rest of the text in the document is going to wrap around the vertical text image.
- Break text – the vertical text is placed on its own line, but with some additional spacing
- Behind text – the vertical text is placed on a lower layer of the document and will appear behind any text that is below it.
- In front of text – the vertical text is placed on the top layer of the document, and will appear above any text that comes after it.
- Image options – this will open a column on the right side of Google Docs that includes tabs for Size & Rotation, Text wrapping, and Position.
- You can use any of these options to modify the integration of the text box within the document.

- You can click on the X button at the top of the Image options column when you have finished adjusting the settings on each of those tabs.
How To Create Vertical Lines on Google Docs
There are several reasons you might want to create vertical lines in Google Docs. When you’re making a newsletter or newspaper page, organizing your text into columns and separating them with vertical lines is necessary.
You can also insert these borders in your resume to divide it into sections for easier reading–it will make the document neater and more visually appealing!
There are several different ways that a vertical line can be added to a document in Google Docs. The first one involves using the Drawing tool again, as we did to create vertical text earlier.
- Open your Google Docs document to which you would like to add a vertical line.
- Click the Insert tab at the top of the window.
- Select the Drawing option on the drop-down menu.
- After you click on the Drawing option you will see another menu with two options.
- Click on the New option to create a new drawing. You can also choose the From Drive option if you have previously created a drawing or vertical line that you wish to add to the document.
Next, to create the vertical line on the drawing canvas:
- Click the Select line button in the toolbar, then choose the Line option at the top of the menu.
- You can use this option to draw a line by clicking and dragging down to create the line on the canvas.

You should now have a vertical line on the canvas. If you click on the line it will be highlighted, allowing you to use the various line editing tools in the toolbar above the canvas. You can continue to customize and make changes to your vertical line before clicking the Save and Close button.
You can also change the color of the vertical line by clicking on the Line color button and choosing the desired color.
If you click on the Line weight button you can select from a number of different pixel sizes, which determine the width of the line.
The Line dash button allows you to select the style of the line.
The Line start and Line end buttons can be customized if you would like to place arrows on either end of the line.
Another way that you can include some vertical lines in your document is if you are using columns in the document. Google Docs has an option on its column menu that will place a line between the columns in the document.
If you are looking to add vertical lines in between your columns you can complete the following steps.
- Select the Format tab at the top of the window, then choose the Columns option.
- After clicking the Columns option, click on More options.

- After clicking on the More options item in the menu you will see a new Columns options window. Here you can select the number of columns, the spacing betweent he columns, and whether or not to include a line between the columns.
- After selecting the number of columns and spacing, check the box next to the Line Between Columns option.

- Click on Apply for the changes to appear in the document.
How to Use the Borders and Shading Option to Add Vertical Lines in Google Docs
You can also add vertical lines to your text via the Borders and Shading option available in Google Docs. This is going to allow you to apply borders to various sections of your document, such as paragraphs. If you want to use the Borders and Shading option to add vertical lines to your text, follow the steps mentioned below.
- Use your mouse to highlight the paragraph next to which you want to add a vertical line. If you want to add a line without using it as a border around existing text, then add a few blank lines to the document and select those lines.
- Select the Format tab at the top of the window, choose Paragraph styles, then click Borders and shading.

- Choose the desired border settings on the Borders and shading window.
- Click on the Apply button once you have finished selecting the appearance of the vertical line.

How to Rotate Text in Google Docs
While you aren’t able to rotate text that has been added directly to the body of your Google Docs document, you can take advantage of the insert Drawing loophole that we have been utilizing throughout this article to add text boxes and reposition text you want to rotate or display vertically.
- Select the Insert tab in the menu at the top of the window.
- Select the Drawing option.
- Click on the New button.
- Click the Text box button in the toolbar, draw the text box, then add the text that you want to rotate in the document. You can drag the text box to any location on the drawing canvas.
- Click on the text box to select it, then click on the blue dot at the top of the text box and rotate it to the desired angle.
- Once done adjusting, you can click on Save and Close for the changes to appear.

One of the nice things about using this option for rotated text is that you don’t need to mess around with trying to write sideways or anything awkward if you need to edit or format the text later.
Editing Paragraphs and Borders in Google Docs
One of the most important features, when you need to make visual customizations to a Google document, can be the way that your text is organized. Many writers prefer to separate different thoughts or topics into paragraphs, which can then be formatted with various border and shading options.
Paragraphs are great for structuring and organizing your content, but sometimes it can be difficult to tell where one ends, and another begins without any visual separation or alignment tools.
Follow these instructions to add borders to a text selection (such as a paragraph or sentence) in your document.
- Select the text that you want to format.
- Click on the Format tab at the top of the window.
- Select the Paragraph styles option.
- Choose the Borders and shading option
- Chose the border positions from the horizontal row at the top of the window.
- Format the borders as desired using the rest of the options found on this menu.
- Click the Apply button when you have finished with your border styling selection.
Additional Options for Google Docs Vertical Text
There are a few more options and settings that you may want to use when formatting text in Google Docs, especially if what you are trying to accomplish in your document hasn’t been achievable with any of the options or methods described above.
Adding Curved Lines on Google Docs
You can also draw curved lines on the drawing canvas if you want to add a vertical line with a bit of a curve to it to the document instead.
- Open your Google Docs file.
- Select Insert.
- Click Drawing, then New.
- Click the downward-facing arrow to the right of Select Line.
- Select the Curve option.
- Click once to begin drawing.
- Click again to start curving.
- Double click to complete the curved line.
- It’s a little tricky to get this right, so you may need to try a couple times before you wind up with a curved line that you like.
- Once done, click on Save and Close.
Customize Text on Google Docs Using Word Art
One way to make text cool is through the use of Word Art.
- Open Google Docs and select Insert.
- Go to the Drawing tab.
- From the Drawing tab, select New.
- Select Actions, then choose “Word Art.”
- Enter the desired text where it says “Enter Text.”
- Change the font by clicking the Font dropdown menu and choosing a desired font style. There are a number of good font options available, and many font styles have some additional sub options.
- You can click the paint bucket icon next to choose the fill color for your word art.
- You can click the pen button next to the paint bucket icon to set the border color for the word art.
- When you are finished click the Save And Close option, which will add the word art into your document.
Frequently Asked Questions About How to Type Vertically in Google Docs
How do I rotate my entire document in Google Docs?
If you want your entire page to be rotated, then you need to change the page orientation.
You can do this by clicking File at the top-left corner of the window, choosing Page setup, then clicking the Landscape orientation option.
How do I create a single column table in Google Docs?
One of the most common suggestions when you are trying to make unusual layout choices in Google Docs is to create a table that just has one column.
You can do this by placing your cursor where you want the table in your document, selecting Insert > Table > then choosing one of the options on the left side of the grid.
Can I include only one letter in my text box in Google Docs?
Yes, you can use the Drawing option if you want to add Google Docs sideways text to your document and only need it for one letter.
How do I open the Table option menu in Google Docs?
If you have a table in your document and you’re trying to format it, then you can right-click inside a table cell and choose the Table properties option.
This opens a column at the right side of the window where you can make adjustments to your table’s layout and appearance.
With so many fun options available in Google Docs, you’ll never run out of ways to make your projects stand out.
The formatting possibilities in the Google Docs application are fairly extensive, even when using tools other than the default text editor. One can change the text formatting, color, and size at any time with a click!
The best part is that you always have access to these features because they’re built into your document; no need for fancy plug-ins or add-ons here.
Now you should be able to use one of several different options to add vertical text or vertical lines to your document in Google Docs.

Matt Jacobs has been working as an IT consultant for small businesses since receiving his Master’s degree in 2003. While he still does some consulting work, his primary focus now is on creating technology support content for SupportYourTech.com.
His work can be found on many websites and focuses on topics such as Microsoft Office, Apple devices, Android devices, Photoshop, and more.