While a document that you are writing for a class in school might not need visual customizations, there are many types of documents that can benefit from them.
Whether you want to place a video in your document or put an image in the background of a page, Google Docs offers ways to accomplish it.
Our tutorial below will show you how to use a Google Docs background image in the document that you are editing.
How to Set a Background Image in Google Docs
- Open your document.
- Click the Insert tab.
- Choose Drawing, then New.
- Click the Image button, then select the image.
- Choose Save and close.
Our article continues below with additional information on setting a background image in Google Docs, including pictures of these steps.
Images in word processing applications can often be manipulated in one way or another. Our flip image Google Docs guide, for example, includes many of the ways that you can adjust the size or rotation of an image. But when you need a Google Docs background image, it may not be as simple or obvious how to include one.
It can be useful to include a background image in a document when you are creating a flyer, newsletter, or other file, or when your organization requires a watermark. But you may be wondering how to set a background image in Google Docs if you have looked for that option and been unable to locate it.
Google Docs is capable of using various file and font formats for the documents that you create in its Web browser and mobile applications. Even though Google Docs is a highly useful document editing application, many users have often lamented the lack of options available for adding background images or colors to the documents.
While it is true that there is no established method for setting a background image in Google Docs, it does not mean that you need to settle for the boring plain white Google Docs background. In this tutorial, we discuss a number of workarounds that you can use in order to make your Google Docs documents more colorful, personalized, and vibrant.
Do you need to print on legal paper instead? Our Google Doc page size guide can help you find and change your document setting.
How do I Insert a Background Image in a Google Docs Document?
Google Docs does not include a specific way for you to add a background image to one of your documents, but there are a few workarounds that take advantage of some other features in the application, as well as one that incorporates Microsoft Word.
Using Drawings to Insert a Background Image in Google Docs (Guide with Pictures)
This method is my preferred way of doing this, as the drawing tool provides you with some additional ways to customize the image, such as putting text boxes on top of the picture. I am performing these steps in the desktop version of the Google Chrome Web browser, but this will also work in other desktop or laptop browsers like Microsoft Edge, Mozilla Firefox, or Apple Safari.
Step 1: Open the document to which you wish to add a background image.
Step 2: Select the Insert tab at the top of the window.
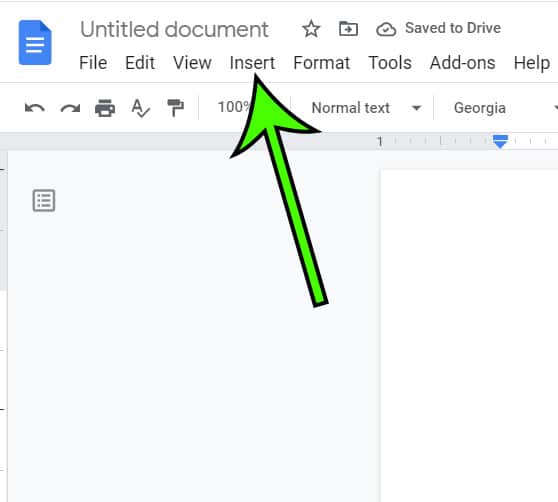
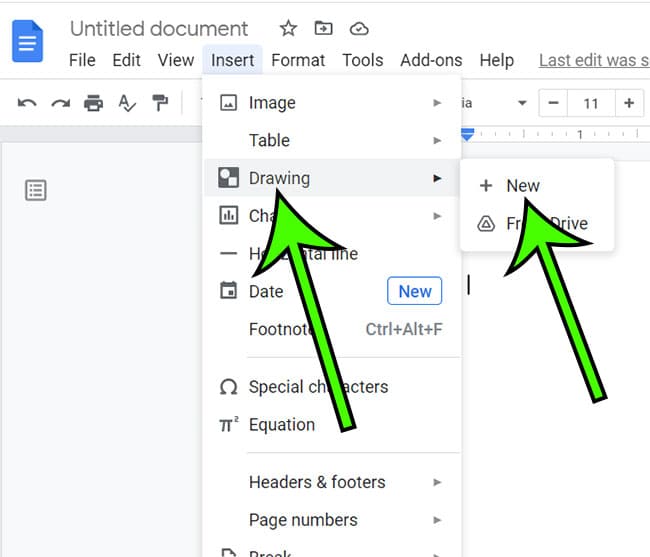
Step 3: Choose the Drawing option, then click New.
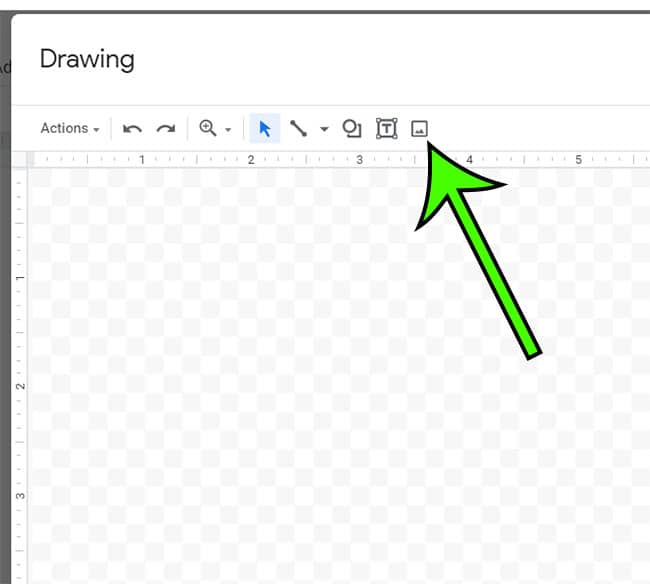
Step 4: Click the Image button in the toolbar above the canvas.
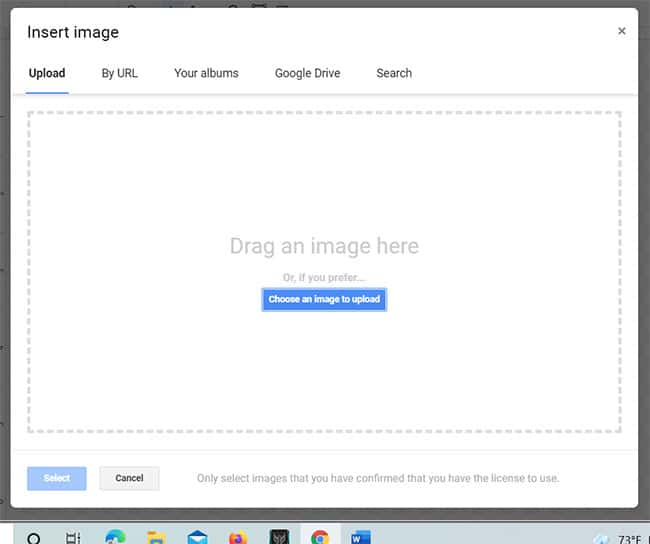
Step 5: Browse to the image that you wish to use and select it.
You can now add text, as well as customize fonts and colors according to your requirements and to make sure that it fits with your background image in Google Docs. Once you are done making changes, click the Save and Close button at the top-right corner of the Drawing window.
This “Insert drawing” method is one that is commonly used for this purpose because you can place a text box on top of the image so that you get the effect of an image behind text.
If you also use Google Sheets to edit spreadsheets, then check out our how to set column width in Google Sheets article and easily adjust your layout.
Using Word files to Insert a Background Image in Google Docs
If you absolutely have to work in Google Docs and need a background image, but you also have access to Microsoft Word, then you can simply make all of the background image edits in Word, then upload the document to Google Docs.
Step 1: Open the document in Microsoft Word.
Step 2: Select the Design tab.
Step 3: Click the Watermark button.
Step 4: Choose the Custom Watermark option.
Step 5: Select Picture watermark, then click Select Picture.
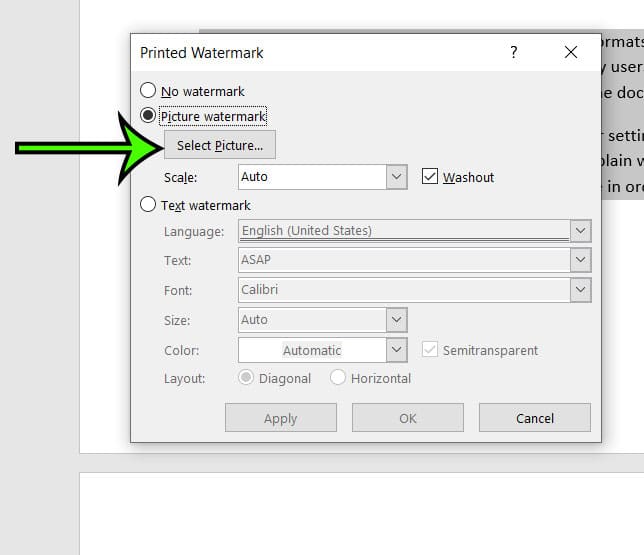
Step 6: Browse to the picture that you would like to use and select it.
Step 7: Click Apply, then OK.
You can then save the document.
The next step is to upload and open your document on Google Docs.
- Navigate to your Google Drive.
- Select ‘File’.
- Hit the ‘Upload’ button and choose the saved Word file that you just created.
- Go to the image, hit the right click button on your mouse, and choose ‘Image Options’.
A pane will show up on the right-hand side of the document. You will be able to see a transparency slider that will allow you to choose the transparency level of your image. This transparency level will determine how prominently your text shows up.
Using Google Slides to Insert Background Image in Google Docs
Google Slides can be a strong alternative for many document types, and once you print the slide, people probably won’t even realize that it wasn’t made in a word processing application.
Making use of Google Slides is another excellent way of inserting a background image in Google Docs. This option is ideal for situations with minimal text input, as Google Slides can be difficult to work with when you are including a lot of text on your slides.
Start by creating a blank Google Slides presentation.
- Next, visit ‘File’.
- Choose the ‘Custom’ option. If you want the presentation to appear like a background image on your document on Google Docs, you should keep the width at 8.5 inches and the height at 11 inches. These are the dimensions of a standard letter-sized document in Google Docs when it is in the portrait orientation.
- Choose ‘Slide’ and select the ‘Change Background’ option.
- This will make the dialog box for ‘Background’ pop up. It will also allow you to select a background color. Setting a background image will require you to hit the ‘Image’ option. Once the upload is complete, you will have to choose ‘Done’.
If you wish to have an identical background on more than one slide, you will need to upload the image on the specific slides where you want it as the background.
After creating the text, you must download your presentation in PDF form before uploading it to your document on Google Docs.
Using Watermarks to Insert Background Images in Google Docs
Google Drawings permits you to establish a background image in the form of a watermark. This will make sure that the text behind the image is prominent. Google Drawings is a part of Google Drive, but it is a separate application. In fact, if you’ve never had a reason to use it, you may not even realize it’s there.
- Navigate to your Google Drive.
- Click the ‘New’ button.
- Select ‘More’, then ‘Google Drawings.’
- Choose ‘Insert’.
- Select ‘Image’.
- At this point, you will be able to upload any image from your computer, Google Photos, or Google Drive. You can even enter a specific URL, use instant camera, or turn to Google Images to find the image.
- Choose your preferred option from the above ones, and continue.
The next section will address how to modify this image in Google Drawings so that it is more effective as a watermark.
Using Google Drawings to Modify Watermark Transparency
If you want to use Google Drawings to insert an image as a watermark on your Google Docs document, you will have to change the image transparency. Usually, watermark images have low levels of transparency to allow the image to easily sit behind the text without blocking off any of the actual content.
You can use the instructions mentioned below and reduce the image transparency.
Step 1: Once you have inserted the image, you need to right-click on it and choose ‘Format Options’. Alternatively, you could click on the image, then click Format options in the toolbar above the canvas.
You will see the Format Options column show up on the right-hand side of the window.
Step 2: Go to ‘Adjustments’ and slide the ‘Transparency’ slider to the right – this will reduce the image transparency.
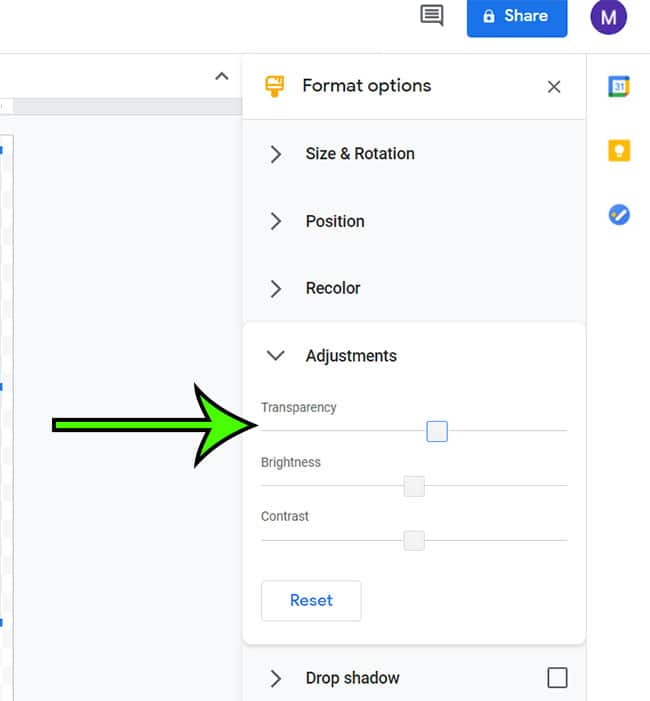
Now, you can use this watermark image in other Google applications, such as Google Docs. The image will be saved automatically in Google Drive so that you can access and use it for future documents that you edit or create.
Once you have prepared your watermark text or image through Google Drawings, all which is left is to add it to the Google Docs document.
- Open the document in Google Docs.
- Choose ‘Insert’.
- Select ‘Drawings’.
- Click the ‘Drive’ option and choose the image that you just saved.
How do I Add a Background Color to Google Docs?
If you want to make a change to the background of your document, but you don’t want to use a background image or a watermark, then setting a different color could be a good alternative.
Thankfully, it is easy to set a background color for your document on Google Docs, and only requires a few straightforward steps.
- Choose ‘File’.
- Select ‘Page Setup’.
- You will now be able to see a pop-up that is showing the option for choosing page color, paper size, and orientation.
- Choose ‘Page Color’ and use the available color list to pick a color of your choice.
Note that removing a background color from a Google Docs document can be accomplished by returning to this same menu and choosing the White color from the Page color dropdown menu. You could also change the background color to something else if you find that your current color selection doesn’t look as good as you had hoped.
Some Information on the Background Color Palette on Google Docs
Upon choosing the drop-down for page color, you will notice that the color palette on Google Docs has opened up. This palette will contain many different colors out of which you can select a color that suits your needs best.
Additionally, this option lets you personalize the colors – to do that, you will need to choose the ‘Custom’ button on the color palette selector on Google Docs. This option will allow you to choose specific shades for every color. If you cannot find a color of your liking, you can even add HTML color codes to solve this problem.
Once you have selected a particular color, you need to click ‘OK’. Moreover, if you wish to make your chosen color the default one on the palette, you should select the ‘Set as default’ option.
Wrapping Images in a Google Doc
Did you know that it is also possible for you to break or wrap the text in your Google Docs document? This will allow you to add floating images to the document if you are finding that the standard method for inserting and working with images is problematic.
How to Use Floating Images on Google Docs
You can use three distinct ways to make images float alongside the text. All that is required is clicking the image and selecting the option you think is the best fit for your particular purpose.
- The first option is the ‘In Line’ one. This option will treat your image as if it was a text piece. You will be able to see words showing up before the image as well as right after it.
- The second way to make images float is through the ‘Wrap Text’ option. As the name suggests, this option will wrap text around the image.
- The third and final option is called ‘Break Text’ – this option will make the text show up above and below your image.
Can You Remove Background Color from Google Docs Text?
While we have discussed adding or removing a background color in your document in a section above, it’s possible that you could have a background color applied to the text of the document instead.
- If the content is in the form of a table, you need to drag the cursor across the whole table and choose ‘Table Properties’ before clicking on ‘Cell Background Color’. You can either change the color to ‘None’ or to ‘white’. Hitting ‘OK’ will update the changes.
- Removing the background text color in the paragraphs will require you to choose the text before hitting ‘Format’ and selecting ‘Clear formatting’. This will make sure that the background colors are removed.
The ‘CTRL and /’ combination on the keyboard can also be used to get rid of any formatting.
- If you want to remove background color from the entire document on Google Docs, choose ‘CTRL and A’ on the keyboard – this will allow you to select the entire document.
- The next step is choosing ‘Highlight Color’ which you will be able to find towards the top end of the document.
- Now you can use the palette of colors and go with ‘white’ or ‘none’.
How Do You put a Background on Google Docs?
There are a couple of simple ways that you can insert a background on Google Docs. The first, and the easier of the two methods, is to add a background directly through Google Docs. The second method involves the use of Google Slides, and, while it is slightly more complicated than the first one, it is still fairly straightforward.
Let us discuss the two methods, starting with the first one.
Adding a Background through Google Docs
- Select ‘File’.
- Choose ‘Page Setup’.
- Choose ‘Page Color’.
- Choose your favorite color.
Now when you click the OK button on the Page Setup menu the color you chose will be applied to your document as a background color.
Adding a Google Docs Background through Google Slides
Using Google Slides for this purpose allows you to add backgrounds that are more vibrant and fancy – making it the preferred choice if you want to create a poster or flyer through Google Docs.
While MS Word allows you to just add your background image and play around with the transparency, Google Docs does not provide you with the same watermark or page background options as Microsoft’s word processing software.
However, while Google Docs doesn’t make this process as simple as Microsoft Word, you aren’t completely out of luck. We have a highly effective and fairly simple workaround that can resolve your issue.
Start by opening a new presentation on Google Slides, and perform the following simple steps:
- Go to ‘File’.
- Choose ‘Page Setup’.
- Choose ‘Custom’ and make sure that the size is set to 8.5 by 11.
- You will notice that the presentation screen now appears slightly different.
- Go to your slide pane, put your mouse cursor anywhere on the slide, and right click. Select ‘Apply Layout’ and choose ‘Blank’.
- Choose ‘Background’ and select ‘Image’.
- Next, you need to drag the image so that it fills the entire page. If you want it to fill a specific area, drag accordingly.
- You can either go for text boxes or paste your text from another source.
Do not worry; this method will still allow you to use Google Docs for collaborating. If you want to print the image, you need to simply download the presentation in PDF form.
Final Word on our Google Docs Background Image Tutorial
Google Docs is a highly popular tool, considering the fact that it is available for free, has an option for real-time collaboration option, contains an auto-saving mode so that you do not lose your work, and even allows you to work offline.
The tips and strategies discussed in this blog will now allow you to add greater visual appeal to your documents by inserting a Google Docs background image, along with background colors. If for some reason you want to get rid of the background colors, we also have that covered.

Matt Jacobs has been working as an IT consultant for small businesses since receiving his Master’s degree in 2003. While he still does some consulting work, his primary focus now is on creating technology support content for SupportYourTech.com.
His work can be found on many websites and focuses on topics such as Microsoft Office, Apple devices, Android devices, Photoshop, and more.