Google Slides often requires you to position various elements close to one another on a slide.
Occasionally these items might overlap one another, which could block some of your content.
Our tutorial below will show you how to change the layer order of a picture by bringing it to a higher level in Google Slides.
How to Bring an Image Forward in Google Slides
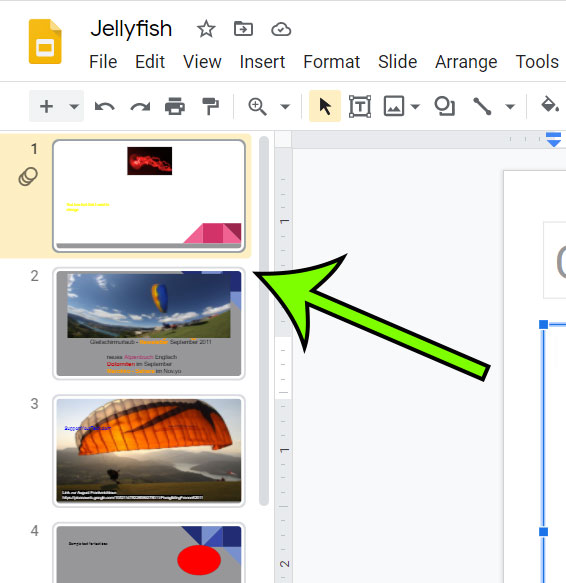
- Open the slideshow.
- Choose the slide with the image.
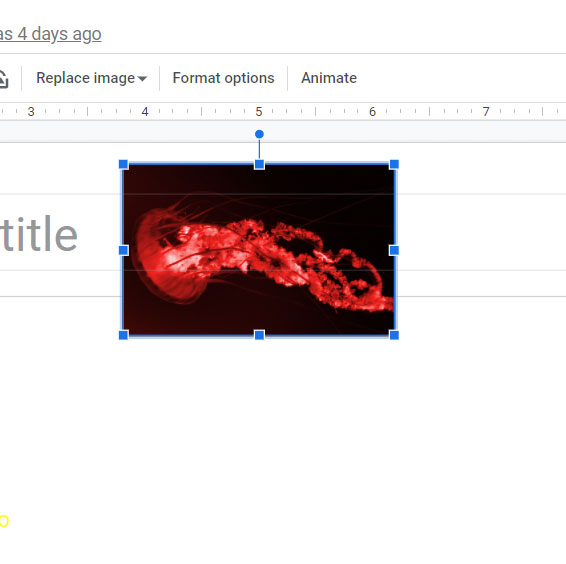
- Click on the image.
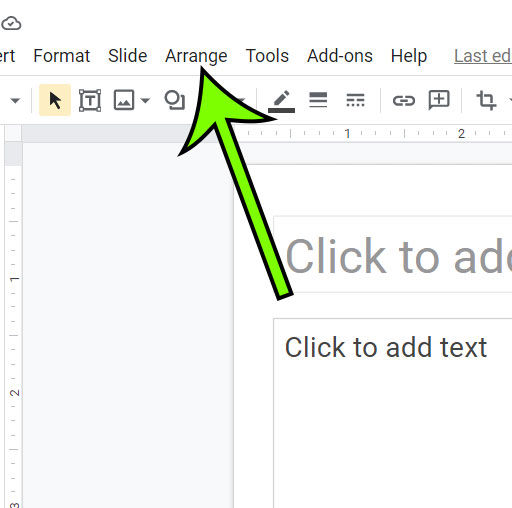
- Select the Arrange tab.
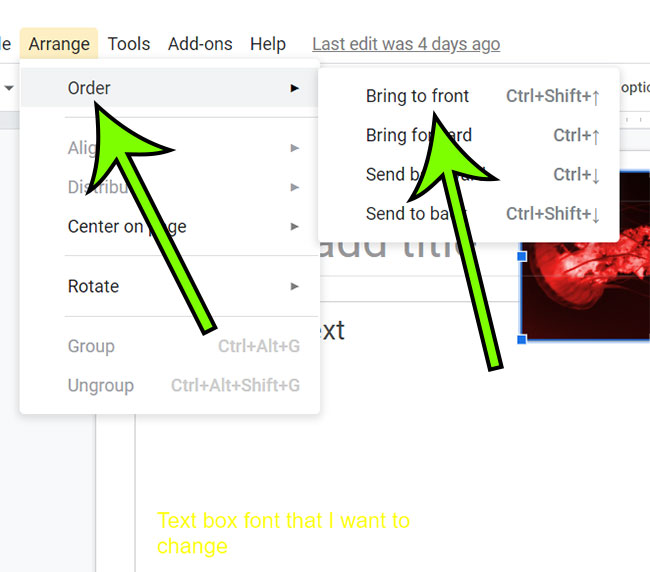
- Click Order, then Bring to front.
Our article continues below with more information on how to bring image forward in Google Slides, including pictures of these steps.
Whether you are creating slides from scratch or working from an existing theme in Google Slides, you may discover that you have one part of your slide overlapping another part.
This can leave you looking for a way to change the layer order of your slides if you need to bring text to the front in Google Slides or if you need to put an image in front of another in Google Slides.
When you are adding new objects to your slides in Google Slides, you may have discovered that slide elements can overlap one another.
This can be due to manual placement, or because Google Slides has a tendency to automatically place inserted elements in the same spots.
This allows you to create interesting effects quite easily, but it can create problems if you have an image that is covered by something else.
While you may have found that the order in which you add elements can allow you to overcome this obstacle, you have another option.
Our guide below will show you how to bring an image to the front in Google Slides so that it is on the top level and isn’t covered by something else that is on the slide.
Related Guide: You can do some other things with images, too. For example, check out this Google Docs background image tutorial if you want a picture in the back of your document page.
How to Move an Image to the Front or the Top in Google Slides (Guide with Pictures)
The steps in this article were performed in the desktop version of the Google Chrome Web browser, but will also work in other desktop browsers like Firefox or Safari.
Step 1: Sign into Google Drive and open your presentation.
Step 2: Select the slide containing the picture to adjust.

Step 3: Click on the picture to select it.

Step 4: Choose the Arrange tab at the top of the window.

Step 5: Click Order, then choose Bring to front.

Note that you can also use the keyboard shortcut Ctrl + Shift + up arrow when a picture is selected to move it to the front as well.
Where is the Order Drop Down Menu in Google Docs?
If you are trying to set a desired image as a background image or you are trying to layer images in a Google Docs document, then you may be wondering how to accomplish this.
Google Slides, much like Microsoft Powerpoint in the Microsoft Office suite of applications, is meant as a presentation software, and you will find that it is easier to position multiple objects in that Google Apps program that in Google Docs.
However, you do have some image options in a Google Doc in regard to how that image is layered. Once you have inserted the image in the document you will need to click on it to select it. This shows a number of “wrap text” options below the image. Two of these options are “Behind text” and “In front of text.”
If you select one of those options a new drop down menu appears with options that include:
- Move with text
- Fix position on page
- Position options
If you elect to fix the position on the page then you will be able to add text on top of the image rather than making the image move as you insert text in front of it.
You also have the ability to add a text box in Google Docs via the Insert > Drawing menu. This can be a more desirable way to put text on top of an image in Google Docs if you are having trouble working within the confines of the “Wrap text” positioning.
Our next section is going to discuss how to move image to back in Google Slides, which can also be useful if you are in the process of re-positioning the objects on your slides.
How to Move an Image to the Back in Google Slides
While the steps in this article have focused on what you need to do when you want to move an image to the forefront, situations might arise where you need to know how to send to back in Google Slides as well.
Fortunately, this is a very similar process.
- Open the slideshow.
- Choose the slide.
- Select the picture.
- Click Arrange, then Order.
- Choose the Send to back option.
You can also use the Google Slides “move image to back” keyboard shortcut of Ctrl + down arrow if you are going to be performing this action a lot and need a quicker way to access the command.
More Information on How to Bring an Image Forward in Google Slides
Once you have learned how to bring a picture forward in Google Slides you can start to incorporate that action into your slideshow creation routine. It can also be applied to other slideshow elements like text boxes. Taking advantage of the different layers in Google Slides presentations not only gives you more options for designing slides, but it will also make position slide elements much simpler.
The Google Slides “Bring image to front” command can be useful for a handful of reasons. First, it allows you to place an image on the top layer of the slide so that you can position it more easily. You may have already found that certain elements, like text boxes, can easily get in the way when you are trying to move images that are on a lower layer.
Plus, when combined with the option to send to back, Google Slides has a fairly robust set of ways that you can manage the layers that exist on y ur slides.
Another reason why it’s beneficial is that you may find that you need to resize an image in relation to another object on the slide. This resizing is often a lot easier when you can put the picture at the top so that it can be edited with fewer objects in the way.

Matt Jacobs has been working as an IT consultant for small businesses since receiving his Master’s degree in 2003. While he still does some consulting work, his primary focus now is on creating technology support content for SupportYourTech.com.
His work can be found on many websites and focuses on topics such as Microsoft Office, Apple devices, Android devices, Photoshop, and more.