Microsoft Excel has a lot of different ways that you can format and customize your data. Some of these options, however, are focused more on printing or sharing the document.
One such item is a watermark. These can be useful so that people know who created the spreadsheet, but you might need to know how to remove a watermark in Excel if it’s making things difficult to read.
You may also be wondering how to remove page 1 watermark in Excel if the other methods of removing watermark don’t seem to be working.
Microsoft Excel – Remove Watermark Steps
- Open your file in Excel.
- Select the Page Layout tab at the top of the window.
- Click the Delete Background button.
Our guide continues below with additional information on getting rid of watermarks in Excel spreadsheets including pictures of these steps. We also talk about how to remove page 1 watermark in Excel.
You can remove a watermark in an Excel spreadsheet by going to the Page Layout tab, then clicking the Delete Background button.
You can insert a picture or logo into the background of the pages in your Excel workbook using an option on the Page Layout tab.
Related: Read this how to add someone to a group text guide if you want to start creating group messages on your mobile phone.
If your company often creates and distributes Excel files and wants people to know who created those files, then these background images can serve an important purpose. It allows people reading the spreadsheet to see some text or a company logo and know who created the data.
Depending on how that file was distributed, this simple act of adding a company logo watermark can even serve as a means of marketing.
But using a background image in an Excel worksheet can make it difficult to read some of the content contained within the spreadsheet cells, and you may find that a picture or text behind the data is making things a bit more difficult to comprehend..
In cases like this, it’s helpful to know how to remove the watermark from the Excel file.
The steps in this article are going to show you how to remove a watermark in Microsoft Excel. This means the watermarks that are added to the background of the page, which typically consists of either a word or an image.
Our tutorial on how to make gridlines darker in Excel will show you how to change a setting that controls the color of the default gridlines separating your cells.
How to Delete a Watermark in Excel (Guide with Pictures)
The steps in this article were performed in Microsoft Excel for Office 365.
The first section of this guide assumes that you are removing a watermark that has been added as a background image (one of your own images, or a WordArt watermark) to the worksheet.
If these steps don’t remove the watermark, then it may have been added in a different way, which we discuss further in this tutorial.
These steps will show you how to remove a watermark from a Microsoft Excel spreadsheet.
Step 1: Open your file in MS Excel.
Open your spreadsheet.
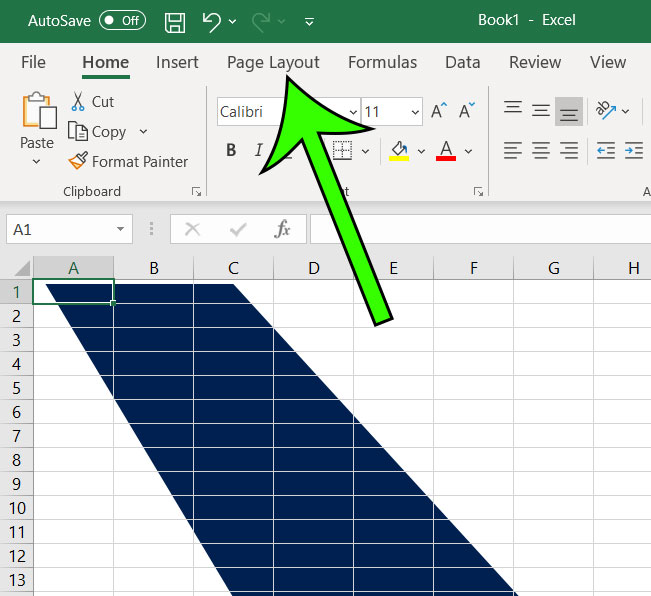
Step 2: Select the Page Layout tab at the top of the window.

Click Page Layout.
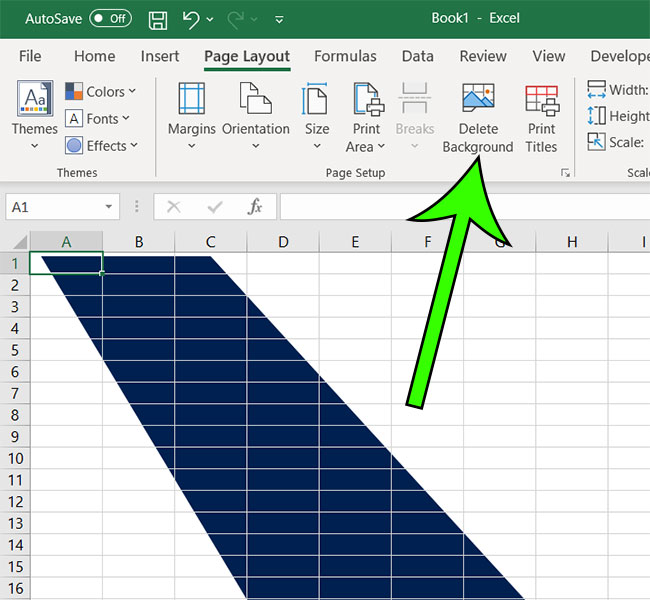
Step 3: Click the Delete Background button in the Page Setup section of the ribbon.

Select the Delete Background option.
Now that you know how to delete a watermark from your spreadsheet in Microsoft Excel, you will be able to remove them whenever you encounter a spreadsheet that has a watermark but doesn’t need one.
If this didn’t get rid of the unwanted watermark in your spreadsheet, then it may have been added in a different manner.
Method 2 – How to Remove an Excel Spreadsheet Watermark
As mentioned earlier, it’s possible that a background watermark image has been added in a different way that won’t be resolved by the steps above. Instead, if the picture is in your header or footer, then you can follow the steps to open the header & footer menu below to remove it.
- Select the Page Layout tab.
- Click the small Page Setup dialog box at the bottom-right corner of the Page Setup section of the ribbon.
- Select the Header/Footer tab.
- Click the Custom Header or Custom Footer button, depending on whether the Excel watermark is located in the header section or the footer section of the document.
- Delete the &[Picture] text from the header or footer section, then click the OK button.
Note that you can press Delete or Backspace on your keyboard to remove that text.
It’s still possible that you haven’t figured out how to remove a watermark in Excel that is appearing in your spreadsheet, so there’s something else to try.
How to Remove Page 1 Watermark in Excel (or Similar Default Text Watermark Options)
Another way that you may need to remove watermark data from an Excel sheet background is one where there is “Page 1”, “Page 2,” etc. data that appears on your screen, but not on the printed version of the file.
This typically occurs when you are in Page Break Preview view mode. By switching to one of the other workbook views you can remove that watermark.
If you would like to remain in this current view and just want to make sure that this information won’t be included when you print, simply open the Print menu and check the Print Preview to confirm that the page information isn’t there.
- Select the View tab at the top of the window.
- Choose the Normal view or the Page Layout view to switch to a different view mode without the page number watermark.
Now that you have completed the how to remove page 1 watermark in Excel steps, you should be able to fix any spreadsheet that is displaying that background content that you don’t want.
You can insert watermark images in Excel by reversing the header image or background image methods from above. Note that the header image method doesn’t provide any format picture options, so you may need to edit the image in an external application if you need to change its size or appearance.
Microsoft Word has a much more robust method for adding watermark images. Read our guide on Word watermarks and background images and see what your options are in that application.
Frequently Asked Questions About Microsoft Excel Watermarks
How do I add a watermark in Excel?
If you wish to show a watermark in the background of your spreadsheet, then you can do so on the Insert tab.
Simply click the Text button, then choose Header & Footer.
You can then click inside the box where you want the watermark to appear. If you are adding text then you can type the text and format it as needed.
If you want to add a header or footer image then you can click inside the box where you want the picture, then click the Picture button in the Header & Footer Elements group in the ribbon and browse to the picture.
How do I change where the watermark appears on the page?
By default, a sheet background applied to the header or footer will show that background feature at the top or the bottom of the page.
If you want it to be in the middle then you can put the picture in the header, then press the Enter key a bunch of times to move it down.
Can I change the formatting of text watermarks in Excel?
If you have added text to your header but you want to change the font or font style, then you will need to select the text in the header, then use the options on the pop-up dialog box that appears when it’s selected.
You could also choose the Home tab and then use the options in the Font group of the ribbon instead.

Matt Jacobs has been working as an IT consultant for small businesses since receiving his Master’s degree in 2003. While he still does some consulting work, his primary focus now is on creating technology support content for SupportYourTech.com.
His work can be found on many websites and focuses on topics such as Microsoft Office, Apple devices, Android devices, Photoshop, and more.