To open Certificate Manager in Windows 10, press Windows + R, type certmgr.msc, and press Enter. This shows the certificates for your user account. To see the certificates for the whole computer, type certlm.msc instead. That one needs an administrator account.
Applies to: Windows 10. Keep in mind that Windows 10 support ended on October 14, 2025. Security updates now come only through the Extended Security Updates program, which stops on October 12, 2027.
Certificates help Windows and apps confirm who they’re talking to, for example for secure websites, work Wi-Fi, VPNs, and file encryption.
Open Certificate Manager for your account
- Press Windows + R to open the Run box.
- Type certmgr.msc and select OK.
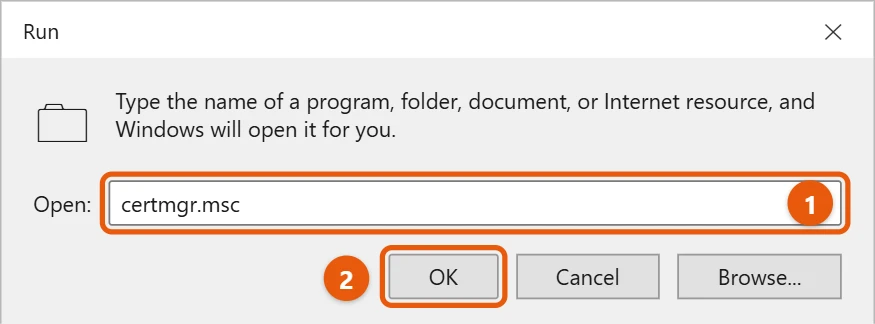
You can also select Start, type Manage user certificates, and open it.
View your certificates
- In the left pane, expand a folder, such as Personal, and select Certificates.
- The list on the right shows who each certificate is issued to, who issued it, when it expires, and what it’s for.
- Double-click a certificate to see more. The General, Details, and Certification Path tabs show its purpose, full details, and the chain of trust.
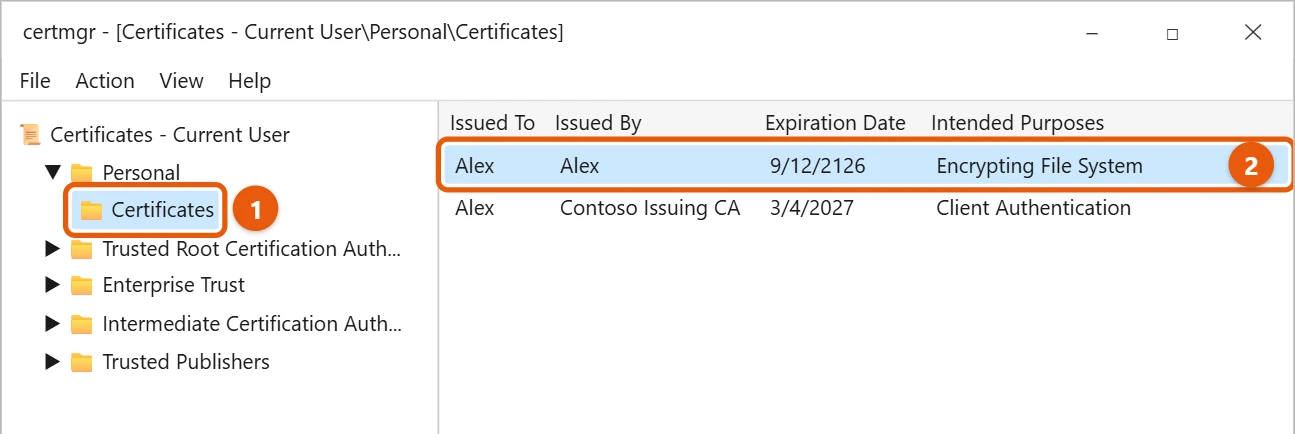
Common folders:
- Personal: certificates that belong to you, such as one for file encryption or signing in to work services. When Word says you don’t have a digital ID as you try to digitally sign a Word document, check that your certificate is listed in this Personal store.
- Trusted Root Certification Authorities: the authorities Windows trusts.
- Intermediate Certification Authorities: authorities that link your certificates to a trusted root.
Open certificates for the whole computer
- Press Windows + R, type certlm.msc, and press Enter. You can also search for Manage computer certificates.
- Select Yes in the User Account Control box.
- Expand a folder under Certificates – Local Computer to see its certificates.
If you’re not an administrator, you can only see your own certificates. Someone with admin rights can run the program as administrator instead.
Open certificates with MMC
- Press Windows + R, type mmc, and press Enter.
- Select File > Add/Remove Snap-in.
- Select Certificates > Add.
- Choose My user account, Service account, or Computer account, then follow the steps and select OK.
You can save the console with File > Save to open it again later.
Find a certificate quickly
If you know part of the name, select Certificates – Current User at the top of the left pane, then select Action > Find Certificates. Type part of the name in the Contains box, choose Issued To or Issued By in Look in Field, and select Find Now. The results show which folder each match is in.
Import a certificate
If your IT team or a website gives you a certificate file (usually ending in .cer, .crt, or .pfx), the easiest way is to double-click it and select Install Certificate. To control where it goes, use Certificate Manager instead:
- Right-click the folder it belongs in, such as Personal, and select All Tasks > Import.
- Select Next, browse to the file, and select Next.
- For a .pfx file, enter the password you were given.
- Confirm the folder and select Finish.
Back up (export) a certificate
Right-click the certificate and select All Tasks > Export. To back up one you use for encryption or signing, choose Yes, export the private key. That creates a password-protected .pfx file. Store it somewhere safe, such as a USB drive kept separately. Anyone with the file and password can use the certificate. To read an exported certificate’s details or convert the .pfx for a web server, you can install OpenSSL in Windows 10 and open the file from the command line.
List certificates with PowerShell
To see your personal certificates and their expiry dates, open PowerShell and run:
Get-ChildItem Cert:\CurrentUser\My | Format-List Subject, NotAfterReplace CurrentUser with LocalMachine to see the computer’s certificates.
If something goes wrong
- “Access is denied” in certlm.msc: computer certificates need administrator rights. Run it from an administrator Command Prompt.
- Websites say a certificate isn’t valid: check that your PC’s date and time are correct first. A wrong date makes every certificate look expired.
- The Export private key option is grayed out: the certificate was imported without allowing export, so it can’t be backed up this way. Ask whoever issued it for a new copy.
Frequently asked questions
Can I delete old certificates?
Be careful. Deleting the wrong one, especially in Trusted Root Certification Authorities, can break secure websites or apps. If you’re not sure what a certificate is for, leave it alone or ask your IT department.
How do I back up my file encryption certificate?
In Personal > Certificates, look for one with Encrypting File System under Intended Purposes, then export it as described above. The encryption itself is explained in encrypting a file or folder in Windows 10.
What’s the difference between certmgr.msc and certlm.msc?
certmgr.msc shows certificates for your account. certlm.msc shows certificates for the local computer, which apply to everyone who uses it.
What should I do with expired certificates?
Most can stay. Windows ignores an expired certificate, and old ones are kept so files signed or encrypted with them still open. Only remove one if your IT team or the app that uses it tells you to.
The MMC method is also documented in Microsoft’s How to: View certificates with the MMC snap-in.
Related: installing a certificate on Windows 10.

Matt Jacobs has been working as an IT consultant for small businesses since receiving his Master’s degree in 2003. While he still does some consulting work, his primary focus now is on creating technology support content for SupportYourTech.com.
His work can be found on many websites and focuses on topics such as Microsoft Office, Apple devices, Android devices, Photoshop, and more.