To run CHKDSK in Windows 11, right-click Start, select Terminal (Admin), and select Yes. Type chkdsk C: /f and press Enter. Because Windows is using drive C:, you’ll be asked to check it at the next restart: type Y, press Enter, and restart your PC. If you’d rather not type commands, open File Explorer, right-click the drive, and select Properties > Tools > Check.
Applies to: Windows 11, version 24H2 and 25H2 (Home and Pro), internal and external drives formatted as NTFS, FAT32 or exFAT. The same commands work in Windows 10. Switch details follow the Microsoft Learn chkdsk command reference.
What CHKDSK does and doesn’t do
CHKDSK (short for Check Disk) checks the file system on a drive. The file system is the index Windows uses to keep track of which file lives where, which folders contain what, and which parts of the drive are free. A power cut, a crash or a drive that was unplugged too early can leave that index with mistakes, and those mistakes show up as files that won’t open, folders that look empty, or Windows asking you to “scan and repair” a drive.
Depending on the switch you add, CHKDSK can:
- Report problems only. Run with no switches, it checks the drive and tells you what it found, but changes nothing.
- Fix file system errors with
/f. - Look for bad sectors with
/r. A sector is a small block of storage space. When part of the drive can no longer reliably hold data, CHKDSK tries to read what it can from that spot, move it, and mark the spot so Windows stops using it.
CHKDSK does not repair Windows system files (that’s the job of SFC and DISM), it doesn’t fix a document that is already corrupted inside, and it can’t repair a drive that is physically wearing out. It can only work around damaged areas. If a drive keeps producing new errors, the answer is a backup and a replacement, not more scans.
Before you start: back up and check for a failing drive
- Back up important files first. Repairing a file system means CHKDSK rewrites the drive’s index. That is normally safe, but if the index is badly damaged, some files can end up renamed, moved into a recovery folder, or lost. Copy anything you can’t replace to OneDrive or an external drive before you use
/for/r. - Use an administrator account. You need to be a member of the local Administrators group. On a standard account, Windows asks for an administrator’s password.
- Plug in your laptop and make sure Windows Update isn’t about to restart the PC. A long scan should not be cut off by a dead battery.
- Have your BitLocker recovery key handy if your drive is encrypted. You won’t need it for a normal scan inside Windows, but some recovery tools ask for it when you work from the Windows Recovery Environment.
- Close open files on the drive you’re checking. CHKDSK needs exclusive access to make repairs.
Warning: if the drive might be failing, copy your files off before you run a long scan. Signs of a dying drive include clicking or grinding sounds from a hard drive, a drive that disappears and reappears, very slow file copies, a SMART or “drive health” warning, or CHKDSK reporting new bad sectors every time. The /r scan reads every sector on the drive, which can take hours of continuous work. On a drive that’s already failing, that workload can be the last thing it does. Get your data off first, then scan.
Which CHKDSK command should you use?
Replace C: with the letter of the drive you want to check.
| Command | What it does | Restart needed for C:? | Use it when |
|---|---|---|---|
chkdsk C: |
Checks the drive and reports problems. Fixes nothing. | No | You want a quick, harmless status check. |
chkdsk C: /scan |
Online scan of an NTFS drive while you keep working. | No | You want to check the system drive without restarting. |
chkdsk C: /f |
Finds and fixes file system errors. Needs to lock the drive. | Yes | Windows reports disk errors, files are acting up, or a scan found problems. This is the right choice for most people. |
chkdsk C: /r |
Everything /f does, plus a read of every sector to find bad ones and recover readable data. |
Yes | You suspect physical damage and you already have a backup. |
chkdsk D: /x |
Forces the drive to dismount first, then fixes errors (includes /f). |
Not used on C: | A second or external drive is busy and you’ve saved and closed everything on it. |
chkdsk C: /spotfix |
Fixes only the problems a previous scan logged (NTFS). | Yes | A /scan found problems and you want the fastest offline repair. |
chkdsk C: /offlinescanandfix |
Runs a full scan and fix while the drive is offline. | Yes | You want a thorough repair at the next restart. |
The short version: start with chkdsk C: /scan to see whether anything is wrong. If it finds problems, or if Windows already told you a drive needs repair, run chkdsk C: /f. Save /r for when you have a real reason to suspect bad sectors. You don’t need to type /f /r together: /r already includes everything /f does, although typing both does no harm.
Method 1: Check a drive from File Explorer
File Explorer’s Error checking tool runs the same check behind a couple of buttons. It’s the easiest option if you don’t want to type commands, but it gives you fewer choices: it can’t run a bad-sector scan.
- Press Windows key + E to open File Explorer, then select This PC in the left pane.
- Under Devices and drives, right-click the drive you want to check, such as Local Disk (C:), and select Properties. You can also select the drive and press Alt + Enter.
- Select the Tools tab.
- Under Error checking, select Check. The button has a shield icon, so Windows asks for administrator permission. Select Yes, or enter an administrator password.
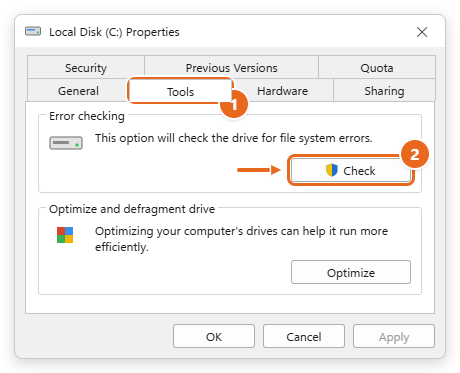
- Read the Error Checking window that opens. What you see next depends on what Windows already knows about the drive:
- You don’t need to scan this drive: Windows hasn’t recorded any errors. You can still select Scan drive (or Scan and repair drive for a removable drive) to check it anyway.
- Repair this drive: Windows has already found errors. Select Repair drive. For the drive Windows runs from, you may be asked to restart so the repair can run before Windows loads.
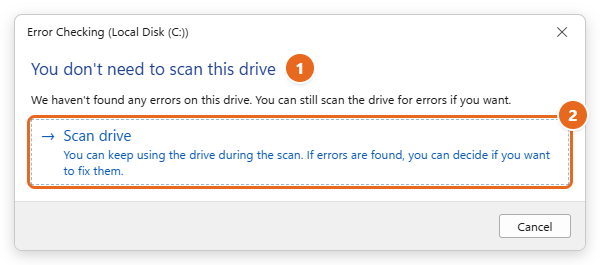
- Wait while Windows scans the drive. A progress bar shows how far it has gotten, and you can keep using your PC while it scans.
- When it finishes, read the result. Your drive was successfully scanned with “No errors were found” means you’re done: select Close. If errors were found, follow the prompt to repair them, which may mean restarting. Select Show Details to open the full CHKDSK log in Event Viewer.
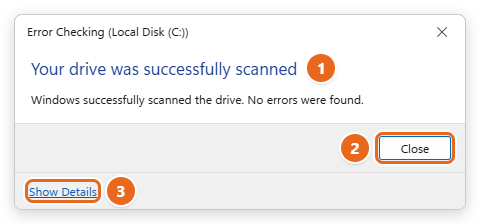
If File Explorer can’t fix the problem or you want to look for bad sectors, use the command method below.
Method 2: Run CHKDSK in Terminal or Command Prompt
The command line gives you every CHKDSK option. In Windows 11, Terminal opens Windows PowerShell by default. CHKDSK works the same in PowerShell, Command Prompt or a Command Prompt tab inside Terminal, so use whichever you like. The one thing that matters is opening it as administrator.
Open an administrator window
- Right-click the Start button (or press Windows key + X).
- Select Terminal (Admin).
- Select Yes in the User Account Control prompt. The window title starts with Administrator:, and the prompt usually reads
PS C:\Windows\system32>.
Prefer the classic Command Prompt? Select Start, type cmd, then select Run as administrator on the right. There are more ways in opening Command Prompt in Windows 11.
Start with a quick online scan
- Type
chkdsk C: /scanand press Enter. Leave a space betweenchkdsk, the drive letter and the switch. - Wait for the scan to work through its stages. It runs while Windows stays usable, and on most SSDs it finishes in a few minutes.
- Read the last lines. “Windows has scanned the file system and found no problems. No further action is required.” means the file system is healthy, and you can stop here. If CHKDSK reports problems, continue with the next section.
/scan only works on NTFS drives, which is what Windows 11 uses for drive C: and what most internal drives use. For a USB stick or memory card formatted as FAT32 or exFAT, run chkdsk E: (with that drive’s letter) for a read-only check, then chkdsk E: /f to fix it.
Fix errors on drive C: with /f
- Save your work and close your apps.
- Type
chkdsk C: /fand press Enter. - Because Windows is running from drive C:, CHKDSK can’t lock it. You’ll see “Cannot lock current drive” followed by “Chkdsk cannot run because the volume is in use by another process. Would you like to schedule this volume to be checked the next time the system restarts? (Y/N)”.
- Type
Yand press Enter. You’ll see “This volume will be checked the next time the system restarts.”
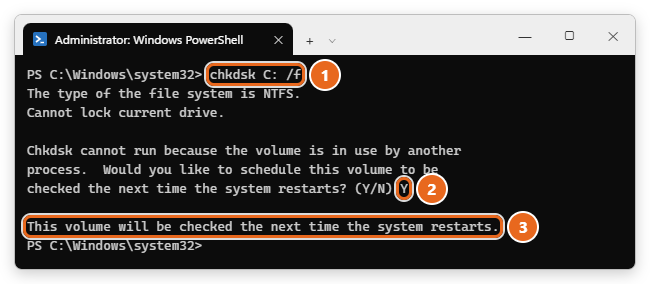
- Restart your PC from Start > Power > Restart.
- Before Windows loads, a screen shows the check’s progress as a percentage. Don’t turn off the PC. When the check is done, Windows starts normally. For a boot drive, CHKDSK restarts the computer automatically after it checks the drive.
Check a second internal drive or a USB drive
Drives that Windows isn’t running from can usually be checked right away, without a restart.
- Find the drive’s letter in File Explorer > This PC, for example D: or E:.
- Type
chkdsk D: /fand press Enter. - If a program has files open on that drive, CHKDSK asks whether to force a dismount. Before you agree, save and close anything stored on that drive. Forcing a dismount, which is also what the
/xswitch does, cuts off every program that has a file open there, and unsaved changes in those files are lost. TypeYto continue, orNto stop and close those programs first.
When the check finishes, the drive reconnects on its own. For an external drive, eject it properly before unplugging it, because pulling a drive out mid-write is a common cause of the errors CHKDSK fixes.
Scan for bad sectors with /r
Read this before you run /r. A bad-sector scan reads the entire drive, including empty space. On a large hard drive it can take several hours, and long runtimes aren’t unusual. If the drive shows any of the failing-drive signs listed above, back up first, or copy your most important folders off right now. Don’t run /r on a drive holding your only copy of irreplaceable files.
- Open Terminal (Admin) as described above.
- Type
chkdsk C: /rand press Enter. For another drive, use its letter, such aschkdsk D: /r. - For drive C:, type
Ywhen asked to schedule the check, then restart. Plan to leave the PC alone until the scan finishes. Overnight is a good time. - When Windows starts again, read the results as described in How to read the results. Look for a line about bad sectors or clusters being found and added to the bad clusters list.
A few bad sectors on an older hard drive aren’t always an emergency, but they are a warning. If a second /r scan a week or two later finds more bad sectors, the drive is getting worse. Back up and replace it.
You may also see the /b switch mentioned online. It clears the list of bad clusters and rescans everything, and is meant for use after imaging a volume to a new hard drive. It isn’t a routine repair option.
CHKDSK on an SSD: what’s different
Most Windows 11 PCs use a solid-state drive (SSD), often an NVMe drive. CHKDSK is safe to run on an SSD, and file system errors on an SSD are fixed exactly the same way as on a hard drive. A few things work differently, though:
- Scans are faster. An SSD has no moving parts, so there’s no waiting for a read head to move. Even
/r, which still reads every sector, finishes much sooner than on a hard drive. - “Bad sector” marking is logical only. On an SSD, marking clusters bad is a logical change, not a physical remap. The SSD’s own controller manages worn-out flash memory behind the scenes, so the bad-sector part of
/rtells you less about an SSD’s health than it does for a hard drive. - Don’t run repeated full scans “just in case.” Repeated full-surface scans on an SSD, especially with
/r, can add unnecessary write and erase cycles and slightly reduce the drive’s lifespan. Occasional checks aren’t a concern. - A very quick scan isn’t automatically a problem. An SSD with lots of free space can finish surprisingly fast. A quick finish often just means there was less to check, but it’s also possible the scan didn’t read every sector, so if something still seems wrong, look at the CHKDSK log as described in How to read the results.
Recommended routine for an SSD: use chkdsk C: /scan when something seems wrong, and chkdsk C: /f if the scan finds errors. To check an SSD’s physical health, use its maker’s diagnostic app (most SSD brands offer one), or on many NVMe drives go to Settings > System > Storage > Advanced storage settings > Disks & volumes, select the drive’s Properties, and look under Drive health. For a wider look at the PC, try hardware diagnostics on Windows 11.
Method 3: Run CHKDSK when Windows won’t start
If Windows can’t start, run CHKDSK from the Windows Recovery Environment (Windows RE), the set of repair tools built into Windows.
Open Windows RE
- If Windows still starts: go to Settings > System > Recovery, and next to Advanced startup select Restart now. You can also hold Shift while you select Power > Restart.
- If Windows won’t start: Windows usually opens Automatic Repair by itself after a few failed starts. To force it, turn the PC on, and as soon as the Windows logo appears, hold the power button until it shuts off. Do this twice. On the third start, select Advanced options on the Automatic Repair screen.
- No luck? Boot from a Windows 11 recovery drive or installation USB and select Repair my PC.
Each route is explained in more detail in entering recovery mode in Windows 11.
Run the check
- On the Choose an option screen, select Troubleshoot > Advanced options > Command Prompt. If your drive is encrypted with BitLocker, enter your recovery key when asked.
- Find the drive Windows is installed on. In Windows RE, drive letters can differ from what you see in File Explorer, and the recovery tools themselves use X:. Type
dir C:\and press Enter. If you see folders named Windows, Users and Program Files, that’s your Windows drive. If not, trydir D:\, and so on. - Type
chkdsk C: /f(using the letter you found) and press Enter. Windows isn’t running from that drive in Windows RE, so the check usually starts right away without asking to schedule it. - Wait for it to finish, then type
exitand press Enter. - Select Continue to start Windows.
If Windows still won’t start afterward, go back to Windows RE and try Startup Repair, Uninstall Updates or System Restore.
How to read the results
Messages you’ll see in the window
- “Windows has scanned the file system and found no problems. No further action is required.” The file system is fine.
- “Windows has made corrections to the file system.” CHKDSK found errors and fixed them. Check whether your original problem is gone.
- Problems found but not fixed. You ran a scan without
/f, which only reports. Runchkdsk C: /f, orchkdsk C: /spotfixafter a/scan. - Bad sectors or clusters found. Back up your files and keep an eye on the drive, as described in the
/rsection.
Every run also ends with a summary of total disk space, space used by files and folders, and the size of the bad-sectors list. On a healthy drive, bad sectors are usually listed as 0 KB.
Exit codes
Scripts and advanced tools read CHKDSK’s exit code. The codes mean:
| Exit code | Meaning |
|---|---|
| 0 | No errors were found. |
| 1 | Errors were found and fixed. |
| 2 | Disk cleanup was performed, or wasn’t performed because /f wasn’t used. |
| 3 | The disk couldn’t be checked, errors couldn’t be fixed, or errors weren’t fixed because /f wasn’t used. |
Find the log of a scan that ran at startup
A scan that runs before Windows loads disappears from the screen once Windows starts. Its report is saved in Event Viewer.
- Select Start, type
Event Viewer, and open it. - In the left pane, expand Windows Logs, then right-click Application and select Filter Current Log.
- Open the Event sources list, check Chkdsk and Wininit, and select OK.
- Select the newest event. A startup scan is usually logged under Wininit, and the full report appears on the General tab at the bottom.
Prefer a command? This one for PowerShell lists the startup-scan reports with their dates:
get-winevent -FilterHashTable @{logname="Application"} | ?{$_.providername -match "wininit"} | fl timecreated, message
Replace wininit with chkdsk to see reports from scans that ran inside Windows.
How long does CHKDSK take?
It depends on the drive type, its size, how many files it holds, how many errors it finds and which switch you use. As a rough guide, /scan and /f on an SSD often take minutes, while /r on a large, nearly full hard drive can take several hours. /f can also take a long time on drives with millions of files. Leave the scan alone while it works (see the FAQ on stopping it).
Check or cancel a scheduled scan
If you typed Y by mistake, or Windows keeps checking a drive at every startup, you can see what’s scheduled and turn it off. Use an administrator Terminal.
- Type
chkntfs C:and press Enter. It shows the drive’s file system and, if a check is due, whether the drive has been scheduled for a check or is marked as “dirty” (flagged by Windows as possibly having errors). - You can also type
fsutil dirty query C:to see whether the dirty flag is set. - To skip the check at the next startup, type
chkntfs /x C:and press Enter. There’s no confirmation message. - Undo it later:
/xkeeps excluding the drive from startup checks, even if Windows marks it as needing one. Once you’ve dealt with the problem, typechkntfs /dto restore the default behavior, which checks dirty drives at startup.
When a startup check is about to begin, Windows also shows a short countdown, and pressing a key during it skips that one check. Skipping isn’t a fix: if a drive is flagged as dirty, schedule a proper chkdsk /f soon.
Troubleshooting
“Access Denied as you do not have sufficient privileges”
The window isn’t running as administrator. Close it, then open Terminal (Admin) or run Command Prompt as administrator, and check that the title bar starts with Administrator:.
“Cannot lock current drive”
This is expected for drive C:. Type Y to schedule the check and restart. For another drive, close any programs using it (including File Explorer windows open on that drive), or let CHKDSK dismount it after saving your work.
“The type of the file system is RAW. CHKDSK is not available for RAW drives.”
Windows can’t recognize the drive’s file system at all, so there’s nothing for CHKDSK to repair. Don’t format the drive if it holds files you need. Try another USB port or cable, and for important data, use a data-recovery tool or service before formatting.
CHKDSK seems stuck at the same percentage
Some stages take much longer than others, especially on large hard drives and during /r. Give it several hours, and leave it overnight if you can. If the percentage hasn’t moved for many hours and the drive is making unusual noises, the drive is probably failing. Turn off the PC, copy your files off the drive using another PC or a USB adapter if possible, and plan a replacement.
CHKDSK runs every time the PC starts
Windows keeps flagging the drive as dirty. Let one full check finish without skipping it. Then run fsutil dirty query C: after Windows starts. If the drive is still dirty, run chkdsk C: /f again. If it keeps happening, an external drive is often the cause (unplug it and see whether the checks stop), or the internal drive has a hardware problem. If you previously used chkntfs /x, run chkntfs /d so a needed check isn’t blocked forever.
Windows keeps saying “Scan and repair drive”
This message often appears after a USB drive or memory card was removed without ejecting it. Run chkdsk E: /f on that drive (using its letter), and use Safely Remove Hardware and Eject Media in the taskbar next time.
CHKDSK found nothing, but the problem continues
The drive’s file system is fine, so look elsewhere. Damaged Windows system files are fixed with DISM and SFC instead. Fixing corrupted files in Windows 11 walks through both.
FAQ
Is CHKDSK safe to run?
Yes. A scan without switches, or with /scan, changes nothing. Repairs with /f or /r are designed to protect your data, but they rewrite the drive’s file records, so back up important files first, and don’t run long /r scans on a drive that is clearly failing.
Should I use /f or /r?
Use /f for file system errors, which covers most problems. Use /r only when you suspect bad sectors, such as read errors or a hard drive that makes unusual noises. /r includes /f and takes far longer.
Can I use my PC while CHKDSK runs?
During /scan and File Explorer’s Scan drive, yes. A /f or /r repair on drive C: runs before Windows starts, so the PC is unavailable until it finishes. Checks on other drives lock only that drive.
Can I stop CHKDSK once it starts?
Interrupting it isn’t recommended, but canceling shouldn’t leave the drive more corrupted than before, and a later run should fix what remains. Only force a shutdown if the scan has clearly stopped making progress for hours.
Does CHKDSK work on external drives and USB sticks?
Yes, as long as the drive has a drive letter and an NTFS, FAT32 or exFAT file system. Use that drive’s letter, for example chkdsk E: /f. CHKDSK only works on local drives, not on network drives mapped to a letter.
How often should I run CHKDSK?
There’s no need to run it on a schedule. Run it after a crash or power cut, when Windows reports a drive error, or when files start going missing or won’t open. Windows also checks drives on its own when it detects a problem.
Is CHKDSK the same in Windows 10?
The commands and switches are identical. The main differences are menu names. The Windows 10 menus are covered in running CHKDSK in Windows 10.
If CHKDSK found and fixed errors, restart and use your PC normally for a few days. If problems return or new bad sectors appear, back up your files right away and check the drive’s health before it fails completely.

Matt Jacobs writes and maintains the guides on Support Your Tech, which he started in 2017. He spent most of his career keeping small-business PCs running and still takes the occasional consulting job, so the steps here come from fixing the same problems on other people’s computers. Every guide is checked on his own Windows 11, Windows 10, Mac, iPhone and iPad before it goes up.