To fix 100% disk usage in Windows 11, press Ctrl + Shift + Esc to open Task Manager, select Processes, and select the Disk column header to sort by disk activity. Whatever stays at the top for a minute or two is your culprit: pause or close it, then apply the matching fix below. If nothing obvious shows up, install pending updates, restart, and work through the fixes in order, from the safest to the most advanced.
Applies to: Windows 11, version 24H2 and 25H2 (Home and Pro). Most steps are the same on earlier Windows 11 versions. Checked against Microsoft Support and Microsoft Learn on October 12, 2026.
What 100% disk usage actually means
The Disk percentage in Task Manager is active time: the share of the last moment that your drive was busy reading or writing. It has nothing to do with how full the drive is. A drive with 400 GB free can still sit at 100% if something keeps it busy every second.
That busy-ness hurts most on a traditional hard disk drive (HDD). An HDD has a moving read head, so it can only handle a small number of scattered reads and writes per second. A few background jobs at once, such as an update, a virus scan and search indexing, can be enough to max it out. A solid-state drive (SSD) handles that kind of work far better, so an SSD stuck at 100% usually points to one specific app, a driver problem or a failing drive.
When it’s normal: short bursts to 100% while Windows starts, while an update installs, while you copy large files or while a game installs are expected. Give a freshly started PC about 10 minutes to settle.
When it’s a problem: the disk stays at or near 100% for long stretches while you’re doing very little, the PC freezes for seconds at a time, apps take ages to open, or the problem comes back after every restart.
Before you start
- Save your work. Several fixes need a restart, and a PC at 100% disk can be slow to shut down.
- Use an administrator account. Services, System Configuration, the Command Prompt repair tools and Registry Editor all need administrator rights. On a work or school PC, some of these settings may be locked by your organization.
- Create a restore point before the advanced fixes. A restore point lets you roll back system settings if a change goes wrong. Our guide on how to create a restore point in Windows 11 walks through it.
- Change one thing at a time. Make one change, restart if the steps say so, then check Task Manager again. Keep a short note of every setting you change, for example “SysMain set to Disabled, Oct 12.” That makes it easy to undo anything that didn’t help.
- Back up first if you hear clicking or see disk errors. If the drive might be failing, copy your important files to an external drive or OneDrive before you run long scans. Heavy testing can push a dying drive over the edge.
Find what is using your disk
Don’t start by turning things off at random. Two or three minutes in Task Manager usually tells you exactly which fix you need.
Check the Processes tab
- Press Ctrl + Shift + Esc to open Task Manager. If you see a small window with only a list of apps, select More details.
- Select Processes in the left pane (the icon with four squares if the pane is collapsed).
- Select the Disk column header. The list now sorts with the busiest process at the top, and the percentage above the column shows total disk activity.
- Watch the list for two or three minutes without opening anything else. Write down any process that stays near the top with a high MB/s figure. Processes that jump up for a second and drop away again are normal.
- If a Service Host entry is at the top, select the arrow next to it. The expanded entry shows the name of the Windows service doing the work, such as SysMain or Windows Search.
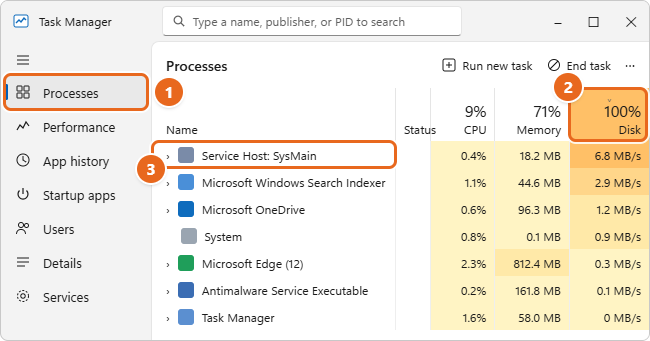
If the culprit is an app you recognize and don’t need right now, right-click it and select End task. That’s a test, not a fix: the app will start again next time unless you change its settings. Don’t end Windows processes you don’t recognize, such as System or Service Host entries, because Windows may need them.
Check the drive type and response time
- In Task Manager, select Performance in the left pane.
- Select your Disk 0 (C:) entry. The label under it shows the type, such as HDD, SSD or SSD (NVMe).
- Look at Active time and Average response time below the graphs. Then check Read speed and Write speed.

Here’s how to read the numbers:
- 100% active time with high read or write speeds (tens of MB/s or more): real work is happening. Find the process doing it and decide if it’s expected, like an update or a cloud sync.
- 100% active time with very low speeds (a few MB/s) on an HDD: the drive is overwhelmed by many small, scattered requests. Indexing, SysMain, antivirus scans and paging are the usual causes, and an SSD is the long-term fix.
- 100% active time with almost no reads or writes and response times in the hundreds or thousands of milliseconds: suspect the drive itself or its storage driver. Jump to Repair Windows and check the drive.
Dig deeper with Resource Monitor
If Task Manager only shows System at the top, Resource Monitor can show which files are being read and written.
- Press Windows + R, type
resmon, and press Enter. - Select the Disk tab.
- Expand Disk Activity and select the Total (B/sec) column to sort it. The File column shows the files getting the most traffic. For example, lots of activity in a OneDrive folder points to syncing, and activity in
C:\pagefile.syspoints to low memory. - Expand Storage and check Disk Queue Length. A number that stays well above 1 means requests are piling up faster than the drive can handle them.
Match the culprit to a fix
| What you see at the top of the Disk column | Most likely cause | Start with |
|---|---|---|
| A named app, such as a browser, game launcher, OneDrive or a backup tool | Cache writes, downloads or a big sync job | Pause or limit the busy app |
| Service Host: Windows Update, or Delivery Optimization | An update downloading, installing or being shared with other PCs | Let updates finish and limit Delivery Optimization |
| Antimalware Service Executable | A Microsoft Defender scan in progress | Scan for malware and let the scan finish |
| Microsoft Windows Search Indexer (SearchIndexer.exe) | The search index being built or rebuilt | Calm down Windows Search indexing |
| Service Host: SysMain | App preloading on a slow drive | Test turning off SysMain |
| System, with memory usage close to full | Paging because the PC is short on RAM | Let Windows manage the page file |
| System, with low speeds and very high response times | Drive errors, a failing drive or a storage driver issue | Repair Windows and check the drive |
| Something different every time | A third-party service or startup app | Clean boot |
Quick, low-risk fixes
These fixes don’t remove anything important and are easy to reverse. Try them first, in this order.
1. Restart the PC properly
Select Start > Power > Restart. Restart clears stuck background jobs and finishes updates that are waiting. After you sign in, leave the PC alone for about 10 minutes, then check Task Manager again. If the disk settles down, the spike was startup work, not a fault.
2. Let Windows updates finish and install optional driver updates
A half-installed update can keep the drive busy as it retries in the background, and newer storage and chipset drivers often fix disk problems.
- Select Start > Settings > Windows Update > Check for updates.
- If updates are listed, select Download & install, then restart when asked. Run Check for updates again until it says You’re up to date.
- Select Advanced options > Optional updates. If you see driver updates, especially storage, chipset or SATA/NVMe drivers, select them and select Download & install.
- Leave the PC on and plugged in for a while after a big update. Windows cleans up and reindexes files after feature updates, and that work is disk-heavy for a few hours.
If Windows Update doesn’t offer a newer storage driver, check your PC or motherboard maker’s support page for your exact model. Avoid third-party “driver updater” programs.
3. Pause or limit the busy app
When a normal app is at the top of the Disk column, fixing it is usually a setting inside that app:
- OneDrive: select the OneDrive cloud icon in the taskbar corner, select the Settings gear, and choose Pause syncing for 2, 8 or 24 hours. A large first-time sync is worth letting finish overnight instead of pausing it repeatedly.
- Game launchers and stores: pause or schedule downloads and updates in the launcher’s settings.
- Browsers: close tabs you don’t need. In Microsoft Edge, go to Settings > System and performance to turn off Startup boost and Continue running background extensions and apps when Microsoft Edge is closed. Chrome has a similar background option under Settings > System.
- Backup tools: move the backup schedule to a time when you’re not using the PC.
4. Turn off startup apps you don’t need
Every app that starts when you sign in competes for the drive at the worst possible moment. Turning one off doesn’t uninstall it; you can still open it yourself.
- Press Ctrl + Shift + Esc and select Startup apps.
- Select the Startup impact column header to sort by impact.
- Right-click an app you don’t need right away when you sign in, and select Disable.
- Restart and compare how long the disk stays busy after you sign in.
Leave your antivirus, touchpad, audio and graphics utilities alone. For more detail, see our guide on how to change startup programs in Windows 11.
5. Stop apps from running in the background
Some apps, mostly ones from the Microsoft Store, keep working in the background after you close them.
- Select Start > Settings > Apps > Installed apps.
- Find the app, select More options (…), then select Advanced options.
- Under Background app permissions, set Let this app run in background to Never.
If you don’t see Advanced options or the background setting, the app doesn’t support this control. Use its own settings or its startup entry instead.
6. Scan for malware
Malware can read and write to your drive constantly. On the other hand, a scan that’s already running is also a common cause of 100% disk, so let any active scan finish first.
- Select Start > Settings > Privacy & security > Windows Security > Virus & threat protection.
- Select Quick scan. If it finds nothing but you’re still suspicious, select Scan options, choose Full scan, and select Scan now. A full scan reads every file, so expect heavy disk use and allow an hour or more.
- For stubborn infections, choose Microsoft Defender Antivirus (offline scan) in Scan options. Your PC restarts and scans before Windows loads, which takes about 15 minutes. Save your work first.
Don’t run two real-time antivirus programs at the same time. They scan the same files twice and can fight over them. If you’ve installed another antivirus, use it or Microsoft Defender, not both.
7. Let Windows manage the page file
When RAM runs short, Windows moves data it isn’t using right now into a hidden file on the drive called the page file (also called virtual memory). If the page file was set to a fixed or tiny size, or turned off, Windows can end up thrashing the disk or freezing apps.
- Press Windows + R, type
sysdm.cpl, and press Enter. - On the Advanced tab, under Performance, select Settings.
- Select the Advanced tab, then under Virtual memory, select Change.
- Make sure Automatically manage paging file size for all drives is checked. Select OK on each window and restart.
Many guides tell you to set a custom size of 1.5 times your RAM. That’s not needed on most PCs. Microsoft’s page file documentation explains that a system-managed page file grows automatically when memory runs short, and that running out of committed memory can cause freezes and crashes. If memory is regularly close to full in Task Manager > Performance > Memory, close memory-hungry apps or add RAM rather than tweaking the page file.
8. Free up space on drive C:
A nearly full system drive leaves Windows little room for updates, temporary files and the page file.
- Select Start > Settings > System > Storage.
- Select Temporary files, check the categories you’re happy to remove, and select Remove files. Check what’s in Downloads before you include it.
- To keep it tidy automatically, turn on Storage Sense on the same page.
9. Limit Delivery Optimization
Delivery Optimization downloads updates in pieces and can share them with other PCs, which caches data on your drive.
- Select Start > Settings > Windows Update > Advanced options > Delivery Optimization.
- Turn off Allow downloads from other devices, or keep it on and choose Devices on my local network.
- Optionally, select Advanced options to set bandwidth limits for background downloads and uploads.
Turning this off doesn’t stop updates. Your PC simply downloads them straight from Microsoft. If the switch is grayed out, your organization manages the setting.
Calm down Windows Search indexing
Windows Search builds an index of your files so searches are fast. It normally works quietly, but it can keep a slow drive busy after a big update, after you copy in thousands of files, or when it’s set to index the whole PC. According to Microsoft’s Windows Search performance guide, performance problems can start once more than about 400,000 items are indexed, and the indexer can handle up to about 1 million.
Reduce what Windows indexes
- Select Start > Settings > Privacy & security > Searching Windows. On some newer builds, this page is labeled Search.
- Check Indexing status to see how many items are indexed.
- Under Find my files, choose Classic if Enhanced is selected. Classic indexes your Documents, Pictures and Music folders and the desktop; Enhanced indexes the whole PC and uses more resources.
- Select Add an excluded folder to exclude folders with huge numbers of files that you don’t search, such as game libraries, virtual machine folders, code projects or backup folders.

Rebuild the index
If indexing seems stuck, or you just changed what’s indexed, rebuild it:
- On the same page, select Advanced indexing options.
- In the Indexing Options window, select Advanced.
- Under Troubleshooting, select Rebuild, then select OK.
Expect more disk activity, not less, while the index rebuilds. Microsoft suggests letting it run for up to 24 hours. When it’s done, the status reads Indexing complete.
Test stopping the Windows Search service
Warning: with the Windows Search service stopped, searches in Start, File Explorer and Outlook become slow or incomplete. Use this as a test, and turn it back on afterward unless you rarely search.
- Press Windows + R, type
services.msc, and press Enter. - Double-click Windows Search, select Stop, and watch Task Manager for a few minutes.
- If disk usage drops a lot, the indexer was the cause. Go back and reduce what’s indexed rather than leaving the service off.
- To restore it, set Startup type to Automatic (Delayed Start), which is the default, and select Start.
Test turning off SysMain
SysMain (called Superfetch in older versions of Windows) learns which apps you use and preloads them so they open faster. On an SSD, it rarely causes trouble. On an older HDD, that preloading can keep the drive busy for long periods after startup.
Warning before you change services: only change the services named in this guide. Disabling the wrong service can break features such as networking, sound or updates. Note the current Startup type before you change it so you can put it back. Turning off SysMain is safe, but frequently used apps may open a little more slowly.
- Press Windows + R, type
services.msc, and press Enter. - Scroll down and double-click SysMain.
- Select Stop to stop it right away.
- Set Startup type to Disabled, then select Apply and OK.
- Restart and watch the Disk column for the first 10 minutes after you sign in.

If nothing changes, turn SysMain back on: open its properties again, set Startup type to Automatic, select Start, and select OK. There’s no benefit to leaving it off if it wasn’t the cause.
Repair Windows and check the drive
Repair system files with DISM and SFC
Corrupted Windows files can make services misbehave and retry work over and over. Microsoft recommends running DISM first, then System File Checker (SFC).
- Select Start, type
cmd, right-click Command Prompt, and select Run as administrator. Select Yes at the User Account Control prompt. - Type
DISM.exe /Online /Cleanup-image /Restorehealthand press Enter. It can take several minutes and may look stuck at a percentage for a while. - Type
sfc /scannowand press Enter. Don’t close the window until verification reaches 100%. - Restart the PC.
“Windows Resource Protection did not find any integrity violations” means your system files are fine. If SFC found and repaired files, restart and check disk usage again. For other results, see our guide on how to fix corrupted files in Windows 11.
Check the drive for errors with chkdsk
Warning: back up important files before a full disk check if you suspect the drive is failing. A full check with /r reads every sector and can take hours on a large hard drive. Don’t turn off the PC while it runs.
- Open Command Prompt as administrator, as above.
- Start with an online scan, which runs while you keep using Windows: type
chkdsk C: /scanand press Enter. - If it reports problems, type
chkdsk C: /fand press Enter. Because drive C: is in use, you’ll be asked to check it the next time the system restarts. TypeY, press Enter, and restart. - If you suspect physical damage, use
chkdsk C: /rinstead of/f. It also locates bad sectors and recovers readable information, but takes much longer.
The /scan, /f and /r switches are described in Microsoft’s chkdsk command reference. Repeated bad-sector reports mean the drive is wearing out: copy your files off it and plan a replacement.
Check the drive’s health
For NVMe SSDs, Windows 11 has a built-in health report. Select Start > Settings > System > Storage > Advanced storage settings > Disks & volumes, select your drive, and select Properties. Under Drive health, you’ll see estimated remaining life, available spare and temperature, plus a warning if Windows detects a problem. For SATA SSDs and hard drives, use the diagnostic tool from your drive or PC maker.
Warning signs that point to hardware: clicking or grinding noises from an HDD, files that won’t open or copy, frequent freezes with 100% active time but almost no data moving, and disk or controller errors in Event Viewer under Windows Logs > System.
Optimize the drive
Select Start, type Defragment and Optimize Drives, open it, select drive C:, and select Optimize. Windows defragments hard drives and sends a TRIM command to SSDs, so this is safe for both. Run it when you’re not using the PC, because it’s disk-heavy while it works. Keep the scheduled optimization turned on.
Find a conflicting app with a clean boot
If the culprit changes every time or hides under System, a clean boot starts Windows with only Microsoft services and no startup apps. If the disk is quiet in a clean boot, something you installed is to blame.
- Select Search, type
msconfig, and select System Configuration. - On the Services tab, check Hide all Microsoft services first, then select Disable all and Apply. Checking the box first is important: it keeps Windows’ own services running.
- On the Startup tab, select Open Task Manager. On the Startup apps page, disable each enabled item and write down what you turned off.
- Close Task Manager, select OK in System Configuration, and restart.
- Check the Disk column. If it’s calm, turn half of the services back on, restart, and test again. Keep halving the group until the problem returns, and you’ve found the app.
Some features may not work while you’re in a clean boot. To go back to normal, open System Configuration, select Normal startup on the General tab, select Enable all on the Services tab, re-enable your startup apps in Task Manager, and restart. Microsoft’s clean boot guide has the full process.
Advanced: the StorAHCI MSI mode registry fix
This fix applies to a narrow case. Microsoft documented an issue in Windows 10 where some AHCI PCI Express storage controllers using the built-in StorAHCI.sys driver didn’t complete requests properly when Message Signaled Interrupt (MSI) mode was on. Task Manager showed 100% disk with little or no workload, and the System log filled with Event ID 129 warnings (controller resets). Dell still publishes Microsoft’s steps for this issue. Microsoft hasn’t published a Windows 11 version of the fix, so treat it as a last-resort test.
Warning: this fix edits the registry. A wrong change in Registry Editor can stop Windows from starting. Create a restore point first, change only the value named here, and skip this fix entirely if your PC doesn’t show Event ID 129 or doesn’t use StorAHCI.sys. Most newer PCs with NVMe drives use a different driver and aren’t affected.
Check whether it applies to you
- Right-click Start and select Event Viewer. Open Windows Logs > System and look for repeated warnings with Event ID 129. If there are none, stop here.
- Right-click Start and select Device Manager. Expand IDE ATA/ATAPI controllers.
- Right-click Standard SATA AHCI Controller and select Properties. On the Driver tab, select Driver Details. If storahci.sys isn’t listed, stop here.
Turn off MSI mode for the controller
- In the same Properties window, select the Details tab and choose Device instance path from the Property list. Note the value, which starts with
PCI\VEN_. - Press Windows + R, type
regedit, press Enter, and select Yes. - Go to
HKEY_LOCAL_MACHINE\SYSTEM\CurrentControlSet\Enum\PCI, then open the keys that match your device instance path, followed by Device Parameters > Interrupt Management > MessageSignaledInterruptProperties. - Double-click MSISupported, change Value data from 1 to 0, and select OK.
- Close Registry Editor and restart.
To undo it, change MSISupported back to 1 and restart, or use your restore point.
Last resort: replace the drive or reset Windows
Upgrade from an HDD to an SSD. If your PC still runs Windows 11 from a hard drive, no setting will make it fast. Windows 11 does a lot of small background reads and writes, which is exactly the work hard drives are worst at. Moving to an SSD is the single biggest improvement for these PCs, and it also rules out a worn-out drive. Check your PC maker’s support page for the drive type and size your model accepts.
Reset Windows. If the drive is healthy and nothing above helped, select Start > Settings > System > Recovery and select Reset PC. Choose Keep my files to keep your personal files. Your installed apps are removed, so back up first and make a list of the apps you’ll need to reinstall.
Fixes you should skip
Some popular “fixes” trade a quiet disk for a less safe or less stable PC:
- Disabling the Windows Update service. It stops security fixes, and pending updates still have to install later. Pause updates in Settings > Windows Update instead, if you need a break.
- Turning off Microsoft Defender real-time protection to stop disk activity. Let scans finish, or schedule them for times you’re away.
- Turning off the page file or setting it to a small fixed size. That can crash apps without fixing the cause.
- Third-party “PC optimizer,” registry cleaner and driver updater tools. Microsoft notes that some “optimize your PC” apps disable the Windows Search service, and these tools can install the wrong drivers. Windows Update and your PC maker’s support site are safer sources.
- Disabling services you can’t identify because a list online says to. Stick to the services in this guide, one at a time.
How to undo the changes in this guide
| Change you made | How to put it back |
|---|---|
| Disabled a startup app | Task Manager > Startup apps > right-click the app > Enable |
| Set an app’s background permission to Never | Settings > Apps > Installed apps > app > Advanced options > set it back to Power optimized or Always |
| Stopped or disabled Windows Search | services.msc > Windows Search > Startup type Automatic (Delayed Start) > Start |
| Disabled SysMain | services.msc > SysMain > Startup type Automatic > Start |
| Switched indexing to Classic or excluded folders | Searching Windows > choose Enhanced, or select an excluded folder and remove it |
| Clean boot | System Configuration > Normal startup and Enable all, then re-enable startup apps |
| Turned off Delivery Optimization sharing | Turn Allow downloads from other devices back on |
| MSI mode registry change | Set MSISupported back to 1, or restore your restore point |
Troubleshooting
Disk usage goes back to 100% after every restart
Startup apps, update checks, indexing and antivirus all start at sign-in. Disable unneeded startup apps, finish any pending updates, and check that indexing reaches Indexing complete. If the disk stays busy for less than 10 minutes and then settles, that’s normal behavior, especially on a hard drive.
Task Manager shows 100% but no process uses much
Expand the Service Host groups to see which services are hiding inside them, and check Resource Monitor’s Disk tab. If you still see nothing and the response time is very high, focus on the drive: chkdsk, drive health, storage drivers and the MSI mode check.
Disk usage is 100% on an SSD
An SSD rarely hits sustained 100% from normal use. Update storage and chipset drivers, look for a single app writing heavily, check Drive health, and look for SSD firmware updates from the drive maker.
It started right after a Windows update
Leave the PC on and plugged in for a few hours so Windows can finish setup and reindexing. If it’s still at 100% the next day, check Windows Update > Update history for a failed update that keeps retrying, and run DISM and SFC.
The Startup type list or Stop button is grayed out
You’re probably not signed in as an administrator, or your organization controls the service. Sign in with an administrator account, or ask your IT department.
FAQ
Is 100% disk usage bad for my drive?
Activity alone doesn’t damage a healthy drive, but it makes the PC slow and frustrating. Sustained 100% with very low speeds, clicking sounds or chkdsk errors can be a sign the drive is failing, so back up your files.
Does 100% disk usage mean my drive is full?
No. The Disk percentage in Task Manager measures how busy the drive is, not how much space is used. Check free space in Settings > System > Storage.
Should I disable SysMain or Windows Search permanently?
Only if testing shows a clear improvement, and usually only on a hard drive. For Windows Search, reducing what’s indexed is a better long-term fix than turning off the service, because search keeps working.
Can low RAM cause 100% disk usage?
Yes. When memory is nearly full, Windows uses the page file on the drive more, which can keep a hard drive busy. Close apps you aren’t using, and consider adding RAM if memory is regularly near its limit.
Will an SSD fix 100% disk usage?
On a PC with a hard drive, usually yes, because an SSD handles background work far faster. It won’t fix a misbehaving app or malware, though, so find the cause first.
Is it safe to end tasks in Task Manager?
Ending an app you recognize is safe, though you’ll lose unsaved work in it. Avoid ending Windows processes such as System, Service Host entries or Windows Explorer unless you know what they do.
Once your disk is calm again, check Task Manager after a week of normal use to confirm the fix held. For more ways to keep your PC responsive, see our tips on how to make your PC faster on Windows 11.

Matt Jacobs has been working as an IT consultant for small businesses since receiving his Master’s degree in 2003. While he still does some consulting work, his primary focus now is on creating technology support content for SupportYourTech.com.
His work can be found on many websites and focuses on topics such as Microsoft Office, Apple devices, Android devices, Photoshop, and more.