To print gridlines in Excel, open the worksheet, select the Page Layout tab, and in the Sheet Options group check Print under Gridlines. Then press Ctrl+P (or select File > Print) and check the preview before you select Print. Gridlines are off for printing by default, and the setting has to be turned on for each sheet.
Applies to: Excel for Microsoft 365, Excel 2024, Excel 2021, Excel 2019 and Excel 2016 on Windows, and Excel for Microsoft 365, 2024 and 2021 for Mac. Excel for the web can’t print gridlines; a workaround is below. The steps match Microsoft’s article on printing gridlines.
Gridlines or borders: which do you need?
Gridlines are the faint gray lines Excel draws between every cell on screen. They are a sheet-wide display setting, not formatting on the cells, so you can’t print them for one range and not another. Borders are lines you add to specific cells, and they always print.
| Gridlines | Cell borders | |
|---|---|---|
| Print by default? | No, you must turn on Print | Yes, always |
| Where they appear | The whole sheet (on paper, only across the printed area) | Only the cells you choose |
| Style, thickness and color | One thin line style; color can be changed for the sheet | Many line styles, thicknesses and colors |
| Cells with a fill color | Hidden in those cells, even with a white fill | Still visible |
| Excel for the web | Can’t be printed | Print normally |
Use gridlines when you want a quick, even grid across a plain list or form. Use borders when you need lines around only part of the sheet, heavier lines, or lines in cells that are shaded.
Method 1: Turn on Print in Sheet Options
This is the fastest way and works in every desktop version of Excel for Windows. The examples use a small household budget in A1:C8 with the headers Item, Category and Amount.
- Open the sheet you want to print. Click its tab at the bottom of the window. The setting you are about to change applies only to the sheet (or sheets) that are selected.
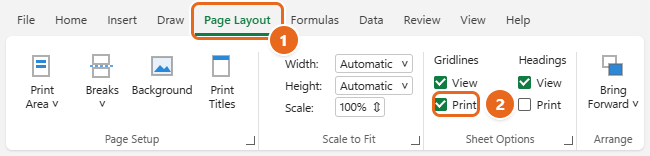
- Select the Page Layout tab on the ribbon. You’ll see groups such as Page Setup, Scale to Fit and Sheet Options.
- Check Print under Gridlines. In the Sheet Options group there are two columns, Gridlines and Headings, each with a View and a Print check box. Select Print in the Gridlines column. Nothing changes on screen, because View only controls what you see while you work.

Select the Page Layout tab (1), then check Print under Gridlines in the Sheet Options group (2). - Open the print preview. Press Ctrl+P, or select File > Print. The preview on the right should now show thin lines around each cell that holds data.
- Print. Choose your printer and number of copies, then select the Print button.
If the Gridlines and Headings check boxes look dimmed and you can’t select them, you probably have a chart, picture or shape selected. Click any cell on the sheet and try again.
The setting is saved with the workbook, so the same sheet will print with gridlines next time you open the file.
Method 2: Use the Page Setup dialog box
The Page Setup dialog box has the same gridlines option plus the Draft quality setting that can secretly stop gridlines from printing. It’s the better choice when you also want to repeat header rows, set a print area or print row numbers in one go.
- Select the Page Layout tab.
- Select the small arrow in the bottom-right corner of the Sheet Options group (the dialog box launcher). The Page Setup dialog box opens. Select the Sheet tab if it isn’t already showing. The launcher in the Page Setup group opens the same dialog box. On Windows, you can also press Alt, P, S, P, one key at a time.
- Under Print, check Gridlines.
- While you’re here, make sure Draft quality is cleared. Draft quality prints without gridlines and most graphics, even when Gridlines is checked.

On the Sheet tab (1), check Gridlines (2), make sure Draft quality is cleared (3), then select OK (4). - Select OK to save the setting, or select Print Preview to go straight to the Print screen and check the result.
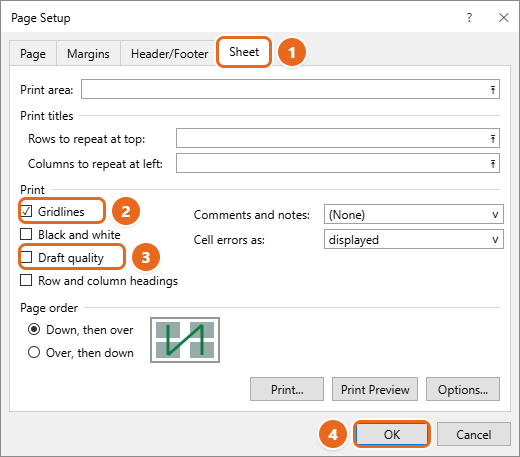
The Gridlines box here and the Print box in Sheet Options are the same setting. Checking one checks the other.
Method 3: Turn on gridlines from the Print screen
Use this when you’re already looking at the preview and notice the lines are missing.
- Press Ctrl+P, or select File > Print.
- Below the list of settings (orientation, paper size, margins and scaling), select the Page Setup link.
- In the Page Setup dialog box, select the Sheet tab and check Gridlines under Print.
- Select OK. You return to the Print screen, and the preview now shows the gridlines.

Select Page Setup below the print settings (1) to open the gridline option, then check the preview (2): the lines appear only around cells that contain data. - Select Print.
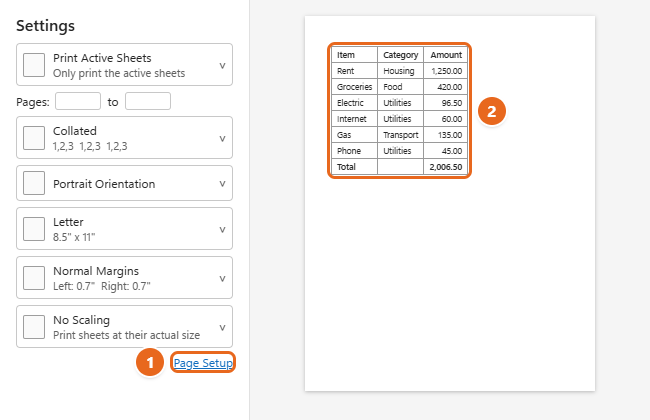
Printing to PDF works the same way. Pick Microsoft Print to PDF (or another PDF printer) in the Printer list, and the gridlines appear in the PDF just as they would on paper.
Print gridlines on several sheets at once
Each worksheet keeps its own print settings. Turning on gridlines for Sheet1 doesn’t affect Sheet2, and choosing Print Entire Workbook on the Print screen won’t add them to sheets where the option is off. To change several sheets in one step, group them first.
- Click the first sheet tab. Hold Ctrl and click each other sheet you want. To select a run of sheets, click the first tab, hold Shift and click the last. To select every sheet, right-click any tab and choose Select All Sheets.
- Check that [Group] appears next to the file name in the title bar.
- Select Page Layout and check Print under Gridlines. The change applies to every sheet in the group.
- Right-click one of the selected tabs and choose Ungroup Sheets, or click a sheet that isn’t part of the group.
Important: Ungroup the sheets as soon as you’re done. While sheets are grouped, anything you type or delete on one sheet happens on all of them in the same cells.
Print gridlines around empty cells
Excel prints gridlines only across the area that contains data. If your list ends at row 8, the printout has lines down to row 8 and blank paper below. That’s a problem when you want a sign-up sheet, inventory count form or log with empty rows to fill in by hand.
The fix is to tell Excel exactly which cells to print by setting a print area that includes the empty rows and columns.
- Select the full range you want on paper, including the blank cells. For a sign-up form with headers in A1:D1 and 30 blank rows, select A1:D31.
- On the Page Layout tab, in the Page Setup group, select Print Area > Set Print Area.
- Make sure Print under Gridlines is still checked.
- Press Ctrl+P. The preview now shows gridlines in every cell of A1:D31, including the empty ones.
The print area is saved with the workbook. To print the whole sheet again later, select Page Layout > Print Area > Clear Print Area. To check what will print, select View > Page Break Preview, where the print area appears with a blue outline. When you only want part of the sheet on paper, printing a selection in Excel is another option.
You can also skip the print area and add borders to the blank range instead (see the next section). Borders print no matter what the used area of the sheet is.
Excel for Mac
Excel for Mac uses the same ribbon option.
- Click the sheet you want to print.
- On the Page Layout tab, under Gridlines, select the Print check box.
- Select File > Print (or press Command+P) and check the preview before you print.
If the lines still don’t show up, select File > Print, then Page Setup, and on the Sheet tab make sure Draft quality isn’t selected.
Excel for the web: use borders instead
Printing gridlines isn’t supported in Excel for the web. You can get the same look by adding borders, which do print.
- Select the cells you want lines around, such as A1:C8.
- On the Home tab, select the arrow next to the Borders button and choose All Borders. Each selected cell now has a dark outline.
- Select File > Print, choose what to print, and select Print.
- Check the preview. If the lines look right, select Print. To go back and make changes, select Cancel.
The same All Borders trick works in the desktop apps whenever you need darker lines than gridlines provide, lines in shaded cells, or lines around only part of a sheet. Other line styles are covered in adding a line in Excel.
Change the gridline color and add row and column headings
Change the gridline color (Windows)
You can change the color of printed gridlines, one worksheet at a time.
- Select File > Options > Advanced.
- Scroll to Display options for this worksheet and pick the sheet in the drop-down list.
- Make sure Show gridlines is checked, choose a color next to Gridline color, and select OK.
Colored gridlines only show up as color on a color printer. If Black and white is checked on the Sheet tab of Page Setup, the sheet prints in black and white. You can’t change the thickness of gridlines; use borders for thicker lines.
Print row numbers and column letters
Gridlines are often paired with the row numbers and column letters, which make a printout easier to discuss (“check cell C5”). In Page Layout > Sheet Options, check Print under Headings, or check Row and column headings on the Sheet tab of Page Setup. Don’t confuse this with Print Titles, which repeats your own header row at the top of each page.
Gridlines still don’t print? Fixes
- Draft quality is on. Open Page Setup (File > Print > Page Setup), select the Sheet tab, and clear Draft quality. This is the most common cause when the preview shows no lines even though Print is checked.
- You checked View, not Print. In Sheet Options, View controls the screen and Print controls paper. Only Print matters for printing.
- You changed a different sheet. The setting is per sheet. Check it on the sheet you are printing, or group the sheets as described above.
- The cells have a fill color. Gridlines don’t show or print in cells with a fill color, and changing the fill to white keeps them hidden. Select the cells, then on the Home tab select the arrow next to Fill Color and choose No Fill, or keep the fill and add All Borders instead.
- Lines stop where your data stops. That’s how gridlines work. Set a print area that includes the empty cells, or add borders.
- Merged cells have no inner lines. A merged cell is one big cell, so there are no gridlines inside it. Unmerge it or add borders.
- The check boxes are dimmed. Click a cell to deselect any chart, picture or shape. If you are typing in a cell, press Enter or Esc first, because most of the ribbon is unavailable while you edit a cell.
- Lines look too faint on paper. Gridlines are thin and light. Try a darker gridline color, or use All Borders for crisp black lines.
- The preview is right but the paper isn’t. The printer driver may be the problem. Install the latest driver from your printer maker’s website, or add borders as a last resort.
- You’re using Excel in a browser. Excel for the web can’t print gridlines. Use borders, or open the file in the desktop app with Editing > Open in Desktop App if you have it.
If gridlines are missing on screen rather than on paper, that’s a separate setting: View > Gridlines. The article on removing lines in Excel explains the difference between gridlines, borders and page break lines.
How to stop printing gridlines
Select the sheet, go to Page Layout, and clear Print under Gridlines. Or open Page Setup, select the Sheet tab, and clear Gridlines. Borders you added are separate: select the cells, then choose Home > Borders > No Border to remove them.
FAQ
Why don’t gridlines print in Excel by default?
Excel treats gridlines as an on-screen guide, so the Print option under Gridlines starts out cleared on every new sheet. Turn it on for each sheet you want to print with lines.
Is there a keyboard shortcut to print gridlines?
There’s no single shortcut, but on Windows you can press Alt, P, S, P to open Page Setup, then check Gridlines on the Sheet tab. Ctrl+P opens the Print screen to preview the result.
Can I print gridlines for only part of the sheet?
Not with gridlines, because they apply to the whole sheet. Either set a print area so only that part prints, or turn gridlines off and add borders to just the cells you want outlined.
Do gridlines show up when I save as PDF?
When you print to a PDF printer such as Microsoft Print to PDF, the PDF follows the same print settings, so the gridlines appear if Print is checked. Check the preview first.
Can I turn on printed gridlines for every sheet with a macro?
Yes. The PageSetup.PrintGridlines property controls it. This short macro turns it on for every worksheet in the active workbook:
Sub PrintGridlinesAllSheets() Dim ws As Worksheet For Each ws In ActiveWorkbook.Worksheets ws.PageSetup.PrintGridlines = True Next wsEnd Sub
Grouping sheets (described above) does the same job without a macro, so most people won’t need this.
Why do my printed gridlines stop halfway down the page?
Gridlines print only as far as the last cell with data. Set a print area that covers the empty rows you want, or add borders to them.
Does the gridline setting carry over to new workbooks?
No. It’s saved per sheet in the workbook where you set it. If you print gridlines on the same kind of report often, set it once in a workbook and save that file as a template.
Once your gridlines look right in the preview, you may also want the table to use more of the page: stretch the spreadsheet to fill the page, or center it horizontally.

Matt Jacobs has been working as an IT consultant for small businesses since receiving his Master’s degree in 2003. While he still does some consulting work, his primary focus now is on creating technology support content for SupportYourTech.com.
His work can be found on many websites and focuses on topics such as Microsoft Office, Apple devices, Android devices, Photoshop, and more.