To change the slide size in PowerPoint, open your presentation and select Design > Slide Size (at the right end of the ribbon). Choose Standard (4:3) or Widescreen (16:9), or select Custom Slide Size to pick a paper size, type your own width and height, or switch to portrait. If PowerPoint asks how to scale your content, choose Ensure Fit to keep everything on the slide.
Applies to: PowerPoint for Microsoft 365 (Windows, Mac and the web), PowerPoint 2024, 2021, 2019 and 2016, including the Mac versions. The steps match Microsoft’s article on changing slide size.
Which slide size should you use?
Slide size is really two things: the shape of the slide (its aspect ratio, such as 16:9 or 4:3) and its actual measurements. The shape matters most. A slide that matches the shape of the screen or paper fills it; a slide that doesn’t gets empty bars on the sides or at the top and bottom.
| Size | Measurements | Good for |
|---|---|---|
| Widescreen (16:9), the default | 13.333 x 7.5 in (33.867 x 19.05 cm) | Laptops, TVs, modern projectors, video calls and screen sharing |
| Standard (4:3) | 10 x 7.5 in (25.4 x 19.05 cm) | Older projectors and older templates that were built at 4:3 |
| On-screen Show (16:9) | 10 x 5.625 in | The same shape as Widescreen, just smaller measurements |
| On-screen Show (16:10) | 10 x 6.25 in | Screens with a 16:10 shape, such as many laptops |
| Letter Paper (8.5×11 in) | 10 x 7.5 in | Printed handouts on US Letter paper, with room left for printer margins |
| A4 Paper (210×297 mm) | 10.833 x 7.5 in | Printed handouts on A4 paper |
| Custom | Any width and height from 1 to 56 inches | Posters, banners, square social posts, portrait handouts and kiosk screens |
Two details trip people up:
- The paper presets are not the full paper size. The Letter Paper preset is 10 x 7.5 inches, not 11 x 8.5, so the slide prints with a border. If you want the slide to match the sheet exactly, type the paper’s measurements into Width and Height instead (for example, 11 in by 8.5 in for landscape Letter).
- Widescreen and On-screen Show (16:9) look identical on screen. They have the same shape, and PowerPoint zooms to fit. Widescreen is the recommended choice for presentations because the larger measurements give you more room to work with at normal font sizes.
If you don’t know what screen you’ll present on, stay with Widescreen (16:9). Nearly every current display is widescreen, and a 4:3 deck shown on one gets black bars on both sides.
Before you start
- The size applies to every slide. PowerPoint can’t give one slide a different size or orientation from the rest of the file. See the FAQ for the workaround.
- Change the size early if you can. On a blank presentation, the change takes seconds and nothing moves. On a finished deck, text boxes, pictures and charts are rescaled or repositioned, and you’ll need to review every slide.
- Keep a copy of a finished deck. Before resizing a presentation you’ve already built, save a copy with File > Save a Copy (or Save As) so you can go back to the original layout if the result isn’t what you wanted.
- Slide size doesn’t change the file size. Making slides bigger or smaller in inches doesn’t make the file larger or smaller in megabytes. To shrink the file, compress the pictures in your PowerPoint presentation instead.
Change to Standard or Widescreen on Windows
These steps are for PowerPoint for Microsoft 365, PowerPoint 2024, 2021, 2019 and 2016 on Windows. The Slide Size button has been in the same place in all of these versions.
- Open the presentation you want to change.
- Select the Design tab on the ribbon.
- At the right end of the ribbon, in the Customize group, select Slide Size. A short menu opens.
- Select Standard (4:3) or Widescreen (16:9).

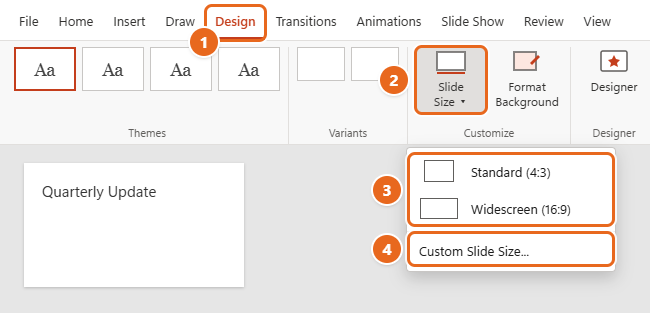
Select the Design tab (1) and then Slide Size (2). Pick Standard (4:3) or Widescreen (16:9) (3), or choose Custom Slide Size (4) for other sizes and portrait slides. - If PowerPoint shows a message asking whether to maximize your content or scale it down, choose Maximize or Ensure Fit. The next section explains the difference. If no message appears, PowerPoint was able to rescale the content on its own.
- Scroll through the slide thumbnails on the left to check the result. All slides now use the new size.
If the Design tab or the Slide Size button is missing, see Troubleshooting.
Maximize or Ensure Fit: which should you pick?
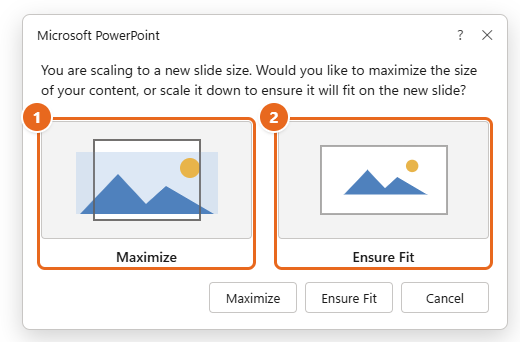
When PowerPoint can’t scale your existing content automatically, it shows a box that reads “You are scaling to a new slide size” and offers two choices.
| Option | What happens | Choose it when |
|---|---|---|
| Maximize | Your content is made as large as possible on the new slide. Some text boxes or pictures may hang off the edges. | You’re moving to a larger slide and want the content to fill it, or you plan to rearrange each slide by hand anyway. |
| Ensure Fit | Everything is scaled down so it all stays on the slide. Text and pictures get smaller. | You’re moving to a smaller or narrower slide, such as Widescreen to Standard, and you don’t want anything cut off. |
For most people resizing a finished deck, Ensure Fit is the safer choice: nothing disappears, and it’s easier to make a few things bigger afterward than to hunt for content that has slid off the edge. Here’s an example. A widescreen slide called “Quarterly Update” has a chart on the left and three bullet points on the right. Switching it to Standard (4:3) with Maximize can push the right-hand bullets partly past the slide edge. With Ensure Fit, both the chart and the bullets stay visible, just smaller, and you can then enlarge the font a little.
If you select Cancel, the slide size isn’t changed.
Use a custom size or a paper size
Use Custom Slide Size when neither 4:3 nor 16:9 fits, for example a printed handout, a poster, a banner, or a square image for social media.
- Select Design > Slide Size > Custom Slide Size. The Slide Size dialog box opens.
- To use a ready-made size, open the Slides sized for list and pick one, such as A4 Paper (210×297 mm), Letter Paper (8.5×11 in), Ledger Paper (11×17 in), A3 Paper (297×420 mm), 35 mm Slides, Overhead or Banner. The Width and Height boxes update to match.
- To use your own measurements, type them in the Width and Height boxes. Type a number, a space, and the unit:
infor inches,cmfor centimeters orpxfor pixels, such as30 cmor1080 px. PowerPoint converts the value to the unit your computer uses. The Slides sized for list changes to Custom. - Check the Orientation section on the right. Slides controls your slides; Notes, Handouts & Outline controls only printed notes pages, handouts and outlines.
- If you want the slide numbers to start at something other than 1, change Number slides from. This is useful when the deck continues from another one.
- Select OK.

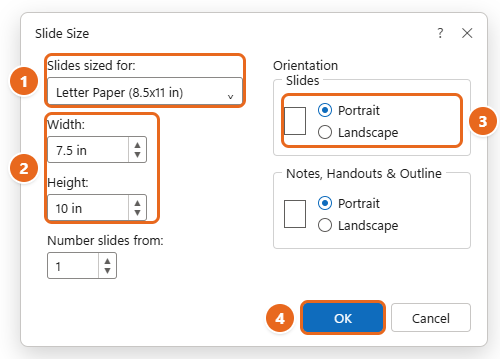
Pick a preset under Slides sized for (1) or type your own Width and Height (2), choose Portrait or Landscape for the slides (3), then select OK (4). - If the scaling message appears, choose Maximize or Ensure Fit.
A few rules for custom sizes:
- Limits: each side must be between 1 inch (2.54 cm) and 56 inches (142.24 cm). PowerPoint won’t accept values outside that range. For a poster bigger than 56 inches, design at a smaller size with the same shape and let the print shop scale it up.
- Units: the dialog shows inches or centimeters depending on your Windows region setting, not a PowerPoint option. To switch, follow the steps to change the measurement units from inches to centimeters. You can still type the other unit at any time and PowerPoint converts it.
- Pick the shape first: for a square social post, make width and height equal; for a phone-shaped vertical slide, use 9 by 16 proportions, such as 7.5 in wide by 13.333 in tall.
Make your slides portrait (vertical)
New presentations are landscape (wider than tall). To make a portrait deck, such as a one-page flyer, a printed handout or a tall kiosk screen:
- Select Design > Slide Size > Custom Slide Size.
- Under Orientation, in the Slides section, select Portrait. PowerPoint swaps the Width and Height values for you.
- Optionally pick a paper size from Slides sized for first, such as Letter Paper or A4 Paper.
- Select OK, then choose Maximize or Ensure Fit if asked. For a deck that already has landscape content, Ensure Fit keeps everything visible on the narrower slide.
Every slide in the file turns portrait. The official page orientation article covers the same steps for Windows, Mac and the web. If you only want to rotate a picture or text box, not the slide, rotate that object instead; the slide can stay landscape.
Change slide size on a Mac
PowerPoint for Microsoft 365 for Mac, PowerPoint 2024 for Mac and PowerPoint 2021 for Mac use the same Design tab, but the custom option is called Page Setup and the scaling choices have different names.
- Open your presentation and select the Design tab.
- Near the right end of the ribbon, select Slide Size.
- Choose Standard (4:3) or Widescreen (16:9), or choose Page Setup for other sizes.
- In the Page Setup dialog box, pick a size from Slides sized for, or type a Width and Height with
in,cmorpxafter the number. - Under Orientation, choose Portrait or Landscape. As on Windows, there are separate settings for slides and for printed notes, handouts and outlines.
- Select OK.
- If PowerPoint asks about your content, choose Scale to shrink or enlarge the content to the new size (everything stays visible when you go smaller), or Don’t Scale to leave it at its current size, which may leave some content off the slide.
The Mac instructions use these labels. If your version shows Maximize and Ensure Fit instead, they work the same way as on Windows: Ensure Fit matches Scale when going to a smaller size, and Maximize keeps content large.
Change slide size in PowerPoint for the web
PowerPoint for the web (in a browser at office.com or through OneDrive or SharePoint) has the same menu with a few limits.
- Open the presentation in your browser and select the Design tab.
- Near the right end, select Slide Size.
- Choose Standard (4:3) or Widescreen (16:9), or select Custom Slide Size.
- In the Slide Size dialog box, pick a size from Slides sized for, or type a Width and Height. The web version takes inches only, between 1 and 56 inches.
- To make the deck vertical, select Portrait.
- Select OK, then choose Maximize or Ensure Fit if asked.
Your change saves automatically to the file in OneDrive or SharePoint, so anyone else editing the presentation sees the new size too. If you need centimeters, convert first (divide centimeters by 2.54 to get inches).
Make a size the default for new presentations
Changing the size of one presentation doesn’t change the size of the next one you create; new blank presentations still start at Widescreen (16:9). If you always need 4:3, A4 or portrait, save the size in a theme and make it your default. These steps are for PowerPoint on Windows.
- Open PowerPoint and select File > New > Blank Presentation.
- Select Design > Slide Size and choose the size you want, or set it with Custom Slide Size.
- On the Design tab, select the More arrow at the bottom-right corner of the Themes gallery.
- Select Save Current Theme. Give the theme a name you’ll recognize, such as “Standard 4-3 blank”, and select Save. Don’t change the folder it saves to.
- Open the Themes gallery again with the More arrow. Your theme appears under Custom.
- Right-click it and select Set as Default Theme.
- Close PowerPoint without saving the blank presentation.
The next time you go to File > New, a Default Theme thumbnail sits at the top left. Its thumbnail may still look widescreen, but presentations created from it use your saved size. On a Mac the steps are the same, except you set the size with Slide Size > Page Setup before saving the theme.
Prefer a file you can share with coworkers? Set the size in a blank presentation and save it with File > Save As as a PowerPoint Template (*.potx). Anyone who starts a new deck from that template gets the same size.
What to check after you resize
Whether you chose Maximize or Ensure Fit, go through the deck once before you present or print. Common problems:
- Stretched logos or backgrounds. Pictures placed on the slide master, such as a company logo in a corner or a background image, can be stretched or moved, especially when going from 4:3 to 16:9. Fix them once in View > Slide Master rather than on every slide. If a picture looks squashed, delete it and insert it again instead of dragging it back into shape.
- Empty space at the sides. Moving a 4:3 deck to widescreen leaves blank areas on the left and right. Spread the content out, make the text larger, or add a picture that supports the point.
- Text that’s too small. Ensure Fit shrinks fonts along with everything else. Check that body text is still readable from the back of the room.
- Content past the edges. After Maximize, objects can sit partly off the slide. Zoom out (the zoom slider at the bottom right) to see anything hanging outside the slide area and drag it back in.
- Tables, charts and grouped shapes. These are the most likely to overlap after a big change in shape. Ungroup and regroup shapes if parts moved independently.
- Animations. Motion paths can end in the wrong place after the slide changes shape. Play the deck in Slide Show to check them.
If you’re combining two decks, make sure both use the same slide size first. Slides you paste or reuse take on the size of the presentation you paste them into, so it’s easier to resize one deck before you copy or duplicate slides between presentations.
How to undo a slide size change
- Right after the change, press Ctrl + Z on Windows or Command + Z on a Mac, or select Undo on the Quick Access Toolbar or Home tab. Check that the slides are back to their old size.
- If you’ve already closed the file or made many other edits, open the copy you saved before resizing.
- For a file saved in OneDrive or SharePoint, select File > Info > Version History and open an earlier version from before the change.
Changing the size back with Slide Size returns the slide to its old measurements, but content that was scaled down or moved doesn’t always return to exactly where it was, which is why undo or a saved copy is better.
Troubleshooting
I can’t find Slide Size
It’s on the Design tab, at the far right in the Customize group. If your PowerPoint window is narrow, the ribbon squeezes groups together; make the window wider or look for a Customize button that opens the group. If the ribbon shows only tab names, select Design to open it.
The options are greyed out
The file is probably open read-only, in Protected View, or shared with you as view-only. Select Enable Editing on the yellow bar, or ask the owner for edit access. Also make sure you aren’t in Slide Show or Reading View.
Only some slides changed
That isn’t possible in one file; all slides always share one size. Usually the slides did change, but their content wasn’t scaled the way you expected. Check the slide master and the layouts in View > Slide Master.
My printout has white borders
PowerPoint slides have no adjustable margins, but most printers can’t print right to the edge of the paper, so a white border is normal. The Letter and A4 presets also leave a border because they’re smaller than the paper. To fill more of the page, type the full paper size in Width and Height, and in the print settings choose Scale to Fit Paper if your version shows it.
Black bars when I present
The slide shape doesn’t match the screen. A 4:3 deck on a widescreen TV shows bars on the sides; a 16:9 deck on an old 4:3 projector shows bars at the top and bottom. Change the slide size to match the screen, or accept the bars. It’s best to check the screen before the event.
I typed a size and PowerPoint changed it
If you typed another unit, such as centimeters on a computer set to inches, PowerPoint converted it, and the size is the same. If the value was below 1 inch or above 56 inches, PowerPoint won’t accept it; enter a size inside that range.
FAQ
What is the default slide size in PowerPoint?
Widescreen (16:9), which measures 13.333 x 7.5 inches (33.867 x 19.05 cm). New blank presentations use it unless you set a different default theme.
Can I change the size of just one slide?
No. Every slide in a presentation has the same size and orientation. The workaround is to put the differently sized slides in a second presentation and link the two: select a piece of text or a shape, go to Insert > Action, choose Hyperlink to > Other PowerPoint Presentation, and pick the slide to jump to. Add a link back the same way. The full method is in using portrait and landscape slides in the same presentation. Keep both files in the same folder so the links keep working.
Can I mix portrait and landscape slides?
Not in one file. Use the linked-presentation workaround above, or place a tall picture or shape on a landscape slide, which looks similar when projected.
Should I use 16:9 or 4:3?
Use 16:9 for almost all screen presentations, including video calls. Use 4:3 only if you know you’ll present on an older 4:3 projector, or you need to match an existing 4:3 template.
Does changing slide size affect image quality?
Making slides larger doesn’t add detail to pictures. If you enlarge a small picture to fill a bigger slide, it can look soft or blurry. Use a higher-resolution picture if it will be shown large.
How do I make a square slide?
Go to Design > Slide Size > Custom Slide Size (or Page Setup on a Mac) and type the same value in Width and Height, such as 10 in and 10 in.
Can I change slide size in the PowerPoint mobile app?
The official slide size instructions cover Windows, Mac and the web only. If you need a different size, change it on a computer or in a browser; the file keeps that size when you open it on your phone.
Next step
Once the slide size is set, flip through the deck in Slide Show on the screen you’ll actually use. If it’s going to a printer, print one test page first so you can catch borders or cut-off content before printing the whole handout.

Matt Jacobs writes and maintains the guides on Support Your Tech, which he started in 2017. He spent most of his career keeping small-business PCs running and still takes the occasional consulting job, so the steps here come from fixing the same problems on other people’s computers. Every guide is checked on his own Windows 11, Windows 10, Mac, iPhone and iPad before it goes up.