To add audio to PowerPoint, select the slide where the sound should play, then select Insert > Audio > Audio on My PC, choose your file and select Insert. A speaker icon appears on the slide. Select it, open the Playback tab, and choose when it plays: set Start to Automatically for one slide, or select Play in Background for music that runs through the whole presentation.
Applies to: PowerPoint for Microsoft 365, PowerPoint 2024, 2021, 2019 and 2016 on Windows; PowerPoint for Microsoft 365, 2024 and 2021 for Mac; and PowerPoint for the web. The steps match Microsoft’s article on adding audio.
Which kind of audio do you need?
“Adding audio” can mean several different jobs in PowerPoint, and each one starts in a different place.
| What you want | Where to start | What you get |
|---|---|---|
| A song, sound effect or saved recording on one slide | Insert > Audio > Audio on My PC (Mac: Audio from File) | A speaker icon on that slide that plays on a click or automatically |
| Background music for the whole show | Insert the file on the first slide, then Playback > Play in Background | One track that starts on its own and keeps going as you change slides |
| A short spoken note on one slide | Insert > Audio > Record Audio (Windows) | A clip you record right inside PowerPoint, saved on that slide |
| A voiceover for every slide, with timings | The Record tab | Narration on each slide plus slide timings, ready to play as a self-running show or export as a video |
If you’re building a kiosk-style show that repeats on its own, add the music first, then set the presentation to loop so the slides restart too.
Before you start: file formats and size
A little preparation saves most audio problems later.
- Use a recommended format. The recommended format for PowerPoint is .m4a encoded with AAC. .mp3, .wav and .aac are also supported on Windows. An MP3 is the safe choice if you aren’t sure.
- Avoid old formats. In PowerPoint version 2505 and later for Windows, support for Windows Media Audio (.wma) and AIFF (.aiff, .aif) is limited and deprecated, and MIDI files (.mid, .midi) can no longer be inserted or played. Convert these to M4A or MP3 first.
- Mac and Windows differ. PowerPoint for Mac does not support .wma files at all, while it accepts formats such as AIFF and M4A. If a presentation will move between a Mac and a PC, MP3 or M4A is the safest pick.
- The web app has a size limit. PowerPoint for the web accepts MP3, WAV, M4A, AAC and OGA files up to 16 MB.
- Download music first. PowerPoint can’t play a song straight from a streaming site. Save the file to your computer before you insert it, and only use music you have the right to use, such as your own recordings or royalty-free tracks.
- Songs bought from the iTunes Store may not play for others. Purchased iTunes files play only on authorized computers, so people you share the presentation with might hear nothing.
When you insert a file with Audio on My PC, PowerPoint embeds it, which means the sound is stored inside the presentation. The file gets bigger, but the audio travels with it to another computer. That’s why embedding is the better choice over linking.
Add an audio file on Windows
These steps work in PowerPoint for Microsoft 365, 2024, 2021, 2019 and 2016 on Windows. The example uses a file called spring-fundraiser-theme.mp3.
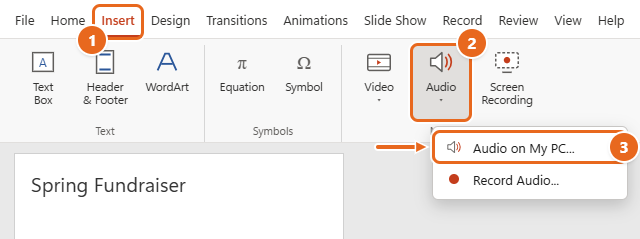
- Open your presentation and select the slide where the audio should start in the thumbnail list on the left. For background music, select the first slide.
- Select the Insert tab on the ribbon.
- In the Media group at the right end of the ribbon, select Audio. A small menu opens. If your PowerPoint window is narrow, the group may collapse into a single Media button; select it first, then select Audio.
- Select Audio on My PC.

Select the Insert tab (1), select Audio in the Media group (2), then choose Audio on My PC (3). - In the Insert Audio box, browse to your file, select it, and select Insert.
- A speaker icon appears in the middle of the slide with a small play bar underneath. Two new tabs, Audio Format and Playback, appear at the end of the ribbon while the icon is selected.
- Drag the icon to a spot where it won’t cover your content, such as a bottom corner. If you use several clips on different slides, keeping the icon in the same spot each time makes them easier to find.
- Select the play button under the icon to preview the sound.
By default, a new clip plays when you click during the slide show. The next section shows how to change that.
Record a voice clip on one slide
Use Record Audio for a short spoken note, such as a welcome message on the title slide. You need a working microphone that Windows can use.
- Select the slide, then select Insert > Audio > Record Audio.
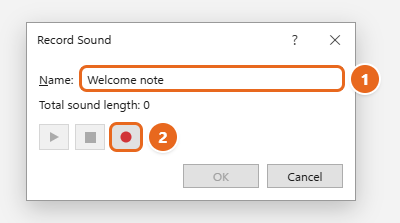
- The Record Sound box opens. Type a name for the clip in the Name box, such as Welcome note. The name helps you tell clips apart later in the Animation Pane.
- Select the red Record button and start speaking.

Type a name for the clip (1), then select the red Record button (2) and start speaking. OK becomes available after you record. - Select the square Stop button when you finish.
- Select the triangle Play button to listen back.
- If you’re happy with it, select OK. If not, select Record again to replace it.
The clip lands on the slide as a speaker icon, just like an inserted file, and you set its playback options the same way. To add a clip to several slides, repeat these steps on each one. For a full voiceover, the Record tab method is quicker.
Tip: Record in a quiet room and keep the microphone at a steady distance, so the clip sounds clean and even.
Choose when and how the audio plays
Every audio clip has its own settings. Select the speaker icon on the slide, then select the Playback tab. The settings are in the Audio Options group.
Start: In Click Sequence, Automatically or When Clicked On
- Select the speaker icon, then select Playback.
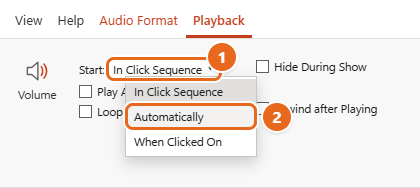
- Open the Start list and choose one of the three options.

Open the Start list (1), then choose Automatically (2) to play the clip as soon as its slide appears.
| Start option | What happens in the slide show | Good for |
|---|---|---|
| In Click Sequence | The clip plays on your next click, as one step in the slide’s click order (like an animation). | Sound you want at a specific moment while you present |
| Automatically | The clip starts as soon as you move to the slide. | Intro music, a narrated slide, a sound that should just happen |
| When Clicked On | The clip plays only when someone clicks the speaker icon itself. | Optional clips, such as a quote or pronunciation a viewer can choose to hear |
The difference between the first and the last trips people up. With In Click Sequence, any click or press of the right arrow key starts the sound. With When Clicked On, pressing the arrow key moves to the next slide without playing it; you have to click the icon.
The other playback settings
- Play Across Slides: keeps the clip playing when you move to the next slide instead of stopping it.
- Loop until Stopped: repeats the clip until it’s stopped. Used on its own, the loop lasts only while its slide is on screen. Combined with Play Across Slides, it keeps looping through the rest of the presentation.
- Hide During Show: hides the speaker icon during the slide show. Only use it with Automatically, because a hidden icon can’t be clicked. The icon stays visible in Normal view so you can still edit it.
- Rewind after Playing: sends the clip back to its start when it finishes, which helps if you may need to play it again on the same slide.
- Volume: choose Low, Medium, High or Mute. This sets the clip’s level relative to the computer’s own volume.
- Trim Audio: opens a window where you drag the green marker (start) and the red marker (end) to cut off parts you don’t want, then select OK.
- Fade In and Fade Out: under Fade Duration, type the number of seconds for the sound to rise at the start or fade at the end. Two or three seconds sounds natural for music.
To test your choices, select Slide Show > From Beginning (or From Current Slide) and listen as you would in front of an audience.
Play music across all slides
For a track that plays under the whole presentation, the quickest route is a single button, Play in Background.
- Select the first slide (or the slide where the music should begin).
- Select Insert > Audio > Audio on My PC, choose the song, and select Insert.
- With the speaker icon still selected, select the Playback tab.
- In the Audio Styles group, select Play in Background.

Select Play in Background (1). PowerPoint sets Start to Automatically (2), checks Play Across Slides and Loop until Stopped (3), and checks Hide During Show (4). - Run the slide show from the beginning to check that the music starts and carries on as you change slides.
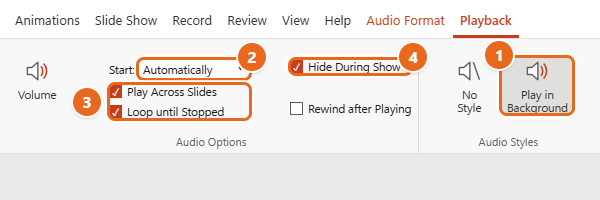
Play in Background is a shortcut that changes four settings at once: it sets Start to Automatically and checks Play Across Slides, Loop until Stopped and Hide During Show. If you’d rather the song play once and then stop, clear Loop until Stopped afterward. To undo it, clear those check boxes and set Start back to the option you want.
Using more than one song
If your slide show runs longer than one song, you can insert a second song on a later slide and give it its own settings. Keeping several songs in step with the slides can be fiddly, though. It’s easier to join the songs into one file with an audio editor such as Audacity, then inserting that single file with Play in Background.
Stop music after a set number of slides
Background music normally plays to the end of the deck. To end it earlier, for example after a three-slide title sequence, change how many slides it plays over.
- Go to the slide that holds the audio clip.
- Select the Animations tab, then select Animation Pane near the right end of the ribbon. The pane opens on the right.
- In the Animation Pane, double-click the entry for your audio clip. The Play Audio box opens.
- On the Effect tab, under Stop playing, select After, then type the number of slides, such as 3. The count includes the slide the clip is on.
- Select OK.
The largest number allowed is 999, which is effectively “until the end.” You can also choose After current slide here to stop the sound when you leave its slide.
Start audio after a delay
Automatically starts a clip the moment its slide appears. To wait a few seconds first, for example so a title can fade in, use an animation instead.
- Select the speaker icon on the slide.
- Select Animations > Add Animation, and under Media, select Play.
- Select Animation Pane. Make sure the audio clip is in the first position at the top of the pane; drag it up if it isn’t.
- Select the down arrow next to the clip and choose Effect Options.
- On the Effect tab, under Start playing, select From beginning. Under Stop playing, select After current slide.
- On the Timing tab, set Start to With Previous, then enter the number of seconds in the Delay box, such as 2.
- Select OK, then test the slide with Slide Show > From Current Slide.
If the clip now plays twice or waits for a click, there’s probably an older Play effect still in the pane set to On Click. Select its arrow and choose Remove, leaving only the delayed one.
Record narration for the whole presentation
Narration records your voice slide by slide and saves the timing of each slide as you go. The result plays back like a self-running show and can be exported as a video. In current Microsoft 365 versions, the tools are on the Record tab. Older versions such as PowerPoint 2016 and 2019 use Slide Show > Record Slide Show instead.
- Add speaker notes to your slides if you want a script. PowerPoint shows them at the top of the recording screen like a teleprompter.
- Select the Record tab, then select From Beginning or From Current Slide. A full-screen recording view opens.
- Use the camera and microphone buttons at the top to turn your webcam off if you only want audio, and to pick the right microphone if you have more than one.
- Select the record button. After a three-second countdown, start talking.
- Use the arrows beside the slide to move to the next slide. Let each slide transition finish before you speak, because narration isn’t recorded during transitions.
- Select Pause if you need a break, or Stop when you’re done. Select Play to review what you recorded.
- To redo a slide, use the delete option in the recording view to clear the recording on that slide or all slides, then record again.
- Close the recording view to go back to editing. Each narrated slide now has a speaker icon in its lower-right corner. Save the presentation.
To share it as a video, select Export in the recording view (or File > Export > Create a Video) and make sure recorded timings and narrations are used.
To present live without the recording: on the Slide Show tab, clear Play Narrations to mute the voiceover and clear Use Timings so slides wait for your clicks. Your recording stays in the file, so you can turn both back on later.
Add audio in PowerPoint for Mac
The Mac version uses slightly different menu names.
- In Normal view, select the slide, then select Insert > Audio.
- Choose Audio from File to pick a file saved on your Mac, or Audio Browser to choose from your Music (iTunes) library. In the Choose Audio box, select the file and select Insert.
- With the speaker icon selected, use the Playback tab for Start, Play Across Slides, Loop until Stopped and Hide During Show, and the Audio Format tab to style the icon with a frame or border.
- To preview, select the icon and select Play/Pause under it.
Play in Background is on the Mac Playback tab too. To stop the music after a few slides, open Animations > Animation Pane, select the clip, open the Media Options section, and under Stop playing select After and enter the number of slides. For narration, open Record > From Beginning or From Current Slide to launch Recording Studio; press Esc or select End show when you finish, and the narration and timings are added to your slides. Remember that .wma files won’t play on a Mac, and Compress Media is a Windows-only feature.
Add audio in PowerPoint for the web
PowerPoint for the web can insert audio files, with a few limits.
- Open the presentation at office.com or from OneDrive, and select the slide.
- Select Insert > Audio. Your browser’s file picker opens.
- Select an MP3, WAV, M4A, AAC or OGA file of 16 MB or less, then select Open.
- With the clip selected, open the Audio tab (it may be labeled Playback). Under Start, choose Automatically or When Clicked On, the two start options in the web app.
- Select Audio Options to check Play Across Slides, Loop until Stopped, Hide During Show or Rewind after Playing, or select Play in Background.
PowerPoint for the web doesn’t support recording a slide show, so record clips or narration in the desktop app and then open the same file online.
Remove or replace audio
- Delete a clip: in Normal view, select the speaker icon and press Delete. Hide During Show only hides the icon in the slide show, so you’ll still see it in Normal view. If you dragged it off the slide, look for it in the gray area around the slide.
- Replace a clip: delete the old icon and insert the new file. Any trim, fade and start settings need to be set again.
- Remove narration: on the Record tab, use Clear to clear the recording on the current slide or on all slides. In older versions, the Clear commands are under the Record Slide Show arrow on the Slide Show tab.
- Undo a mistake: press Ctrl+Z (Mac: Command+Z) right away.
Troubleshooting
The audio doesn’t play during the slide show
- Check Start. If it’s When Clicked On, the sound waits for a click on the icon; if the icon is also hidden, it can never play. Switch to Automatically or clear Hide During Show.
- Check that Volume on the Playback tab isn’t set to Mute, and that the computer’s own volume and output device are correct.
- If the presentation has recorded narration, make sure Play Narrations is checked on the Slide Show tab.
The music stops when I change slides
Select the icon and check Play Across Slides, or select Play in Background. If it still stops early, open the Animation Pane, double-click the clip, and check the Stop playing setting on the Effect tab.
PowerPoint won’t insert the file or reports a missing codec
The format is probably the problem. Convert the file to M4A (AAC) or MP3 with a free audio converter and insert it again. MIDI files no longer work in current Windows versions, and WMA and AIFF support is being phased out.
Record Audio does nothing or reports that no recording device is available
PowerPoint can’t reach a microphone. Check that the microphone is plugged in and selected in Windows. Then in Windows 11, go to Settings > Privacy & security > Microphone and make sure Microphone access, Let apps access your microphone and Let desktop apps access your microphone are all turned on. The desktop PowerPoint app relies on that last switch. More hardware checks are in fixing a microphone that isn’t working.
The sound works on my computer but not on someone else’s
- Use M4A or MP3 rather than WMA, AIFF or MIDI, especially if the other person has a Mac.
- Avoid songs bought from the iTunes Store, which only play on authorized computers.
- Make sure the audio is embedded (inserted with Audio on My PC), not linked to a file in another folder.
- Test the presentation on the computer and speakers you’ll present with before the event.
The presentation file is too big to email
On Windows, select File > Info > Compress Media and choose a quality: Full HD (1080p), HD (720p) or Standard (480p). Standard saves the most space. Compressing removes embedded subtitles and alternate audio tracks, so keep a copy of the original. Images often add even more weight, and compressing the pictures helps there too.
The audio stutters or lags
Close other programs, compress the media as above, and convert unusual formats to M4A or MP3. Also check that hardware graphics acceleration is turned on under File > Options > Advanced and that the computer has enough free disk space.
FAQ
How do I add an MP3 to PowerPoint?
Select the slide, then Insert > Audio > Audio on My PC, choose the MP3 and select Insert. On a Mac, use Audio from File instead.
How do I make music play through the whole presentation?
Insert the song on the first slide, select the speaker icon, and select Playback > Play in Background. It starts automatically, plays across slides, loops and hides the icon.
Can I add a song from YouTube or Spotify?
Not directly. The Audio menu only inserts files saved on your device. You need a downloaded file that you have permission to use. Streaming services generally don’t allow their songs to be saved and reused this way, so royalty-free music libraries are a safer source.
Can I add audio to PowerPoint on an iPhone or iPad?
The official audio instructions cover Windows, Mac and the web. The iOS and Android apps do have a list of formats they can play, so a presentation with audio in one of those formats should play on a phone or tablet, but this guide doesn’t cover inserting audio from the mobile apps.
How do I hide the speaker icon?
Select the icon and check Hide During Show on the Playback tab. Only do this when Start is set to Automatically, since a hidden icon can’t be clicked.
Can I save the audio from a presentation as a separate file?
Yes. Right-click the speaker icon (Control-click on a Mac) and choose Save Media as, then choose a folder and name. On a Mac, this needs a Microsoft 365 subscription.
Why does my audio play on a click even though I didn’t click the icon?
Its Start setting is In Click Sequence, so any click or arrow key press triggers it. Change it to When Clicked On if it should play only when someone clicks the icon.
Once your audio is set, run the whole presentation once on the computer you’ll present with. If it’s a self-running display, finish by setting it to loop until you press Esc.

Matt Jacobs has been working as an IT consultant for small businesses since receiving his Master’s degree in 2003. While he still does some consulting work, his primary focus now is on creating technology support content for SupportYourTech.com.
His work can be found on many websites and focuses on topics such as Microsoft Office, Apple devices, Android devices, Photoshop, and more.