To customize Windows 11, right-click an empty part of the desktop and select Personalize, or go to Start > Settings > Personalization. From there you can apply a theme, change the background, switch to dark mode and pick an accent color, and rearrange the Start menu and taskbar. Every change in this guide uses settings built into Windows 11 and can be undone.
Applies to: Windows 11, Home and Pro. No downloads or administrator rights needed. Checked against Microsoft Support on September 29, 2026. Menu names can vary a little between Windows 11 updates.
Where to change each part of Windows 11
| What you want to change | Where to find it |
|---|---|
| Overall look (wallpaper, colors, sounds, pointer together) | Settings > Personalization > Themes |
| Desktop wallpaper | Settings > Personalization > Background |
| Light or dark mode, accent color, transparency | Settings > Personalization > Colors |
| Start menu layout and folders | Settings > Personalization > Start |
| Taskbar buttons, alignment and auto-hide | Settings > Personalization > Taskbar |
| Quick Settings buttons | Quick Settings > Edit (pencil icon) |
| Mouse pointer and text size | Settings > Accessibility |
| Touch keyboard and emoji panel look | Settings > Personalization > Text input |
1. Apply a theme
A theme changes several things at once: the wallpaper, accent color, sounds and mouse pointer. It’s the quickest way to give Windows a new look.
- Right-click the desktop and select Personalize, then select Themes.
- Under Apply a theme, select one of the themes. Windows applies it right away.
- For more choices, select Browse themes. This opens the Microsoft Store, where many themes are free. Select Get, and the theme appears in your list when it’s installed.
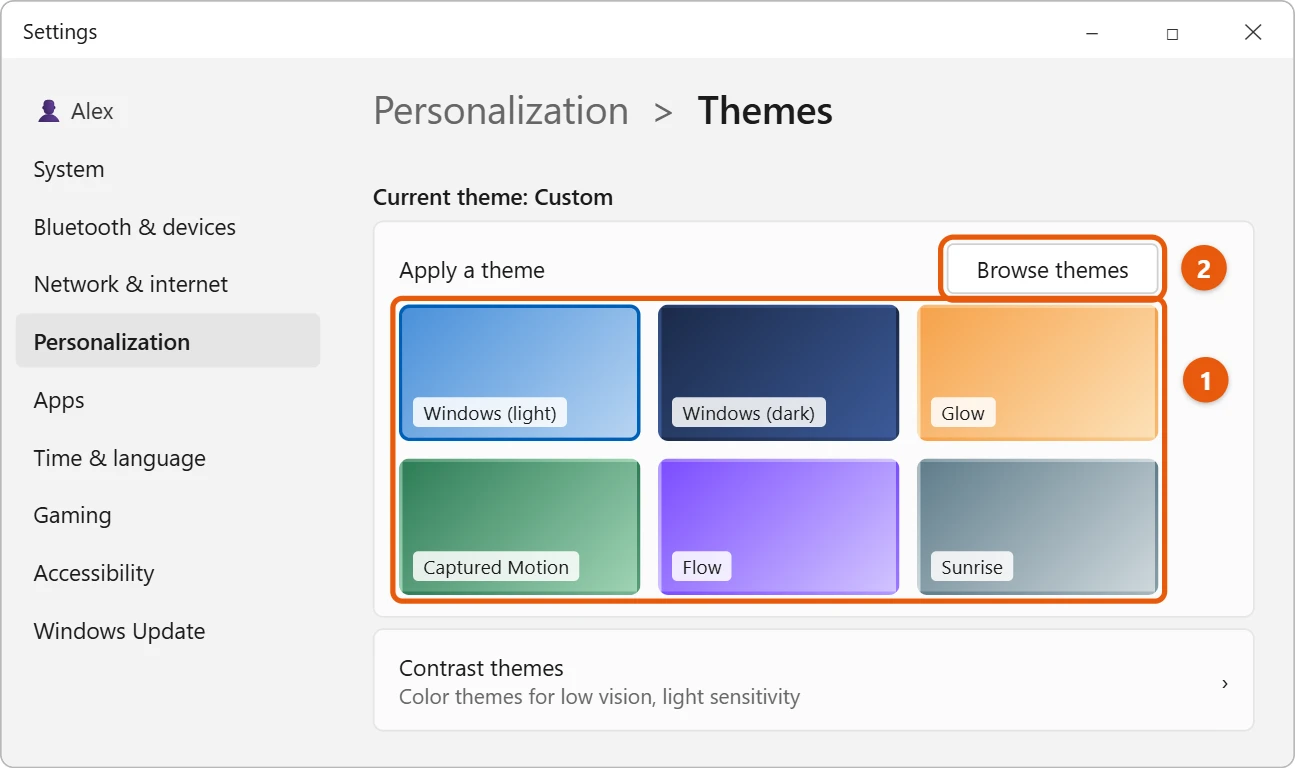
After you change the wallpaper, colors or sounds yourself, Windows calls your look Custom. To keep it, select Save (or Save theme) next to the current theme on the Themes page and give it a name. You can switch back to it any time.
If you have low vision or light sensitivity, Contrast themes on the same page use bold, high-contrast colors that are easier to see.
2. Change the desktop background
- Go to Settings > Personalization > Background.
- Next to Personalize your background, choose one of these:
- Picture: one image. Pick a recent one or select Browse photos to use your own.
- Solid color: a plain color, which makes desktop icons easy to see.
- Slideshow: rotates pictures from a folder you choose. You can set how often it changes.
- Windows spotlight: a new photo from Microsoft each day, downloaded from the internet.
- If the picture doesn’t fit the screen well, change Choose a fit for your desktop image. Fill covers the whole screen, Fit shows the whole picture, and Span stretches one picture across several monitors.
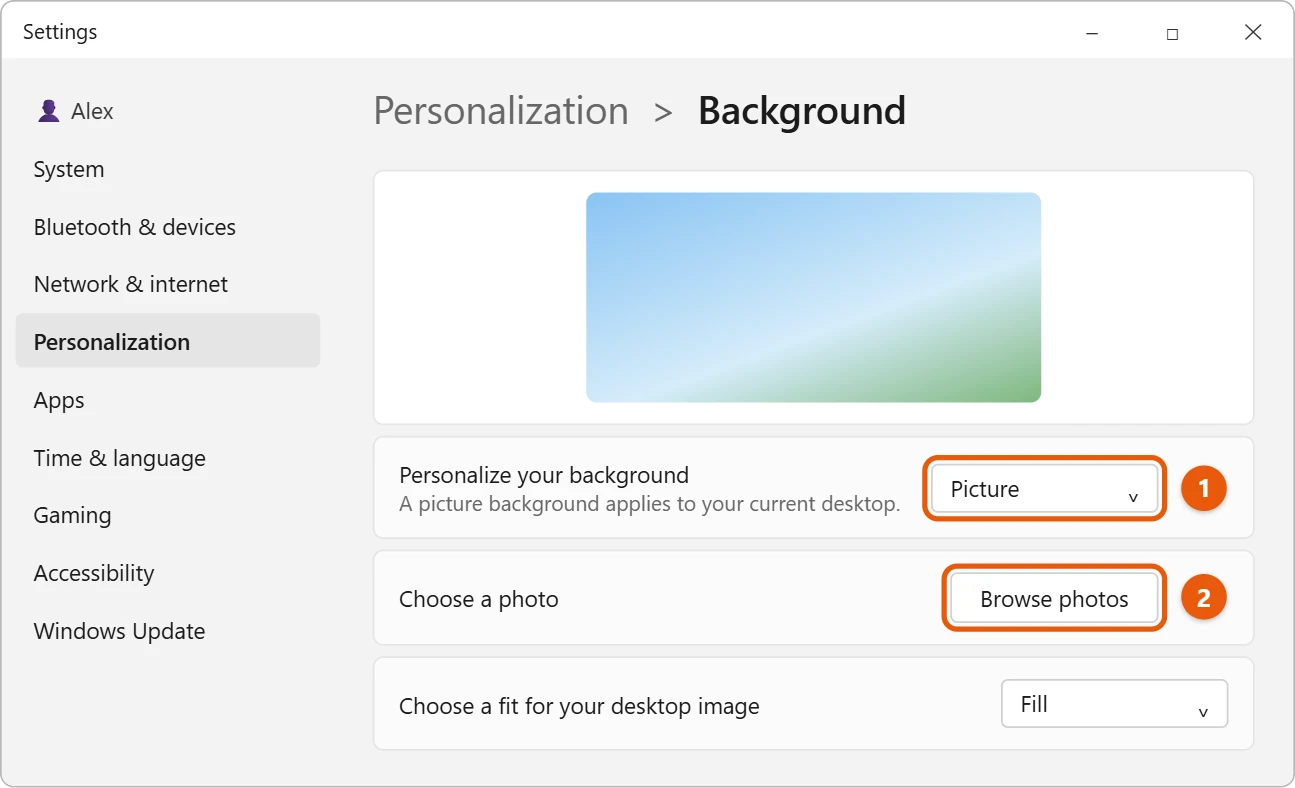
You can also right-click any photo in File Explorer or the Photos app and choose Set as desktop background. If you use more than one virtual desktop, each one can have its own wallpaper: open Task view (Windows logo key + Tab), right-click a desktop, and select Choose background.
3. Switch to dark mode and pick an accent color
- Go to Settings > Personalization > Colors.
- Next to Choose your mode, select Light, Dark or Custom. Custom lets you use dark Windows menus with light apps, or the other way around.
- Under Accent color, choose Automatic to match your wallpaper, or Manual and pick a color. Select View colors for any color you like.
- To show that color on the taskbar and Start menu, turn on Show accent color on Start and taskbar. Microsoft notes this only works in Dark or Custom mode.
- To color the top bar of each window, turn on Show accent color on title bars and window borders.
- Leave Transparency effects on for a see-through, frosted look, or turn it off for solid colors.
Some apps follow the Windows mode automatically. Others have their own light and dark setting in the app’s settings. For more on the see-through look, see how to make the taskbar transparent in Windows 11.
Pin the apps you use most so they’re one click away.
- Select Start. To pin an app, select All (or All apps), right-click the app and choose Pin to Start.
- To remove an app from the pinned area, right-click it and choose Unpin from Start. The app stays installed.
- To move a pinned app, drag it to a new spot. Drag one app onto another to make a folder, then select the folder to rename it.
- For more options, go to Settings > Personalization > Start. Depending on your Windows 11 version, you can choose a Layout with more pins or more recommendations, and turn Show recently added apps, Show most used apps, and recommended files on or off.
- Select Folders to add shortcuts next to the Power button, such as Settings, File Explorer, Downloads or Pictures.

5. Change the taskbar
- Right-click an empty part of the taskbar and select Taskbar settings.
- Under Taskbar items, turn buttons like Task view and Widgets on or off, and choose how Search looks: hidden, an icon, or a search box.
- Under System tray icons, choose which extra icons appear near the clock.
- Open Taskbar behaviors. Set Taskbar alignment to Left if you prefer the Start button in the corner, like older versions of Windows.
- On the same list, check Automatically hide the taskbar to hide it until you move the pointer to the bottom of the screen.
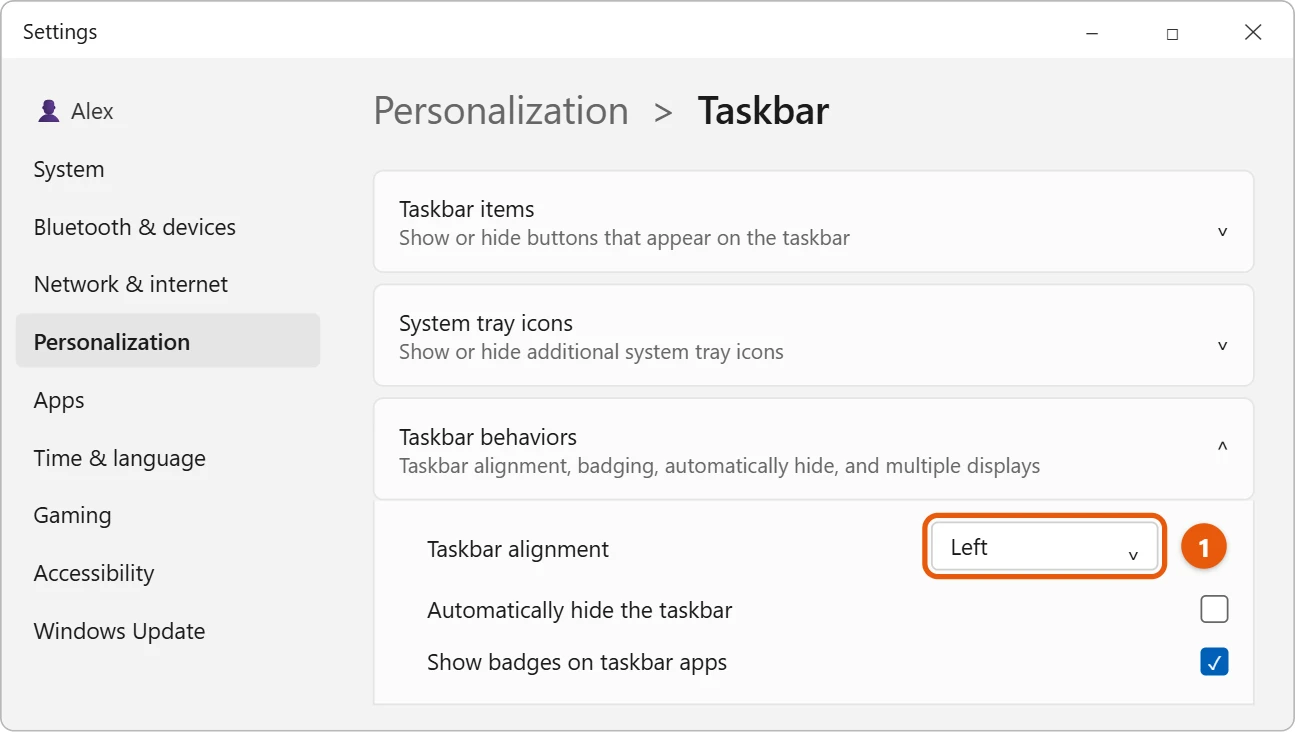
To pin an app to the taskbar, right-click it in the Start menu and choose Pin to taskbar. To remove one, right-click its taskbar icon and choose Unpin from taskbar. To color the taskbar, see how to change the taskbar color in Windows 11.
Quick Settings is the panel that opens when you select the network, sound or battery icons near the clock (or press Windows logo key + A).
- Open Quick Settings and select Edit quick settings (the pencil icon).
- Select Add to bring in buttons such as Night light, Mobile hotspot or Accessibility.
- Select the pin icon on a button to remove it, or drag buttons into the order you want.
- Select Done.
7. Change the mouse pointer and text size
- For the pointer, go to Settings > Accessibility > Mouse pointer and touch. Choose a pointer style (white, black, inverted or a custom color) and drag Size to make it bigger. See how to change the cursor in Windows 11 for more.
- For text, go to Settings > Accessibility > Text size and drag the slider, then select Apply. This makes text larger across Windows without changing everything else.
- To make everything bigger, go to Settings > System > Display and choose a larger Scale.
8. Change system sounds and desktop icons
- Go to Settings > Personalization > Themes and select Sounds to open the sound options. Choose a Sound Scheme, or pick a sound for single events like notifications. Choose No Sounds for a quiet PC.
- On the same Themes page, select Desktop icon settings to show or hide icons like This PC, Recycle Bin and Network on the desktop.
- To change icon size, right-click the desktop, select View, and choose Large icons, Medium icons or Small icons.
9. More ways to make Windows 11 your own
- Text input: Settings > Personalization > Text input changes the colors of the touch keyboard, emoji panel and voice typing window.
- Widgets: open the Widgets board (Windows logo key + W), then use its settings to add, remove or rearrange widgets.
- Virtual desktops: keep work and personal apps apart on separate desktops, each with its own wallpaper. See how to switch desktops in Windows 11.
- Device usage: Settings > Personalization > Device usage lets you tell Windows what you use your PC for, like gaming or school, so it can suggest relevant tips and apps. Turn them all off if you don’t want suggestions.
10. Adjust how Windows looks and behaves day to day
Personalization isn’t only about looks. These built-in settings change how Windows feels to use:
- Night light. Go to Settings > System > Display > Night light. Turn it on to show warmer colors that are easier on your eyes in the evening. Use Strength to adjust how warm the screen gets, and Schedule night light to turn it on automatically at sunset or at set times.
- Snap layouts. Go to Settings > System > Multitasking and open Snap windows. Here you can choose whether layouts appear when you hover over a window’s maximize button or drag a window to the top of the screen. Turn them off if windows keep snapping when you don’t want them to.
- Notifications. Go to Settings > System > Notifications. Turn apps on or off in the list, and turn on Do not disturb to silence banners while you work. You can also set times when Do not disturb turns on automatically.
- Animation effects. Go to Settings > Accessibility > Visual effects and turn off Animation effects if menus and windows feel slow to open. Windows will switch instantly instead of fading and sliding.
- Screen timeout. Go to Settings > System > Power & battery (or Power) and open Screen, sleep, & hibernate timeouts to choose how long Windows waits before turning off the screen.
Each of these can be changed back at any time on the same page.
What to avoid
- Themes and “skins” from unknown websites. Stick to the Microsoft Store. Files from other sites can carry malware.
- Registry tweaks. Many guides use registry changes for things like a classic right-click menu or a smaller taskbar. A mistake can cause problems, and updates often undo them.
- Apps that replace the Start menu or taskbar. They can break after Windows updates. Try the built-in options above first.
Undo your changes
To go back to the standard look, go to Settings > Personalization > Themes and select Windows (light), or Windows (dark) for the dark version. That resets the wallpaper, colors and sounds in one step. Start and taskbar settings stay as you set them, so change those back on their own pages if you want.
If a setting won’t change
- “Some of these settings are managed by your organization.” Your work or school controls this PC. Ask your IT department.
- Show accent color on Start and taskbar is grayed out. Switch Choose your mode to Dark or Custom.
- An app didn’t turn dark. It uses its own theme setting. Look for Appearance or Theme in the app’s settings.
- The wallpaper looks blurry or stretched. Use a picture at least as big as your screen resolution, and try a different Choose a fit option.
- A theme from the Store doesn’t appear. Wait for the download to finish, then reopen Settings > Personalization > Themes.
Frequently asked questions
Can I make Windows 11 look like Windows 10?
Partly. Setting Taskbar alignment to Left and pinning your favorite apps to Start gets you close. Changing the Start menu completely needs third-party apps, which we don’t recommend.
Do themes slow down my PC?
Not noticeably. Slideshow backgrounds and transparency use a little extra power, so turn them off on an older laptop if battery life matters.
Can I use different wallpapers on two monitors?
Yes. On Background, choose Picture, right-click a recent image, and pick which monitor to set it for.
Where can I get more themes?
Select Browse themes on the Themes page. It opens the Microsoft Store, where you can get free and paid themes.
Will my customizations stay after a Windows update?
Yes. Personalization settings stay in place after updates. Occasionally a big update adds new options or moves a setting to a new page.
Next steps
To hide the taskbar until you need it, see how to hide the taskbar in Windows 11. Microsoft’s own guides are Personalize your Colors in Windows and Customize the Taskbar in Windows.
For a slimmer taskbar with smaller icons, see how to make the taskbar smaller in Windows 11.

Matt Jacobs has been working as an IT consultant for small businesses since receiving his Master’s degree in 2003. While he still does some consulting work, his primary focus now is on creating technology support content for SupportYourTech.com.
His work can be found on many websites and focuses on topics such as Microsoft Office, Apple devices, Android devices, Photoshop, and more.