To defrag or optimize a drive in Windows 11, select Search on the taskbar, type defrag, and open Defragment and Optimize Drives. Select the drive, then select Optimize. Windows defragments a hard disk drive (HDD) and trims a solid-state drive (SSD), so the same button is safe for both. It also does this on its own once a week unless the schedule has been turned off.
Applies to: Windows 11, version 24H2 and 25H2 (Home and Pro), internal and external drives formatted as NTFS, ReFS, FAT or FAT32. Details follow Microsoft’s article on optimizing drives and the Microsoft Learn defrag command reference.
Defrag vs. trim: what Optimize actually does
Windows calls both jobs “optimization,” but a hard disk drive and a solid-state drive need very different care. The tool looks at the Media type of each drive and picks the right job for it.
| Drive type | What Optimize does | Why it helps |
|---|---|---|
| Hard disk drive (HDD) | Defragments the drive: it gathers the scattered pieces of each file and stores them next to each other. | A hard drive reads data with a moving arm over a spinning disk. When a file is split into many pieces, the arm has to jump around to read it, which is slow. Files stored in one piece load faster. |
| Solid-state drive (SSD) | Retrims the drive: it tells the SSD which blocks Windows no longer uses. | An SSD has no moving parts, so where a file sits doesn’t affect speed. What helps is knowing which space is free, so the drive can clean it up ahead of time and keep writing quickly. |
| Drive Windows can’t identify, or an SSD without trim support | Usually nothing. The Optimize-Volume reference lists “no operation” for these. | Windows won’t guess, which protects drives it doesn’t understand. |
Here’s a simple way to picture it. Fragmentation on a hard drive is like a book whose chapters are scattered across a library: all the pages are there, but collecting them takes time. Trim on an SSD is more like telling a storage company which boxes you’ve emptied, so they can recycle them before you need the space again.
Don’t run a traditional defrag on an SSD yourself. It doesn’t make an SSD faster, and every write adds wear to the drive. Use the Optimize button, or the /O switch at the command line, and Windows will do the right thing. Third-party “defrag” tools are not needed in Windows 11, and some of them don’t make this distinction.
One detail surprises people: when the scheduled task runs on an SSD, Windows may perform its “traditional optimization” about once a month, which can include a limited defragmentation alongside retrim. This is managed by Windows on purpose, so you don’t need to stop it. It’s different from you repeatedly forcing a full defrag on an SSD.
If your PC only has an SSD, trimming an SSD in Windows 11 goes into trim itself, including how to check that trim is turned on.
Before you start
- You need an administrator account. The
defragcommand requires membership in the local Administrators group, and the Analyze and Optimize buttons show a shield icon for the same reason. On a standard account, Windows asks for an administrator’s password. - Plug in your laptop. A first defrag of a large hard drive can take an hour or more.
- Leave some free space on hard drives. A volume needs at least 15% free space to be fully defragmented, because Windows uses that space to sort file pieces. With less, it only partly defragments the drive. On a 1 TB hard drive, that means roughly 150 GB free.
- Back up a drive that’s acting up. Defragmenting is a normal, safe job, but it reads and rewrites a lot of data. If a hard drive is making clicking or grinding sounds, disappears and reappears, or shows health warnings, copy your files off first and don’t defragment it.
- Close the command window if you use one. The
defragcommand and the Optimize Drives window can’t run on the same volume at the same time.
Ways to open Optimize Drives
The tool’s full name is Defragment and Optimize Drives. Its window title is Optimize Drives. Any of these routes opens the same window, so use whichever is easiest.
From Search (fastest)
- Select Search on the taskbar, or press the Windows key + S.
- Type defrag. Defragment and Optimize Drives appears at the top of the results.
- Select it, or press Enter. The Optimize Drives window opens.
From Settings
- Press the Windows key + I to open Settings.
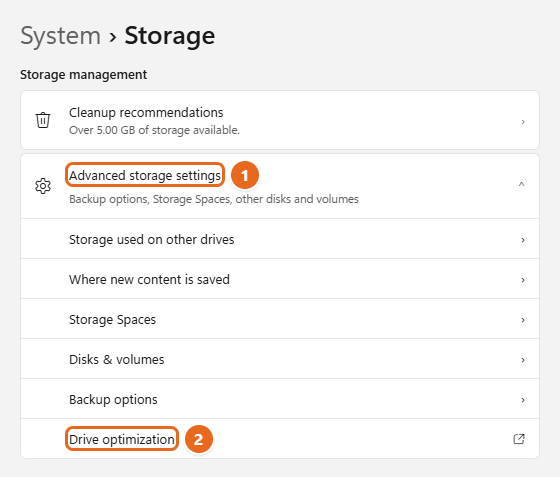
- Select System > Storage. On some recent Windows 11 updates, opening parts of Storage settings shows a User Account Control prompt. Select Yes if you see it.
- Scroll to Storage management and select Advanced storage settings to expand it.
- Select Drive optimization. The icon next to it shows that it opens a separate window, which is the Optimize Drives tool.
From File Explorer
- Press the Windows key + E to open File Explorer, and select This PC in the left pane.
- Right-click the drive you want to work on and select Properties.
- Select the Tools tab.
- Under Optimize and defragment drive, select Optimize. The Optimize Drives window opens. You can close the Properties dialog.
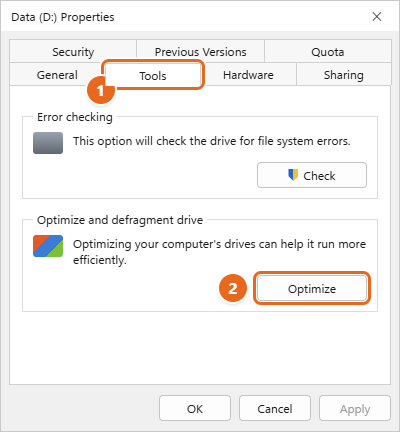
The same Tools tab has an Error checking section with a Check button. That’s a different tool. It looks for file system errors instead of fragmentation.
Other routes
- Run box: press the Windows key + R, type
dfrgui, and press Enter. - Windows Tools: open Start, go to the list of all apps, open Windows Tools, and double-click Defragment and Optimize Drives.
Analyze and optimize a drive
- Open Optimize Drives using any method above. The Status list shows each drive that’s connected to your PC.
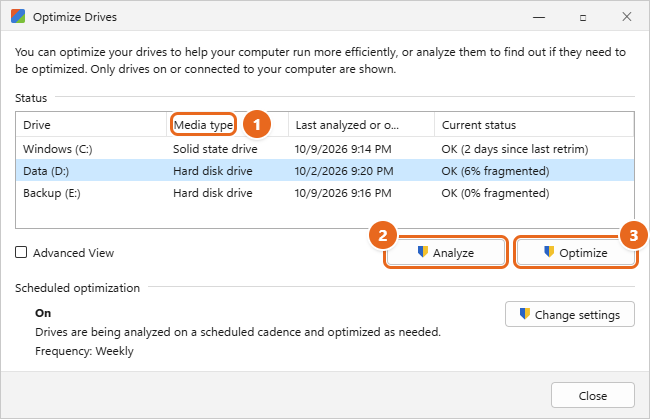
- Find the drive in the list and look at its Media type. It reads Hard disk drive or Solid state drive.
- Select the drive. The row is highlighted.
- For a hard disk drive, select Analyze if you want to check it first. Windows reads the drive and updates Current status with a fragmentation percentage, such as OK (6% fragmented). Analyzing doesn’t move any files. For an SSD, Analyze is greyed out, because fragmentation doesn’t matter on an SSD.
- Select Optimize. Windows defragments a hard drive or retrims an SSD. Current status shows the progress, such as a percentage and the pass it’s on.
- Wait for it to finish. You can keep using your PC, though a hard drive may feel slower while it works. When it’s done, Current status changes to an OK message and the Last analyzed or optimized date updates.
How long does it take? Retrimming an SSD usually takes seconds to a minute. A hard drive depends on its size, how full it is and how fragmented it is. A lightly used drive can finish in minutes, and a large, badly fragmented one can take hours the first time. Later runs are faster because there’s less to fix.
Need to stop? While a drive is being optimized, the Optimize button changes to Stop. Selecting it is safe. Files that were already moved stay where they are, and the next run picks up the rest. To optimize several drives, select the next one and select Optimize again, or use defrag /C /O as shown in the commands section.
Should you analyze first?
You don’t have to. Optimize on a hard drive does what’s needed either way. Analyze is useful when you’re curious whether fragmentation is a likely cause of slowness. There’s no official percentage that means “defragment now,” so treat the number as a clue rather than a rule. A drive that’s only a few percent fragmented won’t feel much faster after a defrag. If it’s well into double digits and you open lots of large files from it, a defrag is worth running.
How to read the Optimize Drives window
| Item | What it tells you |
|---|---|
| Drive | The drive’s name and letter, such as Windows (C:). |
| Media type | Hard disk drive, Solid state drive, or another type such as a removable or thin-provisioned drive. This decides whether Optimize defragments or trims. |
| Last analyzed or optimized | When Windows last checked or optimized the drive. Never run means it hasn’t done so yet. |
| Current status | The result or progress. Examples include OK (0% fragmented) for a hard drive, a message about days since the last retrim for an SSD, Needs optimization, or Optimization not available. |
| Advanced View | A check box that also lists hidden volumes, such as recovery partitions. Most people can leave it unchecked. |
| Scheduled optimization | Whether automatic optimization is On or Off, and its frequency. |
Don’t worry if an SSD’s last-run date is a few weeks old. The scheduled task sometimes skips the analysis step on SSDs, and when it does, the date isn’t updated. It can be up to a month old even when the schedule is working.
Check or change the automatic schedule
Windows optimizes your drives once a week by default. With the schedule on, most people never need to open this tool. Here’s how to check it or change it.
- Open Optimize Drives.
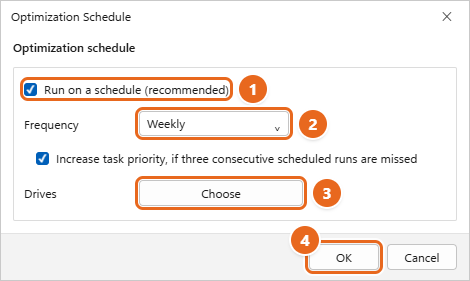
- Under Scheduled optimization, check whether it shows On. Select Change settings (or Turn on if it’s off). The Optimization Schedule dialog opens.
- Make sure Run on a schedule (recommended) is checked.
- Pick a Frequency: Daily, Weekly, or Monthly. Weekly is the default and suits most PCs.
- Leave Increase task priority, if three consecutive scheduled runs are missed checked. It helps a PC that’s often off or asleep catch up.
- Select Choose next to Drives. Check the drives to include, and keep Automatically optimize new drives checked if you want drives you add later to be included. Select OK.
- Select OK to save the schedule, then select Close.
A few things affect whether the schedule actually runs. The task won’t wake your PC to run, won’t run while a laptop is on battery power, and may not run when the PC has just resumed from idle. It runs as part of Windows automatic maintenance, so a PC that is shut down every night or always unplugged may go a long time between runs. If that sounds like your PC, plug it in and leave it idle for a while now and then, or select Optimize yourself once a month.
How to turn the schedule back on (or off)
To turn the schedule off, open Change settings, uncheck Run on a schedule (recommended), and select OK. To turn it back on, select Turn on or Change settings, check the box again, and select OK. There’s rarely a good reason to leave it off. One exception is a PC where your IT department manages maintenance, in which case the option may be greyed out.
Defrag or optimize from Terminal
The defrag command does everything the window does, plus a few extras. It’s handy for scripts, or if the window won’t open.
- Right-click Start and select Terminal (Admin). Select Yes on the User Account Control prompt.
- Type one of the commands below and press Enter. Replace
D:with your drive letter. - Wait for the report. Windows prints the results and returns to the prompt. To cancel, press Ctrl + C.
| Command | What it does | Use it for |
|---|---|---|
defrag D: /A |
Analyzes the drive and reports fragmentation. Changes nothing. | Checking a hard drive |
defrag D: /O |
Performs the proper optimization for the drive’s media type. | Any drive. This is the safest choice if you aren’t sure what kind of drive it is. |
defrag D: /U /V |
Runs a traditional defrag, showing progress (/U) and detailed statistics (/V). |
Hard disk drives only |
defrag C: /L |
Performs a retrim. | SSDs |
defrag /C /O |
Optimizes every drive, each with the right method. | All drives at once |
defrag D: /X |
Consolidates free space on the drive. | Hard drives, for example before you shrink a partition |
Important: a plain defrag C: with no switch runs a traditional defrag, which is the default operation. Don’t use it on an SSD. Add /O instead and let Windows choose.
If you prefer PowerShell, Optimize-Volume -DriveLetter D -Verbose picks the right job for the drive type and shows what it’s doing. Add -Analyze to only check the drive, or -Defrag to defragment a hard drive. Every option is in the Optimize-Volume reference.
Troubleshooting
A drive is missing from the list, or shows “Optimization not available”
The tool can’t optimize several kinds of volumes: network drives, CD and DVD drives, volumes locked by the file system, and volumes that aren’t formatted as NTFS, ReFS, FAT or FAT32. That means a USB stick formatted as exFAT, for example, can’t be optimized. Some removable and virtual drives also show Optimization not available. In those cases, you don’t need to do anything.
Windows wants the drive checked first
If Windows has marked a volume as “dirty,” meaning it may have file system errors, you must run CHKDSK before you can defragment it. Use the Check button on the drive’s Tools tab, or follow the steps for checking for and fixing corrupted files in Windows 11, then try again.
Your SSD is listed as a hard disk drive
If Media type is wrong, Windows may defragment an SSD instead of trimming it. Check what the drive really is: open Task Manager with Ctrl + Shift + Esc, select Performance, and select the disk. The type, such as SSD or HDD, is shown with the disk’s name. Drives in some external enclosures, RAID setups and virtual machines report their type incorrectly. If you use an SSD in one of these setups, uncheck it under Choose in the schedule, and optimize it with defrag X: /L only if the drive supports trim.
The drive stays fragmented after optimizing
The most common cause is too little free space. With less than 15% free, Windows can only partly defragment a drive. Delete files you don’t need or move some to another drive, then run Optimize again. Some system files that Windows keeps open can’t be moved while Windows is running, so a small amount of fragmentation can remain.
The Analyze or Optimize button is greyed out
Analyze is always greyed out for an SSD, which is normal. If both buttons are greyed out, the drive may not be supported (see above), or a defrag command is already running on it. Close any Terminal window that’s running defrag and try again.
Access is denied in Terminal
The Terminal wasn’t opened as an administrator. Close it, right-click Start, and pick Terminal (Admin). On a work or school PC, you may not have administrator rights.
Your PC is still slow
Defragmenting only helps a fragmented hard drive. If your PC runs on an SSD, or the drive was barely fragmented, the slowness is coming from something else, such as too many startup apps, a nearly full drive or not enough memory. The other fixes are in making your PC faster in Windows 11. You can also check how much drive space is left in Windows 11.
FAQ
Is it safe to defrag my computer?
Yes, for a healthy hard drive. Defragmenting moves file pieces around but doesn’t delete your files. Use the built-in tool, keep the PC plugged in, and back up first if the drive is showing signs of failure.
Should I defrag an SSD in Windows 11?
No, not yourself. Select Optimize and Windows will retrim the SSD instead. The occasional monthly optimization that Windows schedules on its own is expected and doesn’t need to be stopped.
How often should I defrag?
Let the weekly schedule handle it. Running it by hand more often won’t help a hard drive much. A manual run makes sense after you’ve deleted or copied a large amount of data, or if the schedule has been off.
Does defragging free up space?
No. It rearranges the data that’s already on the drive. To free up space, delete files you don’t need, empty the Recycle Bin, or use Storage Sense and cleanup recommendations in Settings > System > Storage.
Can I defrag an external hard drive?
Yes, if it’s a hard disk drive formatted as NTFS. Drives formatted as exFAT, which is common on new external drives, can’t be optimized. Connect it, select it in Optimize Drives, and select Optimize. Keep it plugged in until it finishes, and eject it safely afterward.
Can I use my PC while it defragments?
Yes. Windows runs the job at low priority by default, so you can keep working. Large file copies or games on the same hard drive will be slower until it finishes.
Is this the same in Windows 10?
The tool, schedule and commands are nearly identical. The Settings route is different, and defragging and optimizing drives in Windows 10 covers it for older PCs.
Next step: open Optimize Drives, check that Scheduled optimization shows On, and select Optimize once for any hard drive that hasn’t been checked in a while. After that, Windows will keep your drives in shape for you.

Matt Jacobs writes and maintains the guides on Support Your Tech, which he started in 2017. He spent most of his career keeping small-business PCs running and still takes the occasional consulting job, so the steps here come from fixing the same problems on other people’s computers. Every guide is checked on his own Windows 11, Windows 10, Mac, iPhone and iPad before it goes up.