To electronically sign a Word document, select Insert > Signature Line (called Add a Signature Line in some versions) and fill in the signer’s details. Then right-click the signature line, select Sign, and type your name, draw it, or choose Select Image to use a picture of your signature.
If you only need your signature to appear on the page, insert a picture of it with Insert > Pictures.
Applies to: Word for Microsoft 365, Word 2024, 2021, 2019, and 2016 on Windows. Checked against Microsoft Support on September 24, 2026.
Which method should you use?
- Signature line with a digital signature: best when someone needs to know the document wasn’t changed after you signed. It needs a digital ID.
- Picture of your signature: quick and fine for everyday forms and letters. It doesn’t prove who signed.
- An e-signature service or a signed PDF: often required for contracts. Check what the other person or organization accepts.
Add a signature line
- Click where you want the signature to go.
- On the Insert tab, in the Text group, select Signature Line. If you see a menu, choose Microsoft Office Signature Line.
- In Signature Setup, type the Suggested signer, and add a title, email address, and instructions if you want.
- Check Show sign date in signature line to add the date automatically.
- Select OK.
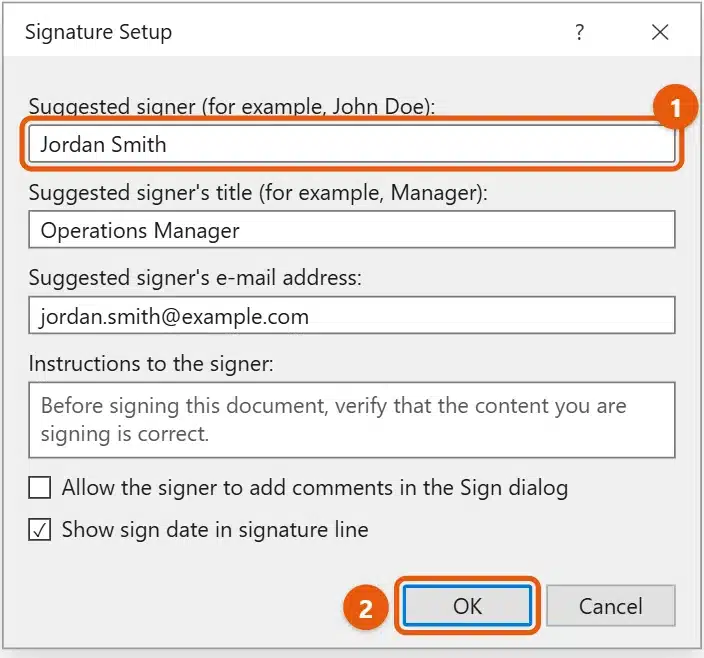
To collect signatures from more than one person, add a signature line for each one.
Sign the signature line
- Right-click the signature line and select Sign.
- Type your name next to the X. Or draw it with a pen or finger on a touch screen, or select Select Image to use a picture of your handwritten signature.
- Select Sign.

Word may ask you to get a digital ID the first time. A digital ID comes from a certificate provider, or from your IT team on a work PC.
What happens after you sign
- The document becomes read-only, so no one can change it by accident.
- A Signatures button appears in the status bar at the bottom of the window. Select it to see who signed.
- If someone edits the document later, the signature is no longer valid.
Save a copy before you sign if you think you’ll need to make more changes.
Insert a picture of your signature instead
- Sign a sheet of white paper, then scan or photograph it and save it as an image.
- In Word, select Insert > Pictures > This Device and choose the image.
- Select the picture, then select Picture Format > Wrap Text > In Front of Text so you can drag it anywhere.
- Resize it and drag it into place above the signature line.
Tip: to reuse it, select the picture and any typed text below it, then select Insert > Quick Parts > Save Selection to Quick Part Gallery. Anyone can copy a pasted image, so only send it to people you trust.
Add an invisible digital signature
If you want to protect the whole document without a visible line, select File > Info > Protect Document > Add a Digital Signature. Choose a Commitment Type, type a purpose if you want, and select Sign. This also needs a digital ID.
Remove a signature
Right-click the signature line, select Remove Signature, and select Yes. You can also select the arrow next to a signature in the Signatures pane and choose Remove Signature.
Frequently asked questions
Is a typed name a legal signature?
It depends on where you are and what you’re signing. Many places accept electronic signatures for everyday documents, but check with the person or organization that asked for it. This isn’t legal advice.
Can I sign a Word document on my phone or tablet?
Yes. See how to sign a Word document on iPad or how to sign a Word doc on iPhone.
Why can’t I edit my document after signing?
Signing makes it read-only. Remove the signature, make your changes, then sign again.
For more on the signature line, see how to insert a signature line in Word and how to insert a digital signature in Word. Using Google Docs instead? See how to insert a signature in Google Docs. Microsoft’s guide is Add or remove a digital signature in Office files. More help is on our Word Help & Guides page.

Matt Jacobs has been working as an IT consultant for small businesses since receiving his Master’s degree in 2003. While he still does some consulting work, his primary focus now is on creating technology support content for SupportYourTech.com.
His work can be found on many websites and focuses on topics such as Microsoft Office, Apple devices, Android devices, Photoshop, and more.