To create a virtual machine in Windows 10, turn on Hyper-V, then open Hyper-V Manager and select Quick Create. Choose Local installation source, select Change installation source to pick an ISO file, and select Create Virtual Machine. Then select Connect and Start to install the operating system.
Applies to: Windows 10 Pro, Enterprise and Education. Checked against Microsoft Learn on September 28, 2026.
Before you start
- Hyper-V needs Windows 10 Pro, Enterprise or Education. It isn’t in Windows 10 Home.
- Turn on Hyper-V first and restart. See how to enable Hyper-V in Windows 10.
- Get an installer file (ISO) for the system you want to run. For Windows 10, see how to download a Windows 10 ISO file. Windows in a virtual machine needs its own license to activate.
- Have at least 4 GB of RAM and about 30 GB of free disk space to spare. See how to check disk space in Windows 10.
Create the virtual machine
- Select Start, type Hyper-V Manager, and open it.
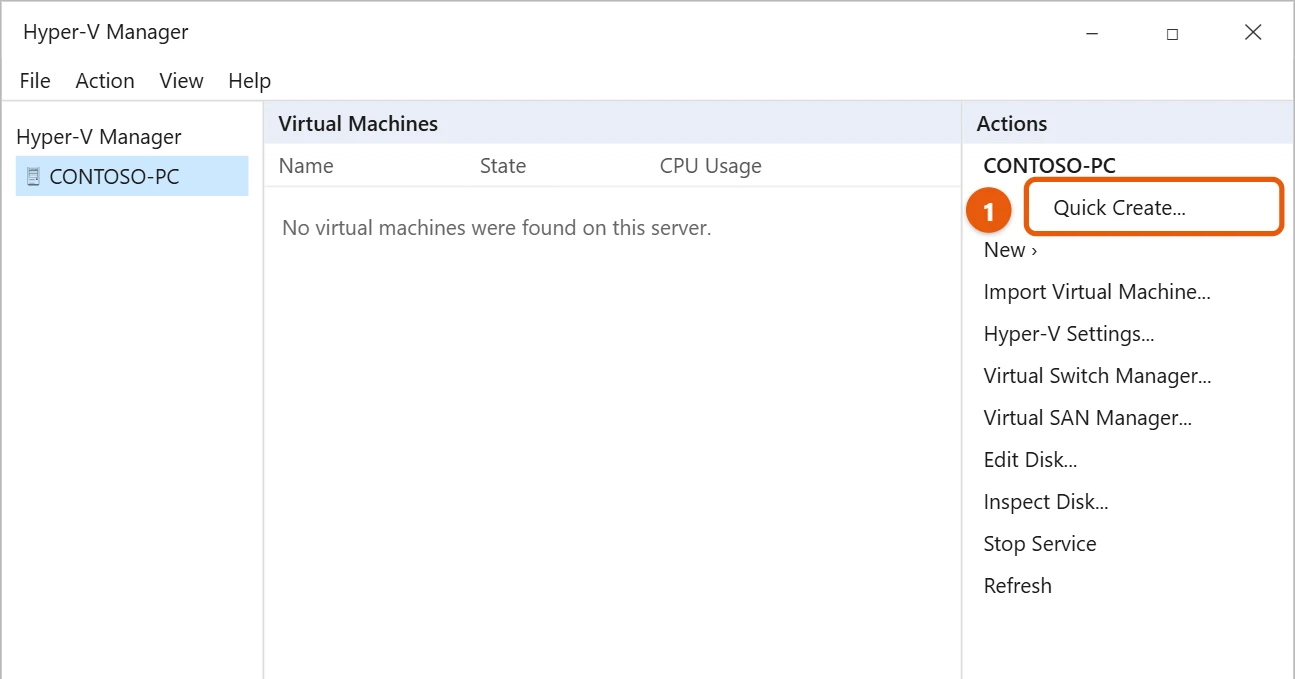
- Select your PC’s name on the left, then select Quick Create under Actions.
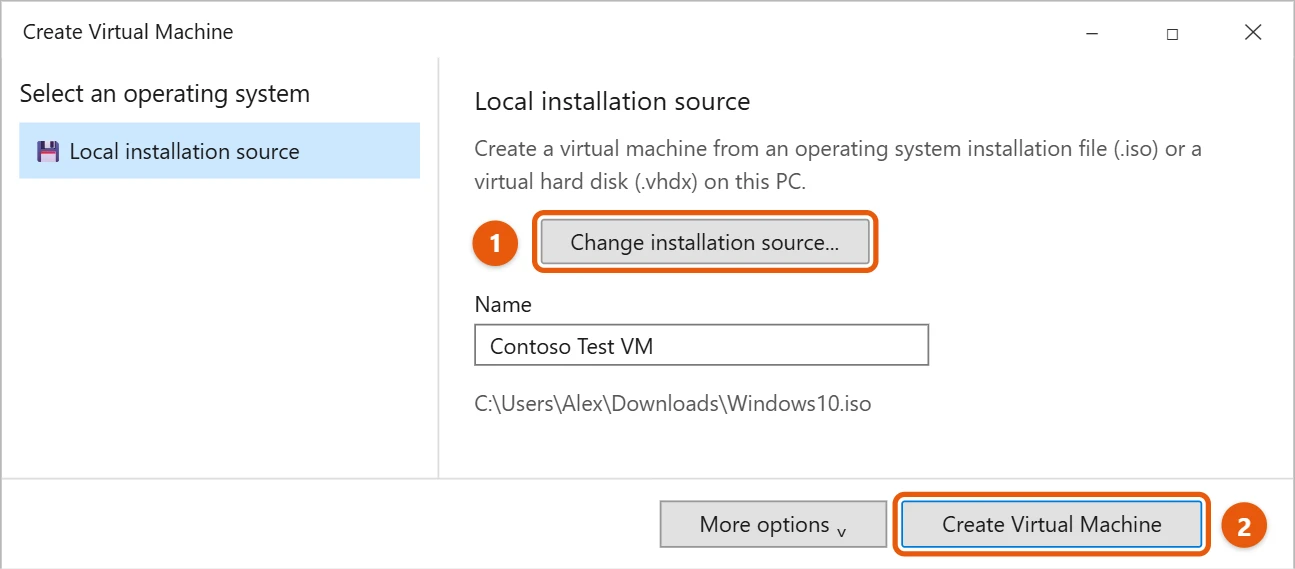
- Select Local installation source, then Change installation source, and pick your ISO file.
- Type a name for the virtual machine, then select Create Virtual Machine.
Start it and install the system
- When Windows says the virtual machine was created, select Connect.
- Select Start. If you see “Press any key to boot from CD or DVD”, press a key right away.
- Follow the setup steps, just like on a real PC.
Your virtual machine now shows in Hyper-V Manager. Double-click it to open it again later.
Change the memory, processors or disk
Turn the virtual machine off first. In Hyper-V Manager, right-click it and select Settings.
- Memory: set the startup RAM, and leave Dynamic Memory on so Windows can share memory between your PC and the virtual machine.
- Processor: raise the number of virtual processors for better speed. Leave at least two for your own PC.
- Hard Drive: select the drive, then Edit, to make the virtual disk bigger.
Save your progress with checkpoints
Before you try something risky inside the virtual machine, select Action > Checkpoint in its window. If something goes wrong, select Action > Revert to go back to that moment.
Copy files and text in and out
For Windows virtual machines, Hyper-V usually opens an enhanced session. Copy and paste then works between your PC and the virtual machine. To use your PC’s drives inside it, select Show Options when connecting, open Local Resources > More, and check the drives you want.
Quick Create connects the virtual machine to the Default Switch, which shares your PC’s internet connection. You don’t need to set up networking yourself.
If the virtual machine won’t start
- “Start PXE over IPv4” appears: the virtual machine missed the chance to start from the ISO. Restart it and press a key as soon as it asks. If it still happens, check the ISO is attached in Settings > SCSI Controller.
- “The hypervisor is not running”: turn on virtualization in your PC’s BIOS or UEFI settings, then restart.
- Not enough memory: lower the startup memory in Settings, or close apps on your PC.
- A Linux ISO won’t boot: in Settings > Security, change the Secure Boot template to Microsoft UEFI Certificate Authority, or turn Secure Boot off.
Frequently asked questions
What is a virtual machine for?
It’s a PC inside your PC. You can test apps or another system without changing your real Windows.
Can I choose the memory and disk size myself?
Yes. In Hyper-V Manager, select New > Virtual Machine instead of Quick Create. The wizard lets you set the memory, network and disk size.
Quick Create is missing. What should I do?
Make sure Hyper-V is fully turned on and the PC has restarted. Use New > Virtual Machine if Quick Create still isn’t there.
How do I delete a virtual machine?
Turn it off, right-click it in Hyper-V Manager, and select Delete. Hyper-V removes it from the list, but the virtual disk file stays. Delete that file too if you want the space back.
Microsoft’s reference is Create a virtual machine in Hyper-V. More help is on our Windows Help & Guides page.
Related: install CorelDRAW X4 in Windows 10.
Related: run macOS apps from a Windows PC.

Matt Jacobs has been working as an IT consultant for small businesses since receiving his Master’s degree in 2003. While he still does some consulting work, his primary focus now is on creating technology support content for SupportYourTech.com.
His work can be found on many websites and focuses on topics such as Microsoft Office, Apple devices, Android devices, Photoshop, and more.