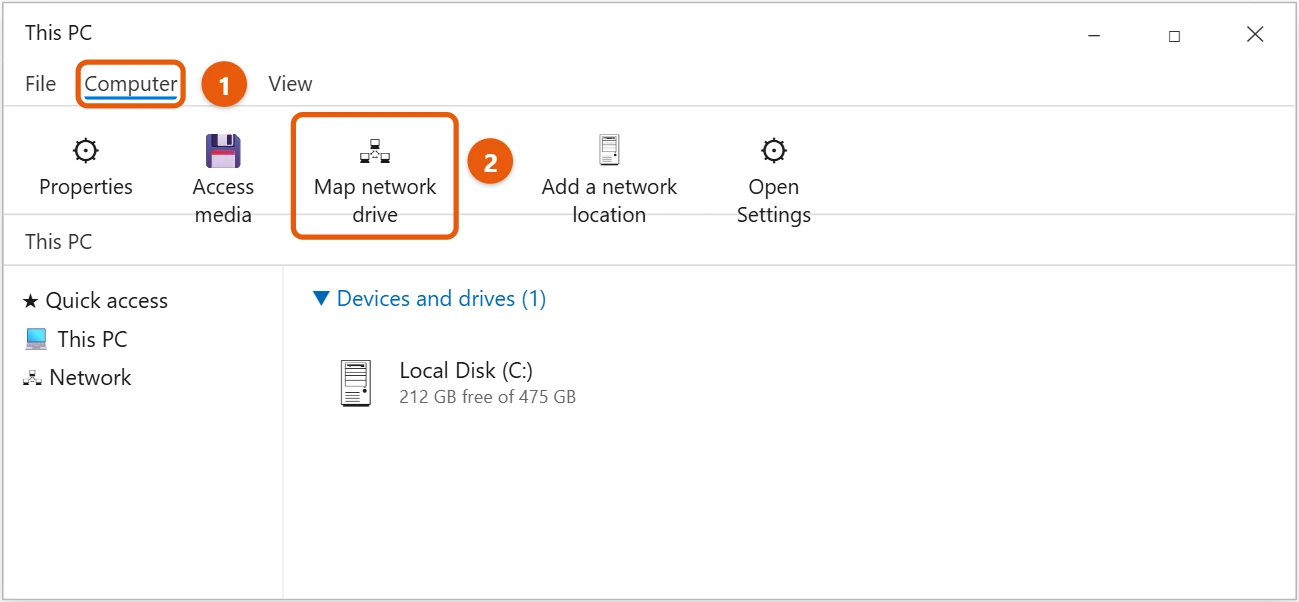
To map a network drive in Windows 10, open File Explorer, select This PC, and on the Computer tab select Map network drive. Choose a drive letter, type the shared folder’s path (like \\server\share), check Reconnect at sign-in, and select Finish. The folder then shows up under This PC like a normal drive.
Applies to: Windows 10. Checked against Microsoft Support on September 26, 2026. On a newer PC, see how to map a network drive in Windows 11.
A mapped drive is a shortcut to a shared folder on another PC or a network storage device (NAS). You need the folder’s network path, and permission to open it. For a Synology NAS, the DSM settings to check are covered in how to map a Synology drive in Windows 11.
Map a network drive
- Open File Explorer (Windows logo key + E) and select This PC on the left.
- Select the Computer tab, then Map network drive.
- In Drive, pick a letter. Z: is the default.
- In Folder, type the path, such as
\\CONTOSO-NAS\Photos, or select Browse to find it. - Check Reconnect at sign-in to keep the drive after a restart. If the folder needs a different user name and password, check Connect using different credentials.
- Select Finish.
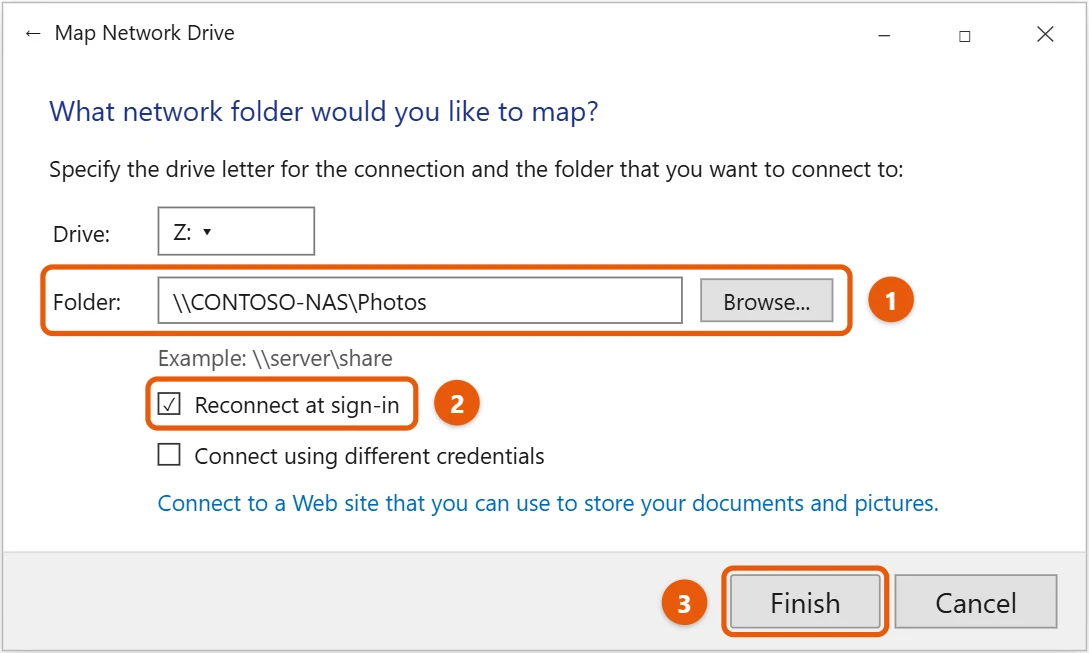
If Windows asks for credentials, enter the account for the PC or NAS that shares the folder.
Disconnect a mapped drive
In File Explorer, right-click the drive under This PC (where Windows 10 lists all your drives) and select Disconnect.
If the drive won’t connect
- Browse shows nothing. Turn on network discovery and check that both devices are on the same network.
- “The network path was not found.” Check the spelling of the computer and folder names. Try the PC’s IP address instead, such as
\\192.168.1.20\Photos. - Access denied. The folder has to be shared with your account. See how to share folders in Windows 10.
- A red X on the drive. Windows couldn’t reconnect at startup, often because the network wasn’t ready yet. Open the drive and it usually reconnects.
- “Multiple connections to a server or shared resource by the same user, using more than one user name, are not allowed.” You already have a connection to that PC under a different account. Open Command Prompt, run net use to list connections, remove the old one with net use \\server\share /delete, and then map the drive again.
- You can’t connect without a password. Many current Windows editions block guest (no-password) access to shared folders for security. Set up a user account and password on the PC or NAS that shares the folder, and sign in with it.
- The drive is missing in an app run as administrator. Drives you map normally don’t show up in programs started with Run as administrator. Map the drive again from an administrator Command Prompt with net use if that program needs it.
Frequently asked questions
What’s the difference between a mapped drive and a network location?
A mapped drive gets a drive letter, which older programs sometimes need. Add a network location on the same tab adds a shortcut without a letter.
Can I map a drive from Command Prompt?
Yes. Type net use Z: \\CONTOSO-NAS\Photos /persistent:yes and press Enter. Use net use Z: /delete to remove it.
How do I do this on Windows 11?
See how to map network drives in Windows 11.
Can I use PowerShell instead?
Yes. Run New-PSDrive -Name Z -PSProvider FileSystem -Root \\CONTOSO-NAS\Photos -Persist. Remove it with Remove-PSDrive Z.
Why does the drive letter I want not appear in the list?
The letter is already used by another drive, such as a USB stick or a card reader. Pick a different letter, or change the other drive’s letter in Disk Management.
If Windows can’t find the shared folder, see how to enable SMB and file sharing in Windows 10.
To find the other PCs and their IP addresses, see how to see all IP addresses on your network in Windows 10.
To browse a server’s shared folders without mapping them, see how to connect to a server on Windows 10.
Microsoft’s guide is Map a network drive in Windows. More help is on our Windows Help & Guides page.
Related: How to connect to an SMB share in Windows 11.
Related: How to enable SMB1 on Windows 11.

Matt Jacobs has been working as an IT consultant for small businesses since receiving his Master’s degree in 2003. While he still does some consulting work, his primary focus now is on creating technology support content for SupportYourTech.com.
His work can be found on many websites and focuses on topics such as Microsoft Office, Apple devices, Android devices, Photoshop, and more.