To schedule an email in the new Outlook for Windows or Outlook on the web, write your message, select the arrow next to Send, choose Schedule send, pick a suggested time or Custom time, and select Send. In classic Outlook, select Options > Delay Delivery in the message window, check Do not deliver before, set the date and time, select Close, and then select Send.
Applies to: New Outlook for Windows, classic Outlook for Microsoft 365, Outlook 2024, 2021, 2019 and 2016, Outlook on the web, Outlook.com, Outlook for iPhone and Android, and Outlook for Mac. Checked against Microsoft Support on October 12, 2026.
In this guide
- Which Outlook are you using?
- Schedule an email in the new Outlook for Windows
- Schedule an email in Outlook on the web or Outlook.com
- Schedule an email in classic Outlook with Delay Delivery
- Schedule an email in Outlook for iPhone or Android
- Schedule an email in Outlook for Mac
- Change, cancel or send a scheduled email now
- Delay every email you send (classic Outlook)
- Troubleshooting
- FAQ
Which Outlook are you using?
Outlook has two different scheduling features, and the one you get depends on the version in front of you. The new Outlook for Windows, Outlook on the web, Outlook for Mac and the mobile apps use Schedule send. Classic Outlook for Windows uses Delay Delivery.
To tell the Windows versions apart, look at the top of the window. The new Outlook has a Settings (gear) button in the upper-right corner, and its main ribbon has Home, View and Help tabs. Classic Outlook has no Settings gear there and has a File tab at the left end of the ribbon. If you are not sure, Microsoft’s What version of Outlook do I have? page walks you through it.
| Version | Feature name | Where the message waits | Does Outlook need to stay open? |
|---|---|---|---|
| New Outlook for Windows | Schedule send | Drafts | No |
| Outlook on the web and Outlook.com | Schedule send | Drafts | No |
| Classic Outlook for Windows | Delay Delivery | Outbox | Microsoft says Outlook must be online and connected; keep it open to be safe |
| Outlook for Mac | Schedule send | Drafts | No |
| Outlook for iPhone and Android | Schedule send | Drafts | No |
Account type matters too. Schedule send works with Microsoft accounts such as Outlook.com, Hotmail and Live, and with work or school accounts on Microsoft 365 or Exchange. Microsoft says the feature isn’t available for IMAP or POP accounts, which includes Gmail, Yahoo and iCloud addresses added to Outlook. If you use one of those accounts, see Troubleshooting for your options.
Schedule an email in the new Outlook for Windows
In the examples below, Alex is writing a meeting recap to Jordan Lee late on a Thursday afternoon and wants it to arrive at 8:00 AM on Friday.
- Open the new Outlook and select New mail in the upper-left corner, or press Ctrl + N. A new message opens in the reading pane.
- Check the From line if you have more than one account. Schedule send must come from an Outlook.com or Microsoft 365 account.
- Add the recipients in To, type a subject in Add a subject, write the message, and attach any files. Write the whole email now, because the scheduled time will be the only thing left to set.
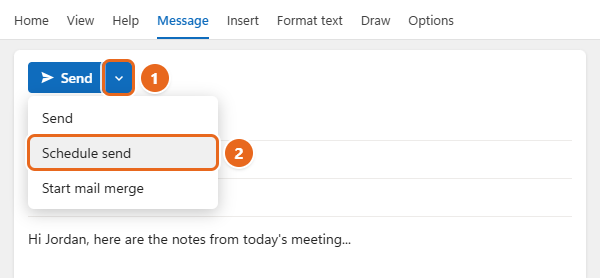
- Look at the blue Send button at the top of the message. Select the small arrow on its right edge, not the word Send. Selecting the word Send sends the email immediately.
- In the menu that opens, select Schedule send.
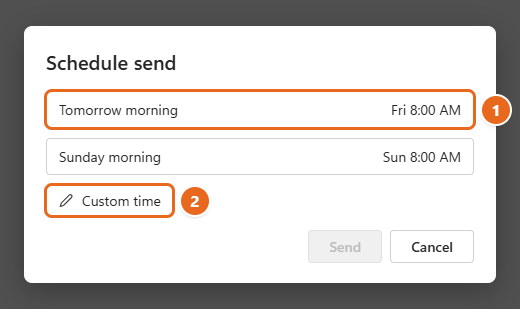
- The Schedule send box opens with one or two suggested times, such as Tomorrow morning. The suggestions change depending on the day and time you open the box. Select a suggestion if it fits.
- For any other time, select Custom time. Choose the date in the calendar, then pick the time from the time list.
- Select Send in the box. The message closes and moves to your Drafts folder, where it waits until the time you chose.
To confirm it worked, open Drafts. The message should be there, and when you open it, a line at the top shows the day and time it is scheduled to be sent. Because Microsoft’s servers hold the message, you can close Outlook or shut down your computer and it still goes out on time.
Tip: You can also schedule a reply or a forward. Select Reply, Reply all or Forward, write your response, and use the same arrow next to Send.
Schedule an email in Outlook on the web or Outlook.com
Outlook on the web (for work or school accounts) and Outlook.com (for personal Microsoft accounts) use the same steps as the new Outlook, because the new Outlook is built on the web version.
- Go to outlook.com for a personal account or outlook.office.com for a work or school account, and sign in.
- Select New mail and write your message.
- Select the arrow next to Send, then select Schedule send.
- Choose one of the suggested times, or select Custom time and set the date and time.
- Select Send. The message waits in Drafts until it is delivered.
This is also the easiest way to schedule a message from a computer that isn’t yours, such as a library or work PC, because nothing needs to stay open after you schedule it. Just remember to sign out of the browser afterward.
Schedule an email in classic Outlook with Delay Delivery
Classic Outlook for Windows is the desktop app that comes with Microsoft 365 and with Office 2024, 2021, 2019 and 2016. It doesn’t have a Schedule send button. Instead, you set a delivery time on the message itself.
Before you start: A delayed message sits in your Outbox, and Microsoft notes that Outlook needs to be online and connected for the feature to work. With IMAP or POP accounts, such as Gmail added to classic Outlook, the message is sent from your computer, so Outlook must be open and online at the delivery time. If it isn’t, the email goes out the next time you open Outlook. Microsoft 365 and Exchange accounts are generally handled by the mail server, but leaving Outlook open is the safe choice for anything time-sensitive.
- Select Home > New Email. A separate message window opens.
- Fill in To, Subject and the message body, and attach any files.
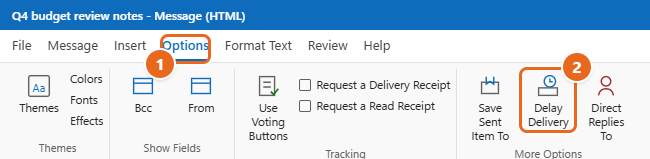
- In the message window, select the Options tab.
- In the More Options group, select Delay Delivery. The Properties box opens.
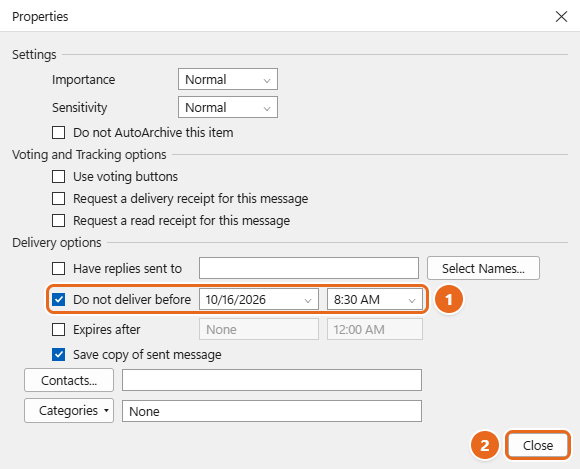
- Under Delivery options, check Do not deliver before.
- Use the date list to pick the day, and the time list to pick the time. In the example, Alex picks 10/16/2026 and 8:30 AM.
- Select Close. Nothing seems to change in the message window, which is normal. The delivery time is saved with the message.
- Select Send. The message moves to the Outbox and stays there until the time you set.
If you don’t see Delay Delivery
Your ribbon may be set to the compact, single-line Simplified ribbon. Select the Options tab, then select More commands (the three dots at the right end of the ribbon) and choose Delay Delivery. On the classic ribbon, you can also reach the same Properties box from the Message tab: select the small arrow in the corner of the Tags group.
Schedule an email in Outlook for iPhone or Android
The Outlook app for iPhone, iPad and Android also has Schedule send. Microsoft announced it in its Microsoft 365 message center (MC617062) when it rolled out to Android in mid-2023, noting it was already available on iOS. Microsoft doesn’t publish a separate step-by-step help page for it, so the exact labels can differ slightly between app versions.
- Open the Outlook app and tap the New mail button.
- Add the recipient, subject and message.
- While you are still in the message, tap the More options button (three dots, …) in the compose screen.
- Tap Schedule send.
- Pick a suggested time, or choose your own date and time, and confirm it.
According to Microsoft, the scheduled message shows up in your Drafts folder until it is sent. Because it syncs with your mailbox, you will also see it in Drafts in the new Outlook and on the web. As on the desktop, the account must be an Outlook.com or Microsoft 365 account; Gmail and other IMAP accounts added to the app may not show the option.
Schedule an email in Outlook for Mac
Outlook for Mac works like the new Outlook for Windows. Older versions called the feature Send Later.
- Write your message and add at least one recipient on the To line.
- Select the dropdown arrow on the Send button and select Schedule send.
- Enter the date and time, then select OK.
The message waits in Drafts and is sent even if Outlook isn’t open on your Mac. Microsoft’s Schedule Send for Outlook on Mac page lists the requirements: a Microsoft 365 subscription, Outlook 2019 for Mac or Outlook 2021 for Mac, and an Exchange-based account such as Outlook.com. It doesn’t work with IMAP or POP accounts.
Change, cancel or send a scheduled email now
A scheduled email isn’t sent until its delivery time, so you can still fix a typo, change the time or call it off completely.
In the new Outlook, Outlook on the web and Outlook for Mac
- Open the Drafts folder.
- Open the scheduled message. A line near the top says when it is scheduled to be sent. You can’t edit it yet.
- Select Cancel send. On a Mac, select Yes to confirm. The message turns back into a normal, editable draft.
- Make your changes. Then choose what you want:
- To send it right away, select Send.
- To pick a new time, select the arrow next to Send > Schedule send again.
- To stop it completely, delete the draft.
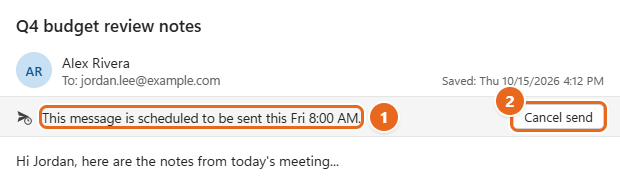
Important: If you want to stop a scheduled email, select Cancel send before you delete it. That way you can see that it is no longer scheduled before it leaves your Drafts folder.
In classic Outlook
- Open the Outbox folder and double-click the delayed message.
- To change the time, select Options > Delay Delivery and pick a new date or time.
- To send it now, select Options > Delay Delivery and clear the Do not deliver before check box.
- Select Close, then select Send.
To cancel a delayed message entirely, right-click it in the Outbox and select Delete. It moves to Deleted Items, so you can still copy the text out if you need it later.
Tip: If you schedule a lot of messages in classic Outlook, add a column that shows each delivery time. In the Outbox, right-click the column headings, select Field Chooser, choose Date/Time fields from the list, and drag Defer Until onto the column headings.
Delay every email you send (classic Outlook)
If you often spot a mistake right after you select Send, classic Outlook can hold every outgoing message for a few minutes. You set this up once with a rule. The maximum delay is 120 minutes.
- Select File > Manage Rules & Alerts.
- Select New Rule.
- Under Start from a Blank Rule, select Apply rule on messages I send, then select Next.
- Select conditions only if you want to delay some messages, such as those sent from one account. To delay everything, leave all boxes clear and select Next. When Outlook asks whether the rule should apply to every message you send, select Yes.
- Check defer delivery by a number of minutes.
- In the lower box, select the underlined words a number of, type the number of minutes (for example, 2), and select OK. Then select Next.
- Add any exceptions you want, then select Next.
- Name the rule, make sure Turn on this rule is checked, and select Finish.
From now on, every message you send waits in the Outbox for that many minutes. Keep in mind that genuinely urgent emails wait too. To turn the rule off, go back to File > Manage Rules & Alerts and clear its check box.
The new Outlook and Outlook on the web don’t use rules for this. They have an Undo send setting that holds messages for up to 10 seconds instead. Our guide on how to edit or recall a sent email in Outlook shows how to turn it on and what to do once a message is already gone.
Troubleshooting
Schedule send is missing from the Send menu
- You’re in classic Outlook. Classic Outlook doesn’t have Schedule send. Use Options > Delay Delivery as described above.
- You’re sending from an IMAP or POP account. Microsoft says Schedule send isn’t available for these accounts in the new Outlook, on the web or on a Mac. Check the From line. If you have a Gmail, Yahoo or iCloud address in Outlook, you can schedule the message from that service’s own website instead, or use classic Outlook’s Delay Delivery and leave Outlook running until it sends.
The email didn’t send at the scheduled time
- Classic Outlook was closed or offline. Open Outlook and check the Outbox. The message should send as soon as Outlook is connected. Make sure Work Offline on the Send / Receive tab isn’t turned on.
- Outlook only checks the Outbox now and then. In classic Outlook, a delayed message can leave a few minutes late, depending on your send and receive settings. See how to change the send and receive frequency in Outlook.
- The schedule was removed. In the new Outlook or on the web, open the message in Drafts. If there is no scheduled time at the top, the schedule was canceled. Schedule it again.
The email went out at the wrong time
This is almost always a time zone mismatch, often after travel. In the new Outlook or on the web, select Settings > Calendar > View and check the time zone under Time zones. In classic Outlook, select File > Options > Calendar and check Time zones. Classic Outlook also follows the Windows clock, so check that your computer’s time zone is correct. Microsoft’s Manage time zone settings in Outlook page has the details for each version.
Outlook offers to schedule a message you didn’t plan to delay
With some work or school accounts, Microsoft Viva Insights can suggest a later send time when your recipients are outside their working hours or out of the office. You can accept the suggestion or ignore it. Microsoft says these suggestions don’t work while you have an Outlook rule that delays messages, and that they can be turned off in the Viva Insights add-in settings. See Schedule send in Outlook (Viva Insights) for how they work.
FAQ
Will the recipient know the email was scheduled?
No. The email arrives like any other message, and the time shown is when it was delivered, not when you wrote it.
Where do scheduled emails go?
In the new Outlook, Outlook on the web, Outlook for Mac and the mobile app, they wait in Drafts. In classic Outlook, delayed messages wait in the Outbox. After they are sent, they move to Sent Items as usual.
Can I schedule an email to repeat every week?
Not with Schedule send or Delay Delivery. Each scheduled message is sent once. Outlook rules can’t send a message on a timetable either; they only act when mail is sent or received. For a weekly reminder, create a recurring calendar reminder for yourself and send the email then, or use a template so writing it takes seconds.
Can I schedule an email to a group?
Yes. Add the contact list or group address to the To line and schedule the message as usual. The only exception is Viva Insights’ suggested send times, which Microsoft says can’t be used for distribution lists or Microsoft 365 groups.
Do attachments work with scheduled emails?
Yes. Attach files before you schedule the message, and they are sent with it. Very large attachments can still be rejected by the recipient’s mail server, so a link to a shared file is safer for big files.
Next step
Schedule a short test email to yourself for a few minutes from now, close Outlook, and check that it arrives. Once you have seen it work, you can schedule important messages with confidence.

Matt Jacobs has been working as an IT consultant for small businesses since receiving his Master’s degree in 2003. While he still does some consulting work, his primary focus now is on creating technology support content for SupportYourTech.com.
His work can be found on many websites and focuses on topics such as Microsoft Office, Apple devices, Android devices, Photoshop, and more.