To set up automatic replies in Outlook, open the out-of-office settings for your version, turn them on, set a start and end time, type your message, and save. In new Outlook for Windows, select View > View settings > Accounts > Automatic replies. In classic Outlook, select File > Automatic Replies. In Outlook on the web or Outlook.com, select Settings (the gear) > Account > Automatic replies.
Applies to: New Outlook for Windows, classic Outlook for Windows (Microsoft 365, Outlook 2024, 2021, 2019 and 2016), Outlook on the web and Outlook.com. Requires a Microsoft 365, Exchange or Outlook.com account. Checked against Microsoft Support on October 12, 2026.
In this guide
- Which Outlook do you have?
- How automatic replies work
- Method 1: New Outlook for Windows
- Method 2: Classic Outlook for Windows
- Method 3: Outlook on the web and Outlook.com
- Block your calendar and decline meetings
- No Automatic Replies option? Use a rule
- Set it from your phone or Teams
- How to turn automatic replies off
- What to write in your message
- Troubleshooting
- FAQ
Which Outlook do you have?
Microsoft currently ships two Outlook apps for Windows, and they keep this setting in different places. Check which one is open before you follow any steps.
| What you see | Your version | Where automatic replies live |
|---|---|---|
| A File tab at the left end of the ribbon that opens an Account Information page | Classic Outlook | File > Automatic Replies |
| No File tab with an Info page, and a View tab with a View settings button | New Outlook for Windows | View > View settings > Accounts > Automatic replies |
| Outlook open in a browser tab (outlook.office.com or outlook.live.com) | Outlook on the web or Outlook.com | Settings > Account > Automatic replies |
Microsoft notes that if the new Outlook steps don’t work, you are probably still using classic Outlook, so switch to Method 2.
How automatic replies work
A few facts will save you confusion later:
- The reply runs on the mail server, not on your PC. Microsoft’s guide to how out-of-office replies work explains that they are server-side rules, so they keep going out when Outlook is closed and your computer is off.
- Each sender gets one reply. If a colleague emails you five times while you’re away, they get your reply once. The list of people who already got a reply is cleared when you turn automatic replies off and on again, or change them.
- One setting, many places. Because the setting is stored with your mailbox, turning it on in Outlook on the web also turns it on in classic Outlook, new Outlook, the Outlook phone app and Teams. You can turn it on in one place and off in another.
- Work accounts can send two messages. With a work or school (Microsoft 365 or Exchange) account, you can write one reply for people inside your organization and a different one for everyone else.
- Some accounts can’t use it. Microsoft says automatic replies aren’t supported for Gmail, Yahoo and other POP or IMAP accounts, even when you read that mail in Outlook. See No Automatic Replies option? below.
Method 1: Set up automatic replies in new Outlook for Windows
New Outlook is the redesigned Outlook app that comes with Windows 11 and is replacing classic Outlook for many Microsoft 365 users. Its settings are a single page shared with Outlook on the web.
- Open new Outlook and select the View tab at the top of the window.
- Select View settings. The Settings window opens. You can also open it with the Settings gear at the top right of the window.
- In the left column, select Accounts, then select Automatic replies.
- Turn on the Automatic replies toggle. The rest of the page becomes available.
- Check Send replies only during a time period, then choose a Start date and time and an End date and time. Outlook starts and stops the replies on its own. If you skip this box, replies stay on until you turn them off.
- Type your message in the message box. You can use the toolbar above it to change the font, add bold text or insert a link.
- With a work or school account, decide whether people outside your company should get a reply. Check Send replies outside your organization to write a second message for them, and check Send replies only to contacts if you only want people in your contacts to receive it.
- Select Save. Your automatic replies are now on, or scheduled if the start time is in the future.
Tip: The time-period area may also offer calendar options, such as blocking your calendar. They are explained in Block your calendar and decline meetings.
Method 2: Set up automatic replies in classic Outlook for Windows
Classic Outlook is the traditional desktop app included with Microsoft 365 and with Office 2016 through 2024. It uses a separate Automatic Replies dialog box with two tabs.
- Open classic Outlook and select File at the left end of the ribbon. The Info page opens with your Account Information.
- If you have more than one email account, use the drop-down list under Account Information to pick the account that needs the reply.
- Select Automatic Replies, next to Automatic Replies (Out of Office). If you don’t see this button, your account type doesn’t support it; jump to No Automatic Replies option?

- In the Automatic Replies dialog box, select Send automatic replies. Until you do, the rest of the dialog is grayed out.
- Check Only send during this time range, then set the Start time and End time. Each has a date list and a time list.
- On the Inside My Organization tab, type the reply your colleagues will receive. You can format the text with the toolbar or paste in formatted text with links.
- Select the Outside My Organization tab before you save. The tab name ends in (On) or (Off), which tells you whether people outside your company will get a reply. See the next section to set it up.
- Select OK. A yellow Automatic Replies bar appears under the ribbon to remind you that replies are being sent for this account.

If the OK button is missing, Microsoft says some screen resolution and display scaling settings can push it off the dialog. Lower the scaling in Windows display settings, or move Outlook to a larger monitor.
Set the reply for people outside your organization
The Outside My Organization tab controls replies to customers, vendors and anyone else with an email address outside your company. It can already be switched on for anyone outside your organization, with an empty message box, so check it every time.
Warning: Microsoft points out that replying to everyone outside your organization sends your reply to every email you get, including newsletters, advertisements and possibly junk mail. That also confirms to spammers that your address is active.
- In the Automatic Replies dialog box, select the Outside My Organization tab.
- To send outside replies, keep Auto-reply to people outside my organization checked. To send none, clear the box; the tab name changes to (Off).
- Choose My Contacts only (Microsoft’s recommendation) or Anyone outside my organization.
- Type a separate, shorter message for outside senders, then select OK.

The Rules button at the bottom of the dialog lets you add extra rules that run only while automatic replies are on, such as forwarding mail from one sender to a coworker. Most people don’t need it.
Method 3: Set up automatic replies in Outlook on the web or Outlook.com
Use these steps for Outlook in a browser, whether you sign in with a work or school account at outlook.office.com or with a personal Outlook.com or Hotmail account at outlook.live.com.
- Sign in to Outlook in your web browser.
- Select Settings (the gear icon) at the top right of the page. On a phone browser, open the menu at the top left and scroll down to Settings instead.
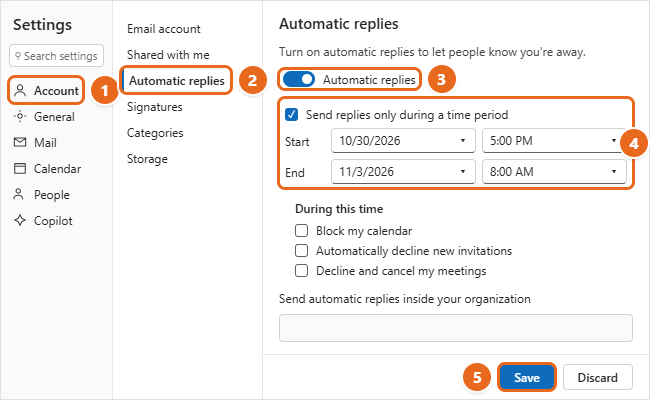
- Select Account, then Automatic replies. You can also type automatic in the Search settings box. Older instructions point to Mail > Automatic replies; Microsoft has since moved the page under Account.
- Turn on the Automatic replies toggle.
- Check Send replies only during a time period and choose the start and end dates and times.
- Optionally, check any of the calendar options that appear. See Block your calendar and decline meetings before you do.
- Under Send automatic replies inside your organization, type your message. On a personal Outlook.com account there is just one message box.
- For a work or school account, check Send replies outside your organization to write a message for outside senders, and check Send replies only to contacts to limit it to people you know. Clear Send replies outside your organization if the reply is for colleagues only.
- Select Save. A notice confirms that automatic replies are on.
Block your calendar and decline meetings
In Outlook on the web, once you set a time period, Microsoft lists three extra options under the dates:
| Option | What it does | Good to know |
|---|---|---|
| Block my calendar | Adds an event across your time away that shows you as out of office | Type a title such as “Vacation” or the event may be saved without a subject. |
| Automatically decline new invitations | Declines new meeting requests for events during your time away | Organizers get a decline, so they know to reschedule. |
| Decline and cancel my meetings | Declines or cancels the meetings already on your calendar during that period | Other people are notified, so use it only if those meetings really won’t happen with you. |
Warning: Declines and cancellations go out to other people, and turning automatic replies off later won’t bring those meetings back. A calendar block can also stay on your calendar after you turn replies off, so delete it if you come back early.
Classic Outlook’s Automatic Replies dialog doesn’t include these options. If you set your reply in classic Outlook, add an all-day event on your calendar and set Show as to Out of Office instead. If coworkers check your schedule in Teams, see how to see someone’s calendar in Teams to understand what they’ll see.
No Automatic Replies option? Use a rule (classic Outlook)
If File shows no Automatic Replies button, you are most likely using a Gmail, Yahoo, iCloud or other POP or IMAP account. To check, select File > Account Settings > Account Settings and look at the Type column. Microsoft Exchange accounts have the button; IMAP and POP3 accounts don’t.
The best fix is usually to turn on the reply in the email service itself, because it works when your PC is off. For Gmail, follow how to set an out of office reply in Gmail; Yahoo Mail has a similar vacation response in its own settings.
If you’d rather do it in classic Outlook, Microsoft’s workaround is a rule that answers with a saved message. Important: a rule only runs while classic Outlook is open on your computer and connected to the internet. If the PC sleeps or Outlook is closed, nobody gets a reply.
Step 1: Save your reply as a template
- Select New Email. Leave the To line empty, and type a subject such as Out of office until November 3 and your message.
- Select File > Save As.
- In Save as type, choose Outlook Template (*.oft). Outlook switches to its Templates folder. Give the file a name and select Save, then close the message without sending it.
Step 2: Create the rule
- Select File > Manage Rules & Alerts, and on the E-mail Rules tab select New Rule.
- Under Start from a blank rule, select Apply rule on messages I receive, then Next.
- To answer everyone, don’t check any conditions. Select Next, then Yes when Outlook asks whether the rule should apply to every message you receive.
- Check reply using a specific template. In the lower box, select the underlined a specific template link.
- In Look In, choose User Templates in File System, select your template, and select Open, then Next.
- On the exceptions page, check except if it is an automatic reply so your rule doesn’t answer other people’s out-of-office messages. Select Next.
- Name the rule, for example Away until Nov 3. Leave Turn on this rule checked if you are leaving now, or clear it to turn it on later. Select Finish.
Outlook warns that the rule only runs when you check email in Outlook, which is expected. When you return, open File > Manage Rules & Alerts and clear the check box next to the rule, or delete it.
New Outlook for Windows has no equivalent for these accounts, so use your email provider’s vacation reply.
Set it from your phone or from Teams
Because the setting lives in your mailbox, you can turn it on from wherever is handy:
- Outlook app for iPhone or Android: Open Settings, tap your account, tap Automatic Replies, and turn the switch on. Microsoft says you can set a time period, block or clear your calendar, reply to everyone or only your organization, and write different messages for each, then tap Save. It works for Microsoft 365, Exchange and Outlook.com accounts.
- Microsoft Teams (work or school): Select your profile picture, choose Set status message, then Schedule out of office. Microsoft says the dates and message you schedule in Teams turn on automatic replies in Outlook, and changes made in Outlook show up in Teams.
How to turn automatic replies off
If you set an end time, you don’t have to do anything; the replies stop on their own. To stop them early, or if you didn’t set dates:
- Classic Outlook: Select Turn off on the yellow Automatic Replies bar under the ribbon. You can also go to File > Automatic Replies, select Do not send automatic replies, and select OK.
- New Outlook: Go to View > View settings > Accounts > Automatic replies, turn off the toggle, and select Save.
- Outlook on the web: Go to Settings > Account > Automatic replies, turn off the toggle, and select Save.
Your message text is kept for next time, but check the dates before you reuse it. Also remove any calendar block or reply rule you created.
What to write in your message
A useful automatic reply answers three questions: Are you away? When will you be back? Who can help in the meantime? Here is a sample inside message:
Hi, thanks for your message. I’m away from the office until Tuesday, November 3, and won’t be checking email. For anything urgent, please contact Sam Rivera at [email protected]. Jordan Lee
And a shorter outside message:
Thank you for your email. I’m out of the office and will reply after Tuesday, November 3. For urgent questions, please email [email protected].
- Give your return date, not just “next week.” People may read it days later.
- Name a backup contact only after they’ve agreed to cover for you.
- Keep the outside message general. Leave out travel plans, internal project names and personal phone numbers.
- Sign it yourself. Type your name and title into the reply box rather than relying on your email signature. If you need to update the signature you use for normal mail, see how to add a signature in Outlook.
- Set the end time to your first working hour back, such as 8:00 AM on your return day, so mail that arrives the night before still gets a reply.
Troubleshooting
I can’t find Automatic Replies
First confirm which Outlook you’re using with the table at the top. New Outlook has no File > Automatic Replies path, and Outlook on the web keeps it under Settings > Account. If it’s still missing, the account is probably POP or IMAP (Gmail, Yahoo, iCloud), which doesn’t support automatic replies. Use a rule in classic Outlook or the provider’s vacation reply.
The sender didn’t get a reply
- They already got one. Each sender gets one reply while replies are on. To test again, turn replies off and on, or test from a different address.
- The message went to Junk. Microsoft says no automatic reply is sent for mail marked as spam.
- Your mailbox forwards all mail. Microsoft lists mailbox-level forwarding as a reason replies aren’t generated. Check the forwarding settings in Outlook on the web.
- The sender is outside your company. Check the outside reply settings. Your IT administrator can also block replies to outside domains.
- The time period hasn’t started or has ended. Check the dates and times.
- You’re using a rule. Rules need classic Outlook running on your PC.
Replies started or stopped at the wrong time
The start and end times use the time zone set for your mailbox and Outlook. If you work in one time zone and travel to another, check Outlook’s time zone, and your PC’s time zone with how to change the time zone in Windows 10.
Classic Outlook says the server is unavailable
The Automatic Replies dialog reads its settings from your mail server. If Outlook is offline or your sign-in has expired, it can’t open them. Reconnect to the internet, sign in again if prompted, and try again, or set the reply in Outlook on the web.
Replies keep going out after I turned them off
Look for a leftover reply rule under File > Manage Rules & Alerts, or a rule added through the Rules button in the Automatic Replies dialog. Also check Teams and the Outlook phone app, since they share the same setting. If nothing turns up, ask your IT administrator; admins can set automatic replies for you.
FAQ
Do automatic replies work when my computer is off?
Yes, for Microsoft 365, Exchange and Outlook.com accounts. The reply is handled by the mail server. Only the classic Outlook rule method needs your PC on and Outlook open.
Will the same person get my reply every time they email me?
No. Each sender gets one reply while automatic replies are on. The list resets when you turn replies off and on or change the settings.
Can I schedule automatic replies in advance?
Yes. Set a start time in the future with Send replies only during a time period (or Only send during this time range in classic Outlook) and save. The replies start and stop on their own.
Can I set automatic replies for a shared mailbox?
Usually, if you have full access to it. In classic Outlook, choose the shared mailbox in the account list on the File > Info page if it appears there, then select Automatic Replies. If it isn’t available to you, ask your IT administrator, who can set it for you.
Is “out of office” different from “automatic replies”?
No. Older Outlook versions called the feature Out of Office Assistant. Microsoft now calls it Automatic Replies, and classic Outlook’s File page still labels it Automatic Replies (Out of Office).
Can I use Outlook for Mac?
Yes. In Outlook for Mac, Microsoft’s path is Tools > Automatic Replies. The steps in this guide cover the Windows and web versions.
Next, before you leave, send yourself a test from a personal address to see exactly what senders will receive and confirm the dates in the reply are right. For Microsoft’s own walkthrough, see its automatic replies guide for Outlook on the web.

Matt Jacobs has been working as an IT consultant for small businesses since receiving his Master’s degree in 2003. While he still does some consulting work, his primary focus now is on creating technology support content for SupportYourTech.com.
His work can be found on many websites and focuses on topics such as Microsoft Office, Apple devices, Android devices, Photoshop, and more.