Windows 11 doesn’t have a box where you type any resolution you like. To use a resolution that isn’t in the usual list, select Start > Settings > System > Display > Advanced display > Display adapter properties, select List All Modes, and pick one of the modes your display supports. To create a completely new resolution, use the control app from your graphics card’s maker, which usually has a Custom resolution or Create option.
Applies to: Windows 11. Checked against Microsoft Support on September 30, 2026.
Before you start, check whether you need a different resolution at all. If text and apps are just too small or too large, change Scale instead. It keeps your screen sharp. Changing the resolution away from the one marked (Recommended) usually makes the picture blurrier. If the screen in question is an external display, follow our steps to adjust the screen size on a second monitor in Windows 11 first.
Method 1: Choose a resolution in Display settings
This is the quickest way, and it’s all most people need.
- Select Start > Settings > System > Display.
- If you have more than one display, select the one you want to change at the top.
- Next to Display resolution, open the list and choose a resolution.
- Select Keep changes. If you don’t, Windows switches back after about 15 seconds, which protects you if the screen goes black.
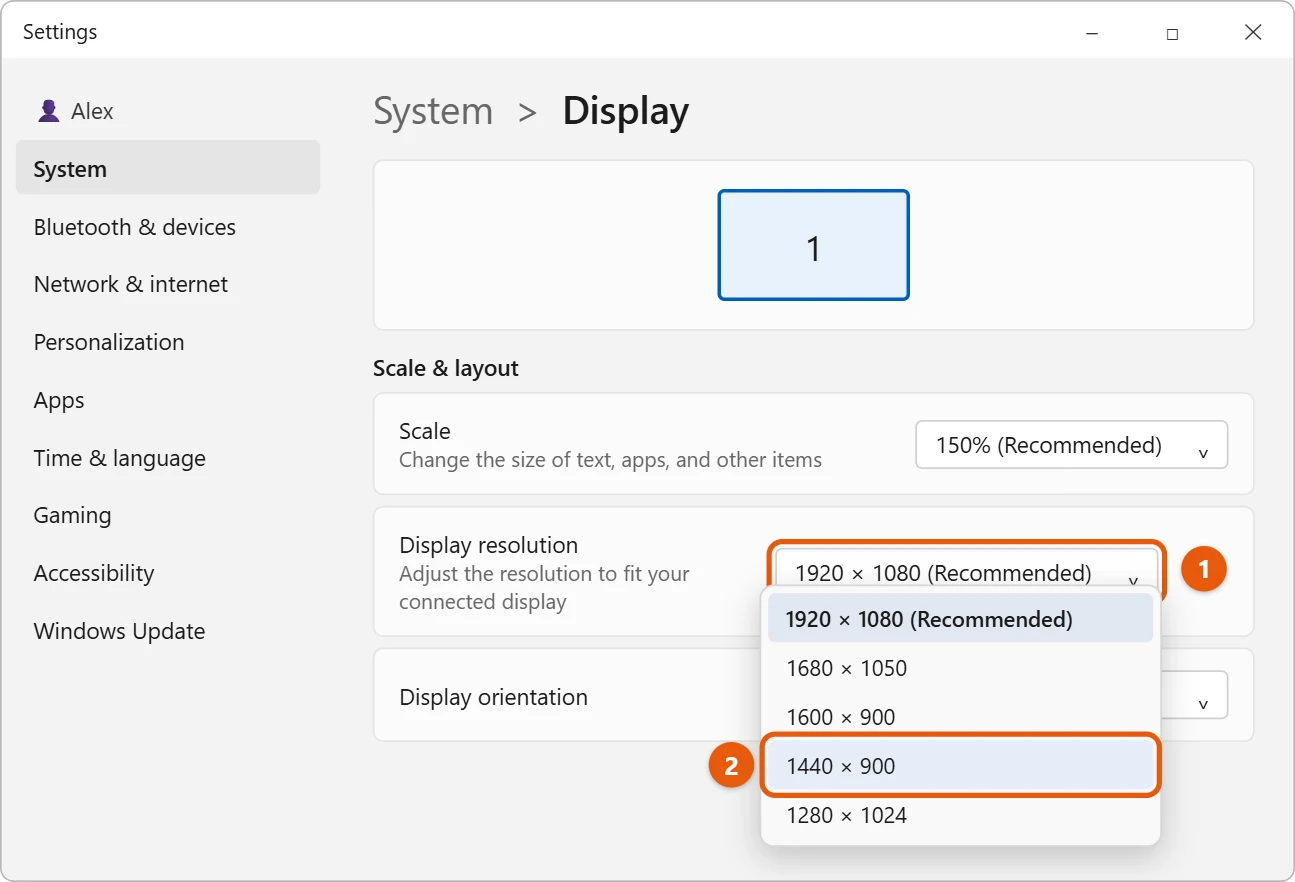
The resolution marked (Recommended) is your display’s native resolution. Microsoft notes that lower resolutions work, but text won’t look as sharp, and the picture may be smaller, stretched or edged with black bars.
Method 2: Use List All Modes
Windows sometimes hides modes from the main list, such as a different refresh rate at the same resolution, or resolutions it doesn’t recommend. You can see every mode your display and graphics driver report here.
- Select Start > Settings > System > Display > Advanced display.
- Choose your display at the top, and then select Display adapter properties for Display 1 (the number matches your display).
- On the Adapter tab, select List All Modes.
- Choose a mode, select OK, and then select Apply.

If the new mode doesn’t look right, don’t confirm it. Windows asks whether to keep the change and switches back on its own if you don’t answer. Every mode in this list is one your display and driver say they can show.
Method 3: Create a custom resolution in your graphics app
To make a resolution that isn’t in any list, such as an unusual size for a game or an old app, use the control app that comes with your graphics card or laptop’s graphics chip. Each maker’s app looks different, but the steps are similar.
- Open the graphics control app. Search for it in the Start menu, or right-click the desktop and select Show more options to see its entry.
- Go to the Display section and find Resolution.
- Look for Custom, Customize or Create, and enter the width and height in pixels. Leave the refresh rate at what your display normally uses, such as 60 Hz.
- Select Test if the app offers it. If the screen stays black, wait for it to switch back.
- Save the resolution. It then appears in the list in Display settings too.
If you can’t find the app, check the support page for your PC or graphics card maker and download it from there. Some laptop screens don’t allow custom resolutions at all, even when an external monitor on the same PC does.
Note: On a work or school PC, your organization may block graphics settings or the control app. If so, ask your IT administrator.
What resolution should you use?
- For everyday use: the (Recommended) resolution. Use Scale to make things bigger or smaller.
- For an older game or app: set the resolution inside the game first. Most games have their own resolution setting, which is safer than changing Windows.
- For a projector or TV: choose a resolution the projector or TV lists as supported, often 1920 × 1080. See how to cast Windows 11 to a TV.
- For a smooth picture: match the refresh rate your display supports. See how to change the refresh rate in Windows 11.
If something goes wrong
- The screen went black. Don’t press anything. Windows switches back to your previous resolution after about 15 seconds. If you already kept the change, press Windows logo key + Ctrl + Shift + B to restart the graphics driver, connect a different display to change the resolution back, or start the PC in safe mode, which uses a basic resolution.
- The resolution you want isn’t listed. Update your graphics driver through Settings > Windows Update, and check that you’re using the display’s best connection (for example, DisplayPort or a newer HDMI cable). Older cables can limit the resolutions available.
- The picture is stretched or has black bars. The resolution doesn’t match the shape of your screen. Go back to the recommended resolution, or choose one with the same shape, such as 1600 × 900 on a 1920 × 1080 screen.
- A window is off the screen after changing resolution. See how to move a window that’s off screen in Windows 11.
Frequently asked questions
Can a custom resolution damage my monitor?
Modern monitors show a warning or a blank screen when they get a signal they can’t handle, and Windows switches back automatically. Avoid pushing the refresh rate above what your display supports.
Why is the recommended resolution the sharpest?
It matches the number of pixels your screen actually has, so each pixel of the picture lines up with one pixel on the screen.
How do I check my screen’s color depth too?
Advanced display also shows your display’s bit depth. See how to enable 10-bit color in Windows 11.
Next steps
Microsoft covers resolution and scale in Change your screen resolution and layout in Windows.

Matt Jacobs has been working as an IT consultant for small businesses since receiving his Master’s degree in 2003. While he still does some consulting work, his primary focus now is on creating technology support content for SupportYourTech.com.
His work can be found on many websites and focuses on topics such as Microsoft Office, Apple devices, Android devices, Photoshop, and more.