To add line numbers in Word, open the Layout tab and select Line Numbers in the Page Setup group. Choose Continuous to number every line from start to finish, or Restart Each Page or Restart Each Section to start again at 1. The numbers appear in the left margin when you’re in Print Layout view.
Applies to: Word for Microsoft 365 (Windows, Mac and the web), Word 2024, Word 2021, Word 2019 and Word 2016. The steps match Microsoft’s article on line numbers.
What Word numbers (and what it skips)
Line numbers are a page-layout setting, not text. Word counts the lines on each page and prints a number in the left margin beside each one. You can’t select, edit or delete a single number, and the numbers don’t change your word count or move your text.
Before you turn them on, it helps to know how Word decides what counts as a line:
- Body text is numbered. Every line of a normal paragraph gets a number, including headings, short last lines and empty paragraphs you created by pressing Enter.
- Some areas are skipped. Text in headers, footers, footnotes, endnotes, tables and text boxes isn’t numbered.
- A table counts as one line. No matter how many rows it has, the whole table takes a single number.
- A picture or chart counts as one line when it sits in line with your text.
- Text boxes depend on wrapping. An inline text box counts as one line. If your text wraps around a text box, the lines of text beside it are counted, but the lines inside the box are not.
Because of those rules, line numbers work best in documents that are mostly paragraphs: contracts, scripts, transcripts, manuscripts and drafts you send out for review. If a document is built mainly from tables, the numbering will feel sparse.
Add line numbers to the whole document
These steps are for Word for Microsoft 365, Word 2024, 2021, 2019 and 2016 on Windows. In Word 2010 and Word 2013 the same button is on the Page Layout tab instead of Layout.
- Open your document and select the View tab. Make sure Print Layout is selected. Line numbers only show in Print Layout view, so if you’re in Read Mode, Web Layout or Draft, you won’t see them even after you turn them on.
- If your document has more than one section (for example, it uses section breaks for a landscape page or different headers), press Ctrl+A to select the whole document first. Otherwise Word applies the setting only to the section your cursor is in. If you’re not sure, selecting everything does no harm.
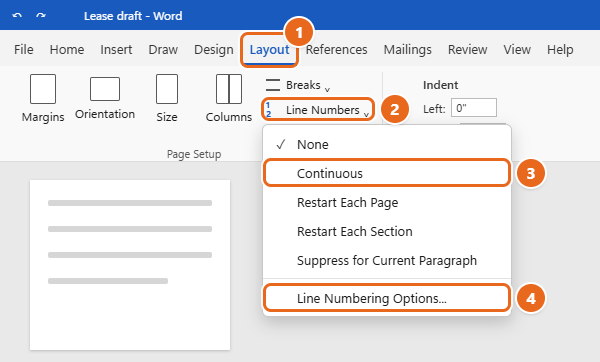
- Select the Layout tab on the ribbon.
- In the Page Setup group, select Line Numbers. A menu opens.
- Choose how the numbers should run:
- Continuous numbers every line from the start of the document to the end (1, 2, 3 … 412).
- Restart Each Page starts again at 1 at the top of every page.
- Restart Each Section starts again at 1 after every section break.
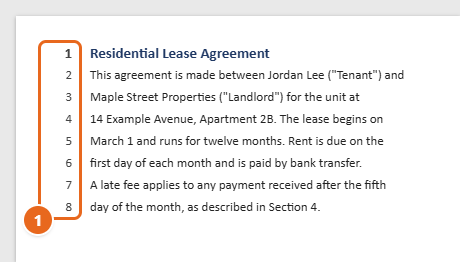
The numbers appear in the left margin right away. Click anywhere in the document to close the menu if it’s still open.
Which numbering option should you pick?
| Option | How references look | Good for |
|---|---|---|
| Continuous | “See line 254” | Short documents, transcripts and drafts where one number is enough to find any line |
| Restart Each Page | “Page 7, line 12” | Long contracts, court filings and printed copies that people mark up by hand |
| Restart Each Section | “Section 3, line 40” | Scripts, chapters or reports split into sections with section breaks |
If several people will discuss the same draft, Restart Each Page is usually the safest choice. A reviewer can find “page 7, line 12” quickly even after earlier pages change, while a continuous number like 254 shifts as soon as someone adds a paragraph near the top.
Change the start number, spacing or interval
The Line Numbering Options dialog lets you start at a number other than 1, move the numbers closer to or farther from the text, or show a number only on every fifth or tenth line.
- Click in the document. If it has several sections and you want the change everywhere, press Ctrl+A first.
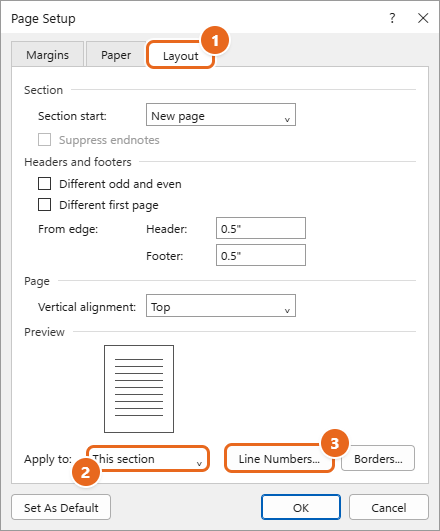
- Select Layout > Line Numbers > Line Numbering Options. The Page Setup dialog opens on its Layout tab.
- Look at the Apply to list near the bottom. Whole document changes every section. This section or Selected sections changes only part of the file.
- Select the Line Numbers button next to Apply to. The Line Numbers dialog opens.
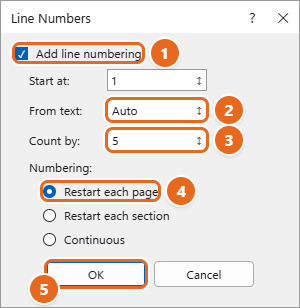
- Make sure Add line numbering is checked. The other boxes are unavailable until it is.
- Change any of these settings:
- Start at: the first number Word uses. For example, enter 101 if this document continues a transcript that ended at line 100.
- From text: the gap between the numbers and the text. Auto works for most documents. Enter a measurement such as 0.3″ if the numbers sit too close to your text.
- Count by: how often a number is shown. Enter 5 to show 5, 10, 15 and so on. Word still counts every line, it just doesn’t print a number on the others.
- Numbering: choose Restart each page, Restart each section or Continuous. These are the same choices as on the Line Numbers menu.
- Select OK to close the Line Numbers dialog.
- Select OK again to close Page Setup. Your numbers update immediately.
Tip: Counting by 5 or 10 keeps a busy page cleaner. Readers can still find line 23 by counting three lines down from 20.
Number only part of a document
Word applies line numbers per section, so to number just one part of a file, that part needs to be its own section. A common example is a report where only the appendix with interview transcripts should be numbered.
- Select Home > Show/Hide ¶ (or press Ctrl+Shift+8) so you can see existing section breaks. They show as a dotted line labeled Section Break.
- If the part you want isn’t already its own section, click just before it and select Layout > Breaks > Continuous. Then click just after it and add another continuous break. A continuous break starts a new section without starting a new page. The other break types are explained in adding a section break in Word.
- Click anywhere inside the section you want to number.
- Select Layout > Line Numbers > Line Numbering Options.
- In Apply to, choose This section. If you selected text across several sections, the choice is called Selected sections.
- Select Line Numbers, check Add line numbering, choose your settings and select OK twice.
Only that section shows numbers. The sections before and after it stay unnumbered.
You can also select some text first and choose Selected text in the Apply to list. Word then adds the section breaks around your selection for you. That’s quicker, but it can leave extra breaks you didn’t plan for, so turn on Show/Hide ¶ afterward to check where they landed.
Skip headings or individual paragraphs
Sometimes you want numbers on the text but not on a title, a signature block or a block quote. You can switch numbering off for one paragraph at a time. The skipped paragraph gets no number, and the count continues on the next numbered line without a gap.
Suppress one paragraph from the ribbon
- Click in the paragraph you want to skip, or select several paragraphs in a row.
- Select Layout > Line Numbers > Suppress for Current Paragraph.
To bring the numbers back, click in the same paragraph and select Suppress for Current Paragraph again.
Skip every heading at once with a style
If you want no numbers on any heading, change the heading style instead of each heading.
- On the Home tab, right-click the style you use for headings in the Styles gallery, such as Heading 1, and select Modify.
- Select Format > Paragraph in the bottom-left corner.
- Open the Line and Page Breaks tab and check Suppress line numbers under Formatting exceptions.
- Select OK, then OK again. Every paragraph that uses that style is now skipped.
The same Suppress line numbers check box is available for any single paragraph through Home > the Paragraph dialog box launcher > Line and Page Breaks.
Word for Mac and Word for the web
Word for Mac
- Select View > Print Layout.
- Select the Layout tab, then Line Numbers.
- Choose Continuous, Restart Each Page, Restart Each Section or None.
- For the start number, spacing and interval, choose Line Numbering Options. On a Mac this opens the Document dialog instead of Page Setup. Select its Layout tab, then the Line Numbers button, and use the same settings described above.
Word for the web
Word in a browser can add line numbers too. The feature arrived in 2024, and Line Numbering Options followed so the web version matches the desktop app more closely (the Microsoft 365 Insider blog has the announcement). Some older guides still claim you need the desktop app, which is no longer true.
- Open the document in Word for the web and make sure you’re in Editing mode.
- Select Layout > Line Numbers.
- Pick a numbering option from the menu, or select Line Numbering Options to set the start number, the distance from the text, the Count by interval and how numbering restarts.
Line numbers you add in the browser are saved with the file, so they also appear when you open it in the desktop app, and the other way around.
Change the font or size of line numbers
Line numbers use a built-in style called Line Number. Word hides it from the normal Styles list, so you have to show it before you can change it. Changing the style updates every line number in the document at once.
- On the Home tab, select the small arrow in the bottom-right corner of the Styles group (or press Alt+Ctrl+Shift+S). The Styles pane opens.
- Select Options at the bottom of the pane.
- In Select styles to show, choose All styles, then select OK.
- Scroll the Styles pane to Line Number. Point to it, select the arrow that appears and choose Modify.
- Pick a font, size or color. A smaller gray number, such as 9 pt gray, keeps the margin from competing with your text.
- Select OK. Every line number in the document changes.
Formatting the numbers directly doesn’t work because you can’t select them. The style is the only way to change how they look.
How to remove line numbers
- If your document has several sections, press Ctrl+A to select everything. Otherwise only the current section loses its numbers.
- Select Layout > Line Numbers > None.
The numbers disappear at once. Nothing in your text changes, so you can turn them back on later with the same menu. If you had customized the settings, check Line Numbering Options after you turn them back on.
To remove numbers from one paragraph only, use Suppress for Current Paragraph as described in Skip headings or individual paragraphs.
If the numbers in your margin don’t go away with None, they may not be line numbers at all. Numbers typed into the text or created by a numbered list are removed differently, as covered in fixing numbering problems in Word.
Troubleshooting
I turned on line numbers but can’t see them
Select View > Print Layout. Line numbers don’t appear in Read Mode, Web Layout, Outline or Draft view. Also check that you didn’t apply them to a different section than the one you’re looking at.
Only part of the document is numbered
Your document has more than one section and the setting went to only one of them. Press Ctrl+A, then choose your option from Layout > Line Numbers again.
Numbering restarts where I don’t expect it
If you chose Restart Each Section, every section break starts the count again, including breaks you might have forgotten about, such as one before a landscape page. Turn on Show/Hide ¶ to find them, or switch to Continuous.
Some lines have no number
Check whether the paragraph was suppressed with Suppress for Current Paragraph, whether its style has Suppress line numbers turned on, or whether the text is inside a table, text box, header or footnote. Those areas are never numbered.
Line numbers show only the last digits
In a long document with more than a thousand lines, continuous numbering and narrow margins can cut off the first digit, so line 1,024 shows as 024. The fix is to widen the left margin or switch to Restart Each Page or Restart Each Section.
The numbers are too close to the text
Open Line Numbering Options > Line Numbers and set From text to a specific measurement instead of Auto. Increase the left margin if the numbers then run off the page.
The Line Numbers button is grayed out
The document is probably not editable. If you see a yellow Protected View bar, select Enable Editing. If you’re in Read Mode, switch to Print Layout. If the document is restricted so you can’t change formatting, ask the owner to remove the restriction.
Line numbers, page numbers and numbered lists
| Feature | Where it appears | Where to find it |
|---|---|---|
| Line numbers | Left margin, one per line | Layout > Line Numbers |
| Page numbers | Header or footer, one per page | Insert > Page Number |
| Numbered list | In the text, one per paragraph | Home > Numbering |
Many reviewers want both line and page numbers so they can cite “page 4, line 18”. For the page half of that, numbering pages in Word takes a minute.
FAQ
Do line numbers print?
Yes. Line numbers are part of the page layout, so they print with the document and appear in the print preview under File > Print. They’re also kept when you save the document as a PDF from Word.
Are line numbers copied when I copy text?
No. The numbers aren’t part of the text, so copying and pasting a paragraph brings only the words. If you need the numbers in the pasted copy, save or print the document as a PDF instead.
Can I number only every fifth or tenth line?
Yes. Open Layout > Line Numbers > Line Numbering Options > Line Numbers and enter 5 or 10 in Count by.
Can I start line numbering at a number other than 1?
Yes. Enter the first number you want in the Start at box of the Line Numbers dialog. This is useful when one document continues another.
Why does Word number the blank lines between my paragraphs?
Each time you press Enter twice to leave a gap, you create an empty paragraph, and Word numbers it like any other line. To avoid that, remove the empty paragraphs and add Spacing After on the Layout tab instead. The space between paragraphs isn’t counted as a line.
Do line numbers work with Track Changes and comments?
Yes. Line numbers make comments and edits easier to talk about in a meeting or email (“see the change on page 3, line 22”). If you’re collecting feedback, Track Changes in Word pairs well with line numbering.
Will other people see the line numbers I add?
Yes. The setting is saved in the document, so anyone who opens it in Word sees the same numbers, whether they use Windows, Mac or Word for the web. On the desktop apps they need to be in Print Layout view.
Next step
Turn on Layout > Line Numbers > Restart Each Page before you send your next draft for review, and ask reviewers to cite page and line numbers in their comments. It saves a lot of “which paragraph did you mean?” back-and-forth.

Matt Jacobs has been working as an IT consultant for small businesses since receiving his Master’s degree in 2003. While he still does some consulting work, his primary focus now is on creating technology support content for SupportYourTech.com.
His work can be found on many websites and focuses on topics such as Microsoft Office, Apple devices, Android devices, Photoshop, and more.