To change your RAM speed, first check the current speed in Task Manager > Performance > Memory. Then open your PC’s BIOS or UEFI and turn on the memory’s rated profile (often called XMP, EXPO or DOCP), or set the memory speed by hand. Save and restart, then check Task Manager again.
Applies to: Desktop PCs with Windows 10. Most laptops don’t let you change RAM speed. Windows 10 reached end of support on October 14, 2025, and only PCs enrolled in Extended Security Updates still get security fixes, through October 12, 2027.
Check the current speed
- Press Ctrl + Shift + Esc to open Task Manager. Select More details if you see a small window.
- Select the Performance tab, then Memory.
- Look at Speed at the bottom right.
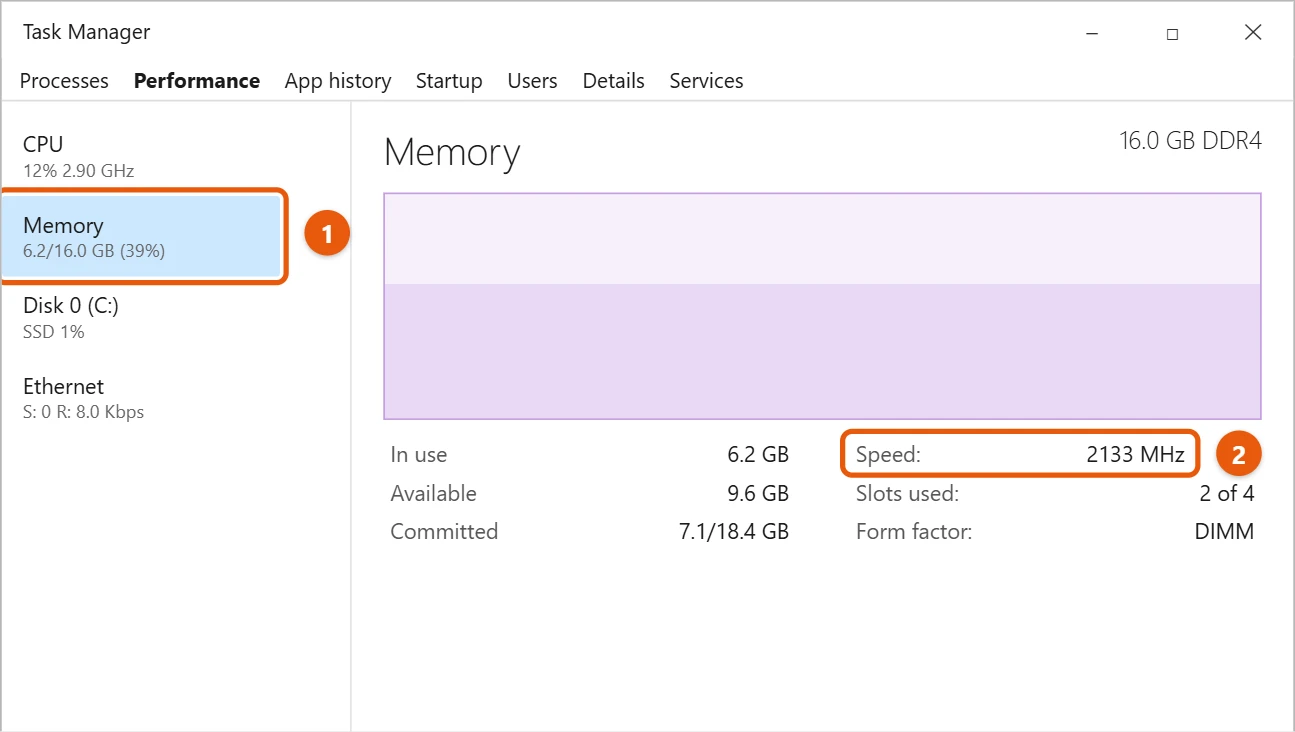
Compare it with the speed printed on the memory’s box or label. Checking RAM in Windows 10 shows other places to find it.
Change the speed in BIOS or UEFI
- Open BIOS or UEFI (entering BIOS or UEFI in Windows 10 shows how).
- Look for a memory setting, often under Advanced, Overclocking or Memory.
- Turn on the memory profile (XMP, EXPO or DOCP, depending on the PC), and choose the profile that matches your memory’s rated speed.
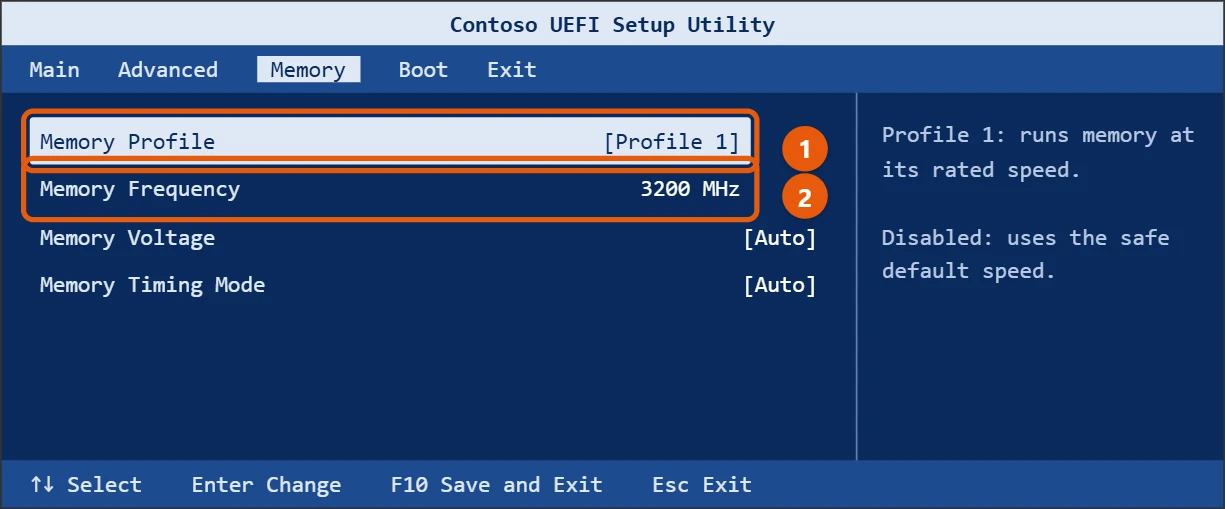
- Save and exit. The PC restarts.
- Check the speed in Task Manager again. To confirm the timings too, check your RAM timings (those steps are written for Windows 11).
Set the speed by hand
If there’s no memory profile, look for a setting such as DRAM Frequency or Memory Frequency. Choose the speed printed on your memory’s label or listed in its specs, such as 3200. Leave timings and voltage on Auto unless you know the exact values your memory is rated for.
If the PC won’t start or crashes
- Go back into BIOS or UEFI and turn the profile off, or choose Load Setup Defaults.
- Test the memory for errors with these RAM test steps for Windows 10.
- Wait out a slow first start. After you change memory settings, many PCs spend a minute or more testing the memory and may restart a few times before Windows loads. Don’t turn the PC off during this.
- If the screen stays black, reset the firmware by clearing the CMOS, as shown in your motherboard manual.
Only use the speed your memory is rated for. Setting it higher can make the PC unstable.
Frequently asked questions
Why is my RAM slower than the speed on the box?
Many PCs start memory at a safe default speed until you turn on the profile in BIOS or UEFI.
Will faster RAM speed up everything?
It helps a little, mostly in games and heavy apps. More memory helps more if you run low. To make the most of what you have, free up RAM in Windows 10.
Why does one tool show half the speed?
Memory sold as DDR4-3200 transfers data 3,200 million times a second but runs at a 1,600 MHz clock, because it sends data twice per cycle. Task Manager shows the 3,200 figure, while some tools show 1,600. Both are correct.
What if my memory sticks have different speeds?
All the memory runs at the speed of the slowest stick. For the best results, use matching sticks from the same kit.
Can my processor limit the RAM speed?
Yes. Each processor supports memory up to a certain speed. Faster memory may need a profile like XMP to go beyond that, and some processors can’t run it reliably.
Is turning on XMP or EXPO safe?
Generally, yes. Memory makers test these profiles, and they only use settings the memory is rated for. A few PCs aren’t stable with them, so check for crashes after you turn one on.
Can I change RAM speed on a laptop?
Usually not. Most laptops lock memory settings in the firmware, and the memory runs at the speed the maker chose. Gaming laptops sometimes offer a profile in the maker’s app.
Will a Windows update change my RAM speed?
No. The speed is set in the BIOS or UEFI, not in Windows. A BIOS update or a reset to defaults can turn the profile off, though, so check again after one.
To put every speed back to normal, turn off overclocking on your Windows 10 PC.
General speed advice is in Tips to improve PC performance in Windows.

Matt Jacobs has been working as an IT consultant for small businesses since receiving his Master’s degree in 2003. While he still does some consulting work, his primary focus now is on creating technology support content for SupportYourTech.com.
His work can be found on many websites and focuses on topics such as Microsoft Office, Apple devices, Android devices, Photoshop, and more.