To use Windows Sandbox in Windows 11, first turn it on: open Settings > System > Advanced > Virtual Workspaces and switch on Windows Sandbox, or check Windows Sandbox in Turn Windows features on or off, then restart. After that, open Windows Sandbox from the Start menu, copy the file or installer you want to test into the sandbox window, and run it there. When you close the window, everything inside the sandbox is deleted.
Applies to: Windows 11 Pro, Enterprise and Education (including version 24H2 and 25H2). Windows Sandbox is not available on Windows 11 Home. Checked against Microsoft Learn on October 12, 2026.
In this guide
- What Windows Sandbox is (and what it isn’t)
- Check that your PC can run it
- Method 1: Turn on Windows Sandbox in Settings
- Method 2: Use Turn Windows features on or off
- Method 3: Turn it on with PowerShell or Command Prompt
- How to use Windows Sandbox
- Change sandbox settings while it runs (24H2 and later)
- Make a safer sandbox with a .wsb file
- How to turn Windows Sandbox off
- Troubleshooting
- FAQ
What Windows Sandbox is (and what it isn’t)
Windows Sandbox is a small, temporary copy of Windows that opens in a window on your desktop. It runs on Microsoft’s Hyper-V hypervisor, so programs inside it are kept apart from your real Windows installation, your files and your installed apps.
A few things make it different from a normal virtual machine:
- It starts clean every time. Each launch gives you a fresh Windows desktop with nothing installed.
- Nothing is kept. Closing the window deletes every app, file and setting you created inside it. There is no way to save the sandbox’s state.
- It uses your own version of Windows. The sandbox always runs the same Windows build as your PC. You can’t use it to try a different Windows version or Linux.
- There’s nothing to buy or activate. It’s built into Windows 11 Pro, Enterprise and Education, although on version 24H2 and later it may download an update from the Microsoft Store the first time you open it.
- Only one sandbox at a time. Microsoft states that you can’t open several sandbox windows at once.
Good uses include trying a program from a site you don’t know, opening an email attachment you weren’t expecting, testing a browser extension, or checking what a script or settings change does before you run it on your real PC.
Note: Windows Sandbox lowers the risk of testing unknown software, but it is not a full malware lab. By default it has internet access through your network, and anything you copy back out of it to your PC is no longer protected. The .wsb file section shows how to cut off the network for riskier files.
| Tool | Keeps changes? | Best for |
|---|---|---|
| Windows Sandbox | No, wiped when closed | Quick, one-time tests of apps, files and websites |
| Hyper-V virtual machine | Yes | Long-term test setups, other operating systems, saved checkpoints |
| Your normal Windows desktop | Yes | Software you already trust |
If you need something that keeps its files between sessions, see how to create a virtual machine in Windows 11 instead.
Check that your PC can run it
Microsoft lists these requirements for Windows Sandbox:
- Edition: Windows 11 Pro, Enterprise, Education or Pro Education/SE. Windows 11 Home isn’t supported.
- Processor: a 64-bit (AMD64) processor, or an Arm64 processor on Windows 11 version 22H2 or later, with at least two cores (four cores with hyper-threading recommended).
- Memory: at least 4 GB of RAM, with 8 GB recommended.
- Storage: at least 1 GB of free disk space, preferably on an SSD.
- Virtualization: turned on in your PC’s BIOS or UEFI firmware.
Check your Windows edition
- Open Settings > System > About.
- Under Windows specifications, look at Edition. If it says Windows 11 Home, you’ll need to upgrade from Windows 11 Home to Pro before you can use Windows Sandbox.
- While you’re on this page, note the Version (for example, 24H2 or 25H2). Some options in this guide depend on it.
Check that virtualization is on
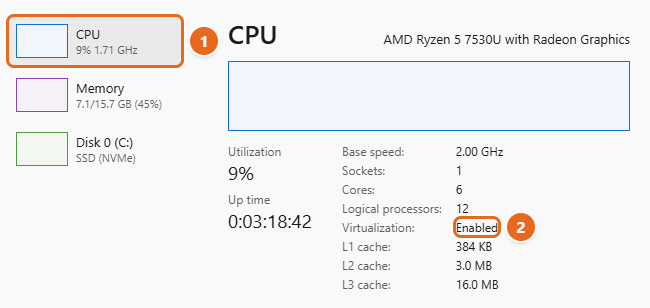
- Press Ctrl + Shift + Esc to open Task Manager.
- Select Performance in the left menu, then select CPU.
- Look at Virtualization in the details under the graph. If it says Enabled, you’re ready. If it says Disabled, follow the steps to enable virtualization in Windows 11 in your firmware settings, then come back.
If you want to run Windows Sandbox inside a virtual machine rather than on a physical PC, the host must have nested virtualization turned on. Microsoft’s install guide gives the PowerShell commands for a Hyper-V host.
Method 1: Turn on Windows Sandbox in Settings
Microsoft added a Virtual Workspaces page to Settings in the December 2025 update for Windows 11 version 24H2 and 25H2 (KB5070311 and later updates). If your PC is up to date, this is the simplest way to turn on the feature. If you don’t see the page, use Method 2.
- Select Start > Settings.
- Select System in the left menu, then select Advanced.
- Select Virtual Workspaces. You’ll see a list of virtualization features, such as Containers, Virtual Machine Platform and the Hyper-V components, each with an On/Off switch.
- Turn on the Windows Sandbox switch. Windows shows that the feature is being installed.
- Restart your PC when Windows asks you to. Windows Sandbox won’t open until you do.
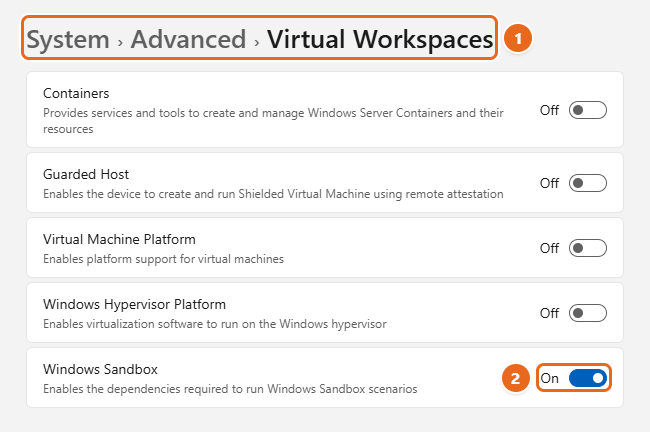
You don’t need to turn on the Hyper-V switches on the same page just to use Windows Sandbox.
Method 2: Use Turn Windows features on or off
This older dialog works on every Windows 11 version, including PCs that don’t have the Virtual Workspaces page yet.
- Select Start, type Turn Windows features on or off, and open the result. You can also press Windows + R, type
optionalfeaturesand press Enter. - In the Windows Features window, scroll down the alphabetical list to Windows Sandbox.
- Check the box next to Windows Sandbox, then select OK.
- Wait while Windows installs the files, then select Restart now.
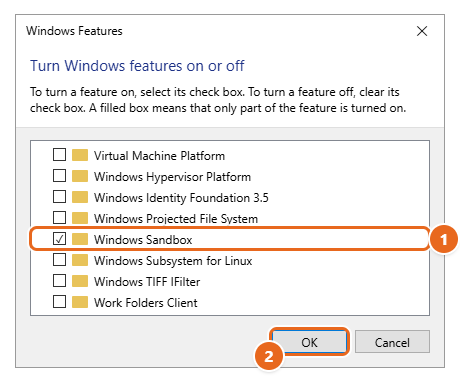
If Windows Sandbox is missing from the list or can’t be selected, Microsoft says your PC doesn’t meet the requirements. Recheck your edition and the virtualization setting above.
Method 3: Turn it on with PowerShell or Command Prompt
Commands are handy if you set up several PCs or prefer typing to clicking. Both commands do the same job as Methods 1 and 2.
- Select Start, type PowerShell (or Command Prompt), right-click the result and choose Run as administrator. Select Yes in the User Account Control prompt.
- In PowerShell, run:
Enable-WindowsOptionalFeature -FeatureName "Containers-DisposableClientVM" -All -Online
In Command Prompt, run:dism /online /Enable-Feature /FeatureName:Containers-DisposableClientVM /All - When the command finishes, restart your PC. PowerShell may ask you to type Y to restart right away.
Containers-DisposableClientVM is the internal name Windows uses for Windows Sandbox.
How to use Windows Sandbox
As an example, say you downloaded a free tool called photo-resizer-setup.exe from a site you haven’t used before, and you want to see what it installs before trusting it.
- Open Windows Sandbox. Select Start, type Windows Sandbox and open it. A window opens showing a clean Windows desktop. The first launch can take a little longer than later ones.
- Let it update, if asked. On Windows 11 version 24H2 and later, the first time you open it, Windows Sandbox may show a progress dialog while it upgrades itself to the newer app from the Microsoft Store. Microsoft says this usually takes 30 seconds to 2 minutes and needs an internet connection.
- Copy the file in. On your normal desktop, open File Explorer, find photo-resizer-setup.exe, select it and press Ctrl + C. Then click inside the sandbox window, right-click its desktop and choose Paste. Copying and pasting works because clipboard sharing is on by default. You can also download the file inside the sandbox with Microsoft Edge.
- Run it inside the sandbox. Double-click the file in the sandbox and follow the installer. Watch what it does: extra toolbars, unexpected programs, pop-ups or settings changes all stay inside the sandbox.
- Test the program. Use the app as you normally would. If it needs to restart Windows, go ahead: starting with Windows 11 version 22H2, data inside the sandbox survives a restart that you start from inside the sandbox.
- Copy out anything you want to keep. If you created a file you need, such as a converted photo, copy it back to your real PC before closing. Only do this with files you trust.
- Close the sandbox. Select the X in the top-right corner of the sandbox window. A message asks you to confirm that everything in the sandbox will be deleted. Select OK.
The next time you open Windows Sandbox, it starts fresh, with no trace of photo-resizer-setup.exe.
Keep these limits in mind while you test:
- Apps installed on your PC aren’t available inside the sandbox. Install what you need inside it each time.
- The Microsoft Store app isn’t available in the sandbox, so you can’t download Store apps there. Microsoft says you can still install an app from an .appx package.
- Starting with version 24H2, built-in Store apps such as Calculator, Photos, Notepad and Terminal aren’t available inside the sandbox. Microsoft says support is coming.
- By default, the sandbox can use up to 4 GB of memory.
Change sandbox settings while it runs (24H2 and later)
On Windows 11 version 24H2 and later, the updated Windows Sandbox app has a settings menu. Select the … icon in the top-right corner of the sandbox window to change these options while the sandbox is running:
- Clipboard sharing: turn copy and paste between your PC and the sandbox on or off.
- Audio and video input: let the sandbox use your microphone or webcam. Microsoft’s defaults are microphone on and webcam off.
- Folder sharing: share a folder from your PC with the sandbox.
Warning: a shared folder is a door between the sandbox and your real files. If you share a folder with write access, changes the sandbox makes to it stay on your PC after the sandbox closes. Share a nearly empty folder that contains only the file you are testing.
On older Windows 11 versions, this menu isn’t available, and you change these options with a .wsb file instead.
Make a safer sandbox with a .wsb file
A .wsb file is a small text file of settings. When you double-click it, Windows Sandbox opens with those settings instead of the defaults. This is the best way to open a file you are genuinely suspicious of, because you can turn off the network and share the file as read-only.
By default, Microsoft lists these settings: networking on, clipboard sharing on, microphone on, webcam off, printer sharing off, and the virtual GPU on (except on Arm64 PCs). Networking being on matters most, because a program in the sandbox can reach your local network.
To make a sandbox with no network and a read-only shared folder:
- Create a folder on your PC named C:\SandboxShare and put the file you want to test in it. The folder must already exist, or the sandbox won’t start.
- Open Notepad and paste in the following text:
<Configuration>
  <Networking>Disable</Networking>
  <ClipboardRedirection>Disable</ClipboardRedirection>
  <MemoryInMB>6144</MemoryInMB>
  <MappedFolders>
    <MappedFolder>
      <HostFolder>C:\SandboxShare</HostFolder>
      <SandboxFolder>C:\Users\WDAGUtilityAccount\Desktop\SandboxShare</SandboxFolder>
      <ReadOnly>true</ReadOnly>
    </MappedFolder>
  </MappedFolders>
</Configuration>- Select File > Save as. Set Save as type to All files, and type the name in quotation marks, such as “Offline test.wsb”, so Notepad doesn’t add .txt to the end. Save it on your desktop.
- Double-click Offline test.wsb. Windows Sandbox opens with no internet access, and your test file appears in a SandboxShare folder on the sandbox desktop.
Here’s what each line does:
| Setting | What it does |
|---|---|
Networking |
Disable cuts off the internet and your local network inside the sandbox. |
ClipboardRedirection |
Disable stops copy and paste between the sandbox and your PC. |
MemoryInMB |
Sets the memory the sandbox can use, in megabytes. If the number is too low to start, Windows raises it to the 2048 MB minimum. |
MappedFolders |
Shares a folder from your PC. ReadOnly set to true means the sandbox can read the files but can’t change them. |
Other options Microsoft documents include vGPU, AudioInput, VideoInput, PrinterRedirection, ProtectedClient (extra isolation that may limit copy and paste) and LogonCommand, which runs a program or script as soon as the sandbox starts. The full list is on Microsoft’s Use and configure Windows Sandbox page.
Tip: Don’t point SandboxFolder at the sandbox desktop itself. Microsoft notes that this causes an “Access is denied” error, while a new folder on the desktop, like the one above, works.
Command line option for advanced users
On Windows 11 version 24H2 and later, the updated app also includes a command line tool named wsb. For example, wsb start opens a sandbox and returns its ID, wsb list shows running sandboxes, and wsb stop --id followed by the ID closes one. Most people won’t need it, but it is useful for scripts.
How to turn Windows Sandbox off
Turning the feature off removes it from the Start menu. It doesn’t affect your files.
- Go to Settings > System > Advanced > Virtual Workspaces and turn off Windows Sandbox. Or, as Microsoft describes, go to Settings > System > Optional features, select More Windows features, clear Windows Sandbox and select OK. On older versions, Optional features is under Settings > Apps.
- Restart your PC when asked.
To turn it off with a command, run Disable-WindowsOptionalFeature -FeatureName "Containers-DisposableClientVM" -Online in PowerShell as administrator, then restart.
Troubleshooting
Windows Sandbox isn’t in the list, or the option is grayed out
This almost always means your PC doesn’t meet a requirement. Check that your edition isn’t Home, that Task Manager shows Virtualization: Enabled, and that you have at least 4 GB of RAM. On a work or school PC, your IT department can block the feature with Group Policy.
“No hypervisor was found. Please enable hypervisor support.”
Microsoft says Windows Sandbox works only with the Hyper-V hypervisor, not third-party ones. Make sure virtualization is enabled in your firmware. If you changed the boot setting for the hypervisor in the past, open Command Prompt as administrator, run bcdedit /set hypervisorlaunchtype auto, and restart.
The sandbox won’t update, or shows a network error
Errors such as WININET_E_NAME_NOT_RESOLVED or WU_E_PT_ENDPOINT_UNREACHABLE mean the upgrade to the newer app couldn’t reach the internet. Check your connection. Microsoft notes that you can keep using the older version while the update keeps trying in the background, and that the update is also queued in the Updates & downloads section of the Microsoft Store app if you want to install it yourself.
REGDB_E_IIDNOTREG
The Windows Sandbox component isn’t turned on. Turn it on again with Method 1 or Method 2 and restart.
Your .wsb file won’t open
ERROR_FILE_NOT_FOUND means the path to the .wsb file or a shared folder is wrong; check that HostFolder exists. E_INVALIDARG means the file has a mistake, such as a missing closing tag. If you see “The following settings are enforced by your IT administrator,” a policy controls that setting and the file can’t change it.
Copy and paste doesn’t work
Check that clipboard sharing is on in the … menu (24H2 and later), and that your .wsb file doesn’t set ClipboardRedirection to Disable or turn on ProtectedClient. As a fallback, share a folder instead.
An app I need is missing inside the sandbox
Programs installed on your PC don’t carry over, and the Microsoft Store isn’t available inside the sandbox. Download the app’s regular installer inside the sandbox, or copy it in from your PC.
FAQ
Is Windows Sandbox free?
Yes. It’s included with Windows 11 Pro, Enterprise and Education at no extra cost.
Can I use Windows Sandbox on Windows 11 Home?
Not officially. Microsoft states that Windows Sandbox is not supported on Home. Upgrading to Pro adds it.
Does anything I do in the sandbox affect my PC?
Changes inside the sandbox are thrown away when you close it. The exceptions are things you deliberately let out: files you copy back to your PC, and changes to a shared folder that has write access.
Can I save a sandbox session and come back to it later?
No. Every launch starts clean. If you need a test setup that keeps its apps and files, use a Hyper-V virtual machine. See how to enable Hyper-V in Windows 11.
Can I browse risky websites in the sandbox?
Yes. Open Microsoft Edge inside the sandbox. Anything the site downloads or changes is deleted when you close the window. Don’t sign in to your real accounts there, though, because the sandbox can’t protect passwords you type into a fake site.
How do I know which version of Windows Sandbox I have?
Open PowerShell and run wsb --help. If Windows says the command isn’t recognized, you have the older built-in version. The newer app, with the wsb command, is available on Windows 11 version 24H2 and later.
Can I run two sandboxes at once?
No. Microsoft says only one Windows Sandbox can run at a time.
Does Windows Sandbox slow down my PC?
It uses memory and processor time only while it’s open. Once you close it, those resources are released.
Next step: turn on Windows Sandbox using Method 1 or Method 2, restart, and open it once with nothing in it so the first-time setup and any update are out of the way before you need it.

Matt Jacobs has been working as an IT consultant for small businesses since receiving his Master’s degree in 2003. While he still does some consulting work, his primary focus now is on creating technology support content for SupportYourTech.com.
His work can be found on many websites and focuses on topics such as Microsoft Office, Apple devices, Android devices, Photoshop, and more.