To do a hanging indent in Word, select the paragraphs you want to format, then press Ctrl + T on Windows or Command + T on a Mac. For an exact measurement, select Home > the Paragraph dialog launcher (the small arrow in the corner of the Paragraph group), set Special to Hanging, check the amount in the By box (0.5″ is standard), and select OK. The first line of each paragraph stays at the margin and every line after it moves in.
Applies to: Word for Microsoft 365 (Windows and Mac), Word 2024, Word 2021, Word 2019, Word 2016 and Word for the web. Checked against Microsoft Support on October 12, 2026.
In this guide
- What a hanging indent is (and when you need one)
- Before you start: select the right paragraphs
- Method 1: Use the Paragraph dialog (Windows)
- Method 2: Word for Mac
- Method 3: Word for the web
- Method 4: Use the keyboard shortcut
- Method 5: Drag the markers on the ruler
- Apply the same hanging indent everywhere with a style
- How to remove a hanging indent
- Troubleshooting
- FAQ
What a hanging indent is (and when you need one)
A hanging indent, which Microsoft also calls a second line indent, keeps the first line of a paragraph at the left margin and indents every line after it. It’s the opposite of a first-line indent, where only the opening line moves in.
You’ll mostly need one for:
- Reference lists and bibliographies. APA style calls for a 0.5-inch hanging indent on the whole reference list, and MLA uses the same half inch on the Works Cited page. Because each entry starts at the margin, the author’s last name stands out and readers can scan the alphabetical list quickly.
- Glossaries and definition lists, where the term starts at the margin and the definition wraps underneath it.
- Numbered or labeled items you type by hand, such as “Step 1:” followed by text that should line up under itself.
Word’s bulleted and numbered lists already use a hanging indent, so the bullet or number sits at the left and the text wraps neatly under the first word. You don’t need to add one to a regular list.
| Method | Best for | Where it works |
|---|---|---|
| Paragraph dialog | An exact width, such as 0.5″ for APA or MLA | Windows, Mac and the web |
| Ctrl + T (Command + T on a Mac) | The quickest way to format a finished list | Windows and Mac desktop apps |
| Ruler | Adjusting the indent by eye while you watch the text move | Windows and Mac desktop apps |
| Paragraph style | Long documents where many paragraphs need the same indent | Windows and Mac desktop apps |
Before you start: select the right paragraphs
A hanging indent is a paragraph setting, and Word treats everything up to the point where you pressed Enter as one paragraph. Two things follow from that:
- Each entry must be one paragraph. Type a reference straight through and let Word wrap the lines for you. If you pressed Enter partway through an entry, Word sees two paragraphs, and the second half will start back at the margin.
- Select only what should hang. To format one paragraph, just click anywhere inside it. To format a whole list, drag from the first entry to the last. Leave out headings such as “References” or “Works Cited,” which are centered on their own line.
It helps to turn on formatting marks so you can see where each paragraph ends. Select Home > Show/Hide ¶, or press Ctrl + Shift + 8 on Windows. A ¶ symbol appears at the end of every paragraph. These marks don’t print, and you can turn them off the same way.
If you need a new line inside an entry without starting a new paragraph, press Shift + Enter. Microsoft notes that this starts a new line without ending the paragraph, so the indent carries on.
Method 1: Use the Paragraph dialog (Windows)
This method lets you type an exact width and see a preview before you apply it. The steps are the same in Word for Microsoft 365, Word 2024, 2021, 2019 and 2016 on Windows.
- Select the text. Click inside a single paragraph, or select all the paragraphs you want to format.
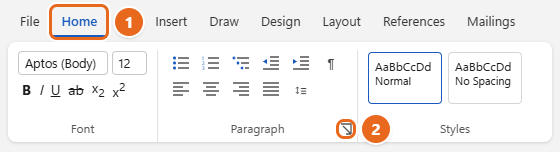
- Open the Paragraph dialog. Select the Home tab, then select the small arrow in the bottom-right corner of the Paragraph group. This button is called the dialog launcher. You can also right-click the selected text and choose Paragraph.

Select the Home tab (1), then select the small arrow in the bottom-right corner of the Paragraph group (2) to open the Paragraph dialog. - Check the tab. Make sure the Indents and Spacing tab is selected at the top of the dialog.
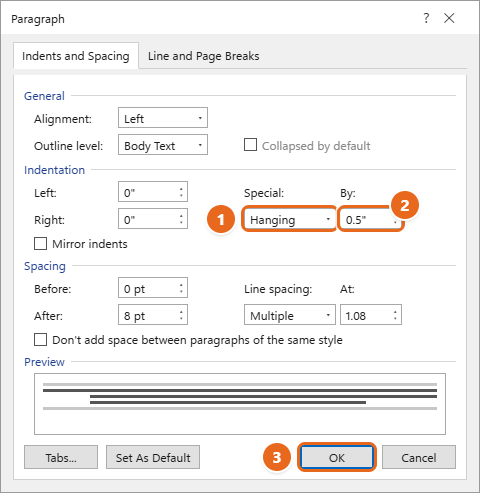
- Choose Hanging. In the Indentation section, open the Special drop-down menu and select Hanging.
- Set the width. Word fills in an amount in the By box, usually 0.5″. Leave it for APA or MLA, or type a different value. The Preview box at the bottom shows the first line sticking out to the left of the lines below it.
- Leave Left at 0″. The Left box moves the whole paragraph, including the first line. For a standard hanging indent it should stay at 0″.
- Select OK. The dialog closes, and each selected paragraph now starts at the margin with its wrapped lines indented.

Under Indentation, set Special to Hanging (1), check or change the By amount (2), then select OK (3).
Tip for reference lists: while the dialog is open, you can also set the spacing your style guide wants. APA asks for the whole list to be double-spaced with no extra space between entries, so set Line spacing to Double and both Before and After to 0 pt. For more on that, see how to double space in Word.
A short paragraph that fits on one line won’t look any different after you apply a hanging indent, because there is no second line to move. The indent appears as soon as the text wraps.
Method 2: Word for Mac
Word for Mac uses the same Paragraph dialog, but you open it from the menu bar.
- Select the paragraph or paragraphs you want to format.
- In the menu bar at the top of the screen, select Format > Paragraph. Right-clicking (or Control-clicking) the selection and choosing Paragraph also opens it.
- On the Indents and Spacing tab, under Special, select Hanging.
- Check the width in the By box and change it if you need to.
- Select OK.
The keyboard shortcut on a Mac is Command + T, and the ruler method below works the same way. If the ruler is hidden, select View > Ruler.
Method 3: Word for the web
Word for the web, the free browser version you open from Microsoft 365 or OneDrive, has the same Special setting.
- Open your document in the browser and select the paragraphs you want to format.
- On the Home tab, select the Paragraph dialog launcher, the small arrow next to the Paragraph group. If you don’t see it, widen the browser window so the full ribbon is shown.
- Under Special, select Hanging.
- Adjust the By value if needed, then select OK.
Word for the web saves changes automatically, so there is no Save step. The indent stays in place when you open the file later in the desktop app.
On an iPhone or iPad? Microsoft’s hanging-indent instructions cover Windows, Mac and the web. If you’re working on a phone or tablet and can’t find the setting, the most reliable route is to open the document in Word for the web in your browser, or apply the indent the next time you’re on a computer. Don’t fake it with spaces or tabs, for the reasons explained in Troubleshooting.
Method 4: Use the keyboard shortcut
Microsoft’s list of Word keyboard shortcuts includes a dedicated pair for hanging indents:
| Action | Windows | Mac |
|---|---|---|
| Create a hanging indent | Ctrl+T |
Command+T |
| Remove a hanging indent | Ctrl+Shift+T |
Command+Shift+T |
- Select the paragraphs you want to format, or click inside one paragraph.
- Press Ctrl + T (or Command + T on a Mac) once. The wrapped lines move in to the next tab stop. In a new document that uses Word’s default tab stops, that’s 0.5 inch.
- Check the ruler or the Paragraph dialog if your paper needs an exact width. If you’ve set custom tab stops in that paragraph, the indent goes to the first custom tab stop instead.
Each extra press pushes the wrapped lines in one more tab stop. If you went too far, press Ctrl + Shift + T to step back. Be careful not to mix this up with Ctrl + M on Windows, which moves the entire paragraph, first line included (Ctrl + Shift + M reverses it).
Method 5: Drag the markers on the ruler
The ruler shows exactly how a paragraph is indented, so it’s worth knowing even if you set the indent another way.
- Show the ruler. If you don’t see it above the page, select View and check Ruler.
- Select the paragraphs you want to change.
- Find the three markers at the left end of the ruler. The downward-pointing triangle on top is the First Line Indent marker. The upward-pointing triangle below it is the Hanging Indent marker. The small square under that is the Left Indent marker, which moves both triangles together.
- Drag the bottom triangle to the right. Grab the upward-pointing triangle itself, not the square, and drag it to the 0.5″ mark or wherever you want the wrapped lines to start. Leave the top triangle at the margin.
- Let go and check the text. The wrapped lines move to the new position as soon as you release the mouse.
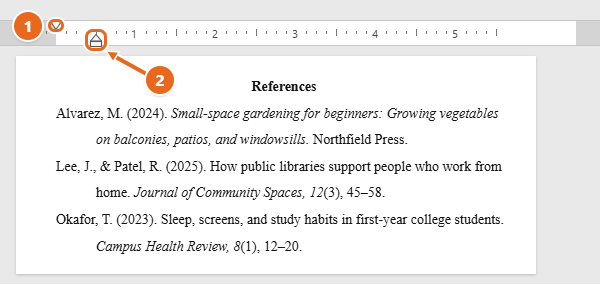
The markers are small and sit close together, so it’s easy to grab the wrong one:
- If the whole paragraph slid to the right, you dragged the square. Press Ctrl + Z to undo and try again.
- If only the first line moved in, you dragged the top triangle and created a first-line indent instead.
- Dragging by hand rarely lands on an exact value. When a teacher or publisher wants exactly 0.5″, use the Paragraph dialog or the shortcut, then use the ruler to check it.
For a wider look at first-line, left and right indents, see how to indent in Word.
Apply the same hanging indent everywhere with a style
If many paragraphs in a long document need a hanging indent, a paragraph style saves you from formatting each one and keeps them all identical. If you later change the width, every paragraph using the style updates at once.
- Format one paragraph with the hanging indent and any spacing you want, using Method 1.
- Keep the cursor in that paragraph. On the Home tab, open the Styles gallery and select Create a Style.
- Type a name, such as Reference Entry, and select OK.
- To format other paragraphs, click in them and select Reference Entry in the Styles gallery.
If you built your list with References > Bibliography, Word formats it with its built-in Bibliography style. To change that list’s indent, right-click Bibliography in the Styles gallery, choose Modify, then select Format > Paragraph and set Special to Hanging. Changing the style keeps the fix in place when Word updates the bibliography.
Be careful with Set As Default. The Paragraph dialog has a Set As Default button. It changes the Normal style for the current document, or for all new documents based on the Normal template if you choose that option. That would give almost every ordinary paragraph a hanging indent, which is rarely what you want. Use a separate style instead.
Setting up a full paper? These guides walk through the rest of the formatting: how to set up APA format in Word and how to set up MLA format in Word.
How to remove a hanging indent
- Undo it right away: press Ctrl + Z (Command + Z on a Mac).
- With the keyboard: select the paragraphs and press Ctrl + Shift + T (Command + Shift + T on a Mac). Press it again if you’d added more than one level.
- With the Paragraph dialog: select the paragraphs, open the Paragraph dialog, set Special to (none), and select OK. Microsoft’s instructions describe this as choosing None, which puts every line of the paragraph back at the margin.
- With the ruler: drag the bottom triangle back so it lines up under the top triangle.
Troubleshooting
The second half of an entry starts at the margin
There’s a paragraph break in the middle of the entry, often added to push a long web address onto its own line. Turn on Show/Hide ¶, delete the ¶ mark inside the entry, and let the text wrap on its own. If you really need a line break there, use Shift + Enter instead.
Pressing Tab indents the whole paragraph
When you press Tab at the start of a line that already has text, Word may change the paragraph’s indent instead of adding a tab character. That’s an AutoFormat feature. Use one of the methods above rather than Tab. If you’d rather Tab never did this, go to File > Options > Proofing > AutoCorrect Options > AutoFormat As You Type and clear Set left- and first-indent with tabs and backspaces.
The indent looked right but broke after editing
The wrapped lines were probably pushed over with spaces or tabs typed at the start of each line. That only lines up until a word, font or margin changes. Show formatting marks, delete the extra spaces (shown as dots) and tabs (shown as arrows), then apply a real hanging indent.
Only some entries have the indent
The original selection stopped short of the full list. Select every entry again and reapply the indent with the Paragraph dialog. Setting Special to Hanging again does no harm, but pressing Ctrl + T again would push entries that already hang in by another tab stop.
The whole entry is shifted to the right
The paragraph has a left indent as well as the hanging indent, or Ctrl + M was pressed by mistake. Open the Paragraph dialog, set Left to 0″, keep Special on Hanging, and select OK.
The By box shows centimeters
Word is set to metric units. A 0.5-inch indent is 1.27 cm, so you can type that value. To show inches instead, go to File > Options > Advanced, and under Display, change Show measurements in units of to Inches.
Ctrl + T doesn’t do anything
Make sure the cursor is in the document text, not in a search box or the ribbon. Another program or add-in may also have claimed the shortcut. The Paragraph dialog works no matter what, so use it instead.
A pasted reference list won’t format properly
Text copied from a website or citation generator can bring its own indents, spacing or list numbering. Paste with Keep Text Only (right-click where you want to paste and choose the paste option with the letter A), then apply the hanging indent. If a citation manager such as Zotero or Mendeley built the list, change the formatting through that tool or its citation style, because it can overwrite manual formatting when it refreshes the bibliography.
FAQ
What’s the shortcut for a hanging indent in Word?
Ctrl + T on Windows and Command + T on a Mac. Add Shift to remove it.
How big should a hanging indent be?
0.5 inch (1.27 cm) is the standard for APA and MLA reference lists, and it’s the width Word usually suggests. Check your instructor’s or publisher’s guidelines if they ask for something different.
Is a hanging indent the same as a second line indent?
Yes. Microsoft uses both names for the same setting: the first line stays at the margin and the second and later lines are indented.
Can I apply a hanging indent to a whole document?
You can press Ctrl + A to select everything and then apply it, but that also hangs your headings and body paragraphs. For most papers, select just the reference list, or use a paragraph style as described above.
Will the hanging indent survive when I save as PDF or open the file elsewhere?
Yes, as long as you created it with one of the methods in this guide. It’s real paragraph formatting, so it’s kept when you save as PDF. Indents faked with spaces or tabs are the ones that shift.
Next step
Once your reference list hangs correctly, check its line spacing and alphabetical order, then turn off Show/Hide ¶ and look over the page in File > Print preview before you submit it.

Matt Jacobs has been working as an IT consultant for small businesses since receiving his Master’s degree in 2003. While he still does some consulting work, his primary focus now is on creating technology support content for SupportYourTech.com.
His work can be found on many websites and focuses on topics such as Microsoft Office, Apple devices, Android devices, Photoshop, and more.