if you’re having trouble distinguishing content from one column to another, then it can make it difficult to read a document that has employed that type of layout.
Microsoft Word includes a variety of formatting options, including one specific to columns that can help to improve this situation.
Our tutorial below will show you how to find and apply the setting that puts a line between the columns in your document.
How to Add Column Lines in Microsoft Word
- Open your document.
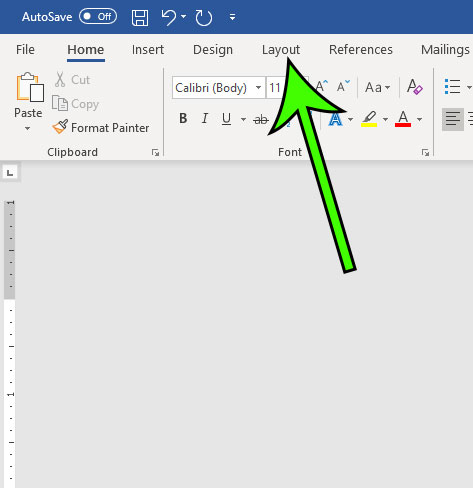
- Select the Layout tab.
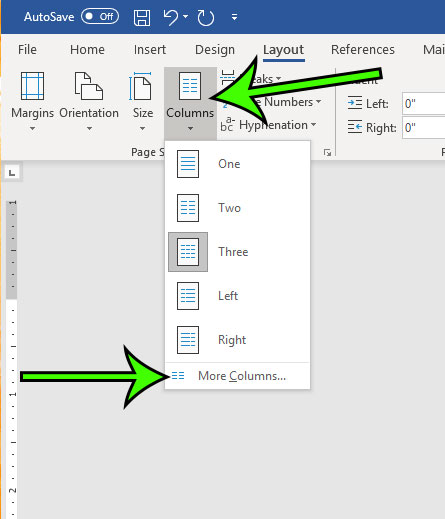
- Click the Columns button, then choose More Columns.
- Check the Lines between box, then click OK.
Our guide continues below with additional information on putting lines between columns in Word documents, including pictures of these steps.
There are a lot of different ways that you will reformat a document based on what you are creating.
We have previously written about adding columns in Word, which is important for people that are writing articles or generating newsletters.
But the design of your document might dictate that the columns aren’t enough and that there needs to be some kind of visual separation between those columns.
You may have experimented with accomplishing this via borders or text boxes, but that can be frustrating and probably won’t create the appearance that you want.
Fortunately, you can use a feature in Word that will simply add lines between your columns automatically.
Microsoft Word has a strikethrough option similar to many other applications. Our guide on how to draw a line through text in Word can show you how to use it.
How to Place a Line Between Columns in Word (Guide with Pictures)
The steps in this article were performed in the Word for Office 365 version of the application, but will also work in earlier versions of Word as well.
Note that this guide will assume that your document already has columns.
Once you’re done with this article, find out how you can hide comments when printing in Word if you’ve discovered that it’s occurring on documents where you’ve collaborated with others.
Step 1: Open your document in Word.
Step 2: Click the Layout tab at the top of the window.

Step 3: Click the Columns button, then choose the More Columns option.

Step 4: Check the box to the left of Lines between, then click the OK button.

You should now have a document with lines between its columns, like the image shown above.
For additional information on working with columns in Microsoft Word documents, check out this how to make columns in Word Office 365 tutorial.

Matt Jacobs has been working as an IT consultant for small businesses since receiving his Master’s degree in 2003. While he still does some consulting work, his primary focus now is on creating technology support content for SupportYourTech.com.
His work can be found on many websites and focuses on topics such as Microsoft Office, Apple devices, Android devices, Photoshop, and more.