To create a rule in new Outlook for Windows or Outlook on the web, select Settings (the gear icon) > Mail > Rules > Add new rule. Name the rule, pick a condition and an action, and select Save. In classic Outlook, select File > Manage Rules & Alerts > New Rule, or right-click a message and choose Rules > Create Rule for a quick version.
Applies to: New Outlook for Windows, classic Outlook for Windows (Microsoft 365, Outlook 2024, 2021, 2019 and 2016), Outlook on the web for work or school accounts, and Outlook.com. Checked against Microsoft Support on October 12, 2026.
How Outlook rules work
A rule is an instruction Outlook follows every time a matching message arrives. Every rule has three parts, and it can have a fourth:
- Name: a label so you can find the rule later, such as Move invoices to Billing.
- Condition: what Outlook looks for, such as a sender, a word in the subject, or an attachment.
- Action: what Outlook does with a match, such as move it to a folder, mark it as read, flag it, or forward it.
- Exception (optional): when to skip the rule, such as “except if it’s marked high importance.”
Rules work on new mail that arrives in your inbox. Messages that are already there aren’t touched unless you run the rule on them, as explained in Run a rule on messages you already have.
Which Outlook do you have?
The steps depend on your version, so check this first. If you see a File tab in the top-left corner, you’re using classic Outlook. If you see a gear-shaped Settings icon in the top-right corner and no File tab, you’re using new Outlook for Windows or Outlook on the web. Outlook on the web is the version you open in a browser, at outlook.office.com for work or school accounts or outlook.com for personal accounts.
| Version | Where rules live | Runs when Outlook is closed? | Run on existing mail? |
|---|---|---|---|
| New Outlook for Windows | Settings > Mail > Rules | Yes (server-side only) | Yes, with the Run button next to the rule |
| Outlook on the web (work or school) | Settings > Mail > Rules | Yes (server-side only) | Only if you see a run option; otherwise new mail only |
| Outlook.com (personal) | Settings > Mail > Rules | Yes (server-side only) | Microsoft says not currently |
| Classic Outlook for Windows | File > Manage Rules & Alerts | Server-side rules yes; client-only rules no | Yes, with Run Rules Now |
If you’re still getting Outlook set up on your PC, start with how to configure Outlook in classic and new Outlook, then come back here.
Server-side vs. client-only rules
This is the part most guides skip, and it explains why a rule can work one day and seem to ignore mail the next.
- Server-side rules run on the mail server (Exchange or Outlook.com) before the message reaches your device. They keep working when your PC is off and Outlook is closed, and the results show up on your phone, your browser and every other device. For example, “from Jordan Lee, move it to the Clients folder” is a server-side rule, as long as the Clients folder is in your mailbox on the server.
- Client-only rules use something that only the classic Outlook program on your PC can do, such as playing a sound, showing a desktop alert, or printing the message. They run only when classic Outlook is open on the computer where you made the rule, signed in with that account.
Microsoft’s list of classic Outlook rule parts that make a rule client-only includes actions such as play a sound, display a desktop alert, print it, permanently delete it, flag message for follow up at this time and clear the message flag. A rule that moves mail to a folder stored only on your PC, such as a folder in a local .pst data file, also can’t run on the server.
How to tell which one you have:
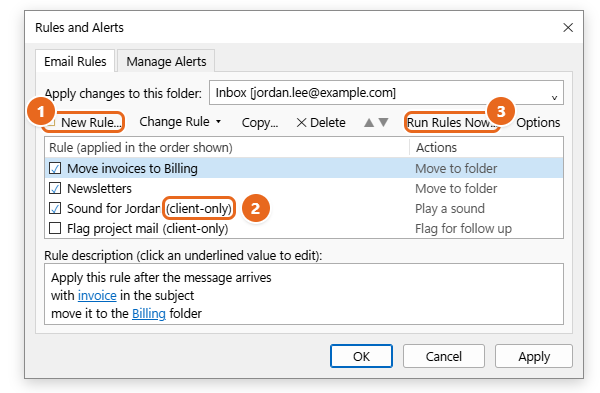
- Classic Outlook labels client-only rules with (client-only) next to the rule name in the Rules and Alerts list. When you save a rule like this, classic Outlook may also warn you that the rule will only run when Outlook is running.
- New Outlook, Outlook on the web and Outlook.com support server-side rules only. Every rule you make there is server-side, which is why you won’t find options such as play a sound.
Switching from classic to new Outlook? Your server-side rules come with you. Client-only rules don’t run in new Outlook, and Microsoft says a migrated client-only rule shows the alert This rule can’t be edited or viewed. Recreate it in new Outlook with the conditions and actions that are available there. Microsoft keeps a full feature-by-feature table on its Edit or fix a broken rule in Outlook page.
Create a rule in new Outlook for Windows
Before you start: new Outlook doesn’t currently support rules for third-party accounts such as Gmail, Yahoo and iCloud that you’ve added to it. Create rules for those accounts in that provider’s own mail settings instead. Rules here work for Microsoft 365 work or school accounts and Outlook.com, Hotmail and Live accounts.
Quick rule from a message
Use this when you want every email from one sender to go to a folder.
- Find a message from the sender. In your message list, right-click an email from the person or company you want to filter.
- Open the rule menu. Point to Rules, then select Create rule. Outlook fills in the sender for you.
- Pick a folder. Choose the folder where these messages should go, then select OK. From now on, new mail from that sender is moved there.
- Need more than a move? Select More options instead of OK. The full rule editor opens with the sender already filled in, so you can follow the steps below from step 4.
Full rule from Settings
Use this when you want to filter on something other than the sender, add several conditions, or choose a different action. The example below moves any message with invoice in the subject to a folder named Billing. Create the folder first if it doesn’t exist yet: right-click Inbox in the folder pane and choose Create new subfolder.
- Open Settings. Select the Settings gear icon in the top-right corner of new Outlook.
- Go to Rules. Select Mail, then select Rules. You’ll see a list of any rules you already have.
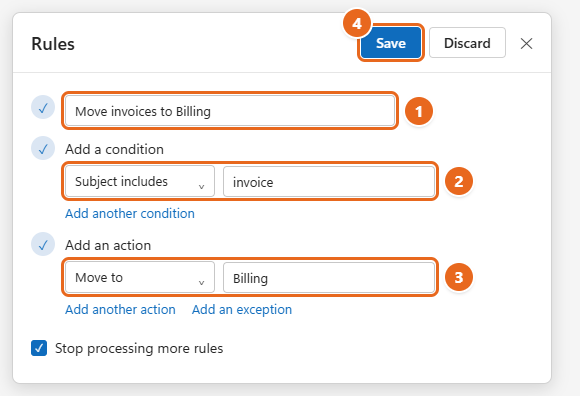
- Start a new rule. Select Add new rule. The rule editor opens.
- Name the rule. Type a clear name in the first box, such as Move invoices to Billing. A good name helps when you have a dozen rules later.
- Add a condition. Under Add a condition, open the drop-down list and choose Subject includes. Type invoice in the box next to it. To narrow the rule, select Add another condition. A message must match all of the conditions for the rule to run.
- Add an action. Under Add an action, choose Move to, then pick the Billing folder. Select Add another action if you also want to, for example, mark the message as read.
- Add an exception (optional). Select Add an exception and choose when the rule should not run, such as when the message is from your manager.
- Decide on Stop processing more rules. When this box is checked, Outlook stops checking your other rules once this one matches. Leave it checked unless you want later rules to act on the same messages. See Rule order and Stop processing more rules.
- Save the rule. Select Save. The rule appears in your list, switched on, and applies to new messages from now on. Select Discard instead if you want to cancel.
Tip: with a work or school account, Microsoft says new Outlook can also notify you when a rule moves an email to a different folder, so moved messages don’t go unnoticed.
Create a rule in Outlook on the web and Outlook.com
Outlook on the web (work or school accounts) and Outlook.com (personal accounts) use the same rule editor as new Outlook. Because rules are stored in your mailbox, a rule you create in the browser also shows up in new Outlook for the same account, and the other way around.
- Sign in. Open Outlook in your browser and sign in to the account you want to filter.
- Open the Rules page. Select the Settings gear icon at the top of the page, select Mail, then select Rules.
- Add the rule. Select Add new rule, type a name, then choose a condition and an action from the drop-down lists. Use Add a condition, Add an action or Add an exception if you need more than one.
- Check Stop processing more rules. Microsoft says this option is turned on by default in Outlook on the web. Clear it if other rules should also act on matching messages.
- Save. Select Save. The rule starts working on new mail right away.
The quick method also works in the browser: right-click a message, select Rules (or Rule in Outlook.com), then Create rule, pick a folder and select OK.
Create a rule in classic Outlook
Classic Outlook has the most rule options, including rules for messages you send and client-only actions like sounds and alerts. There are two ways in.
Method 1: Create Rule from a message (fastest)
- Right-click a message. In your inbox, right-click an email that looks like the ones you want to handle, such as an invoice from a supplier.
- Open Create Rule. Select Rules > Create Rule. The Create Rule box opens with the sender’s name and the message subject filled in.
- Choose the conditions. Under When I get email with all of the selected conditions, check the conditions you want. For the invoice example, check Subject contains and shorten the text in the box to just Invoice, so it matches every invoice rather than one subject line. Leave the sender unchecked if invoices come from several people.
- Choose the action. Under Do the following, check Move the item to folder, select Select Folder, pick a folder (or select New to make one), and select OK.
- Save it. Select OK. A Success message appears.
- Apply it to existing mail (optional). Check Run this new rule now on messages already in the current folder and select OK to sort the messages already in your inbox too.
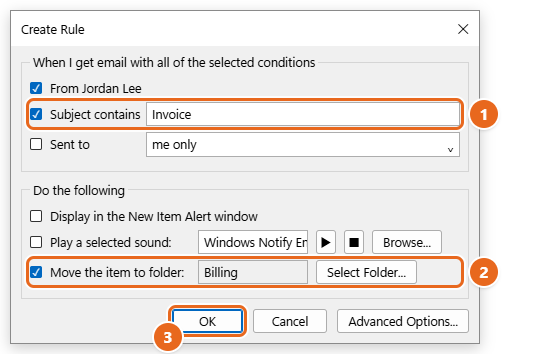
Note: the Display in the New Item Alert window and Play a selected sound options in this box make the rule client-only. Leave them unchecked if you want the rule to run while your PC is off.
Method 2: Use the Rules Wizard (more options)
The Rules Wizard lets you start from a template or a blank rule, combine several conditions and actions, add exceptions, and make rules for mail you send.
- Open Rules and Alerts. Select File > Manage Rules & Alerts. You can also select Home > Rules > Manage Rules & Alerts. On the simplified ribbon, look under Move > Rules.
- Pick the account. If you have more than one email account, choose the right one in Apply changes to this folder at the top of the Email Rules tab.
- Start a new rule. Select New Rule. The Rules Wizard opens.
- Pick a template or a blank rule. Under Step 1: Select a template, choose one, such as Move messages from someone to a folder or Flag messages from someone for follow-up. To build your own, choose Apply rule on messages I receive or Apply rule on messages I send under Start from a blank rule.
- Fill in the blue underlined values. Under Step 2: Edit the rule description, select each underlined value, such as people or public group or specified, and choose the sender, words or folder. Select Next.
- Select conditions. Check any conditions you want to add, fill in their underlined values, and select Next. If you leave every condition unchecked, Outlook asks whether the rule should apply to every message you receive. Select Yes only if that’s what you want.
- Select actions. Check what Outlook should do, such as move it to the specified folder, assign it to the category or forward it to people or public group. You can also check stop processing more rules here. Select Next.
- Add exceptions (optional). Check any exceptions, such as except if it is marked as importance, and select Next.
- Finish the rule. Type a name under Step 1: Specify a name for this rule. Make sure Turn on this rule is checked. Check Run this rule now on messages already in “Inbox” if you want it to sort your current mail. If you have several accounts, you may also see Create this rule on all accounts. Select Finish.
- Read any warning. If you see a message that the rule will only run when Outlook is running, the rule is client-only. Select OK to keep it, or go back and swap the client-only action for a server-side one.
- Close the dialog. Select OK in the Rules and Alerts box to save your changes.
Classic Outlook can also delay everything you send with a rule (defer delivery by a number of minutes), which gives you time to catch mistakes. Our guide to editing or recalling a sent email in Outlook explains that setup and the undo send option in new Outlook.
Rule examples you can copy
These use the names you’ll see in new Outlook and Outlook on the web. Classic Outlook has a matching option for each in the Rules Wizard.
| Goal | Condition | Action |
|---|---|---|
| Send newsletters to a reading folder | From: [email protected] | Move to: Read Later |
| Keep invoices together | Subject includes: invoice | Move to: Billing |
| Spot mail sent only to you | I’m the only recipient | Mark with importance: High |
| Color-code a client’s mail | Sender address includes: @example.com | Categorize: a color category |
| Quiet automated notifications | From: [email protected] | Mark as read and Move to: Alerts |
| Share support requests with a teammate | Subject includes: support | Forward to or Redirect to: a colleague |
Forward or redirect? A forwarded message looks like it came from you, so replies go to you. A redirected message keeps the original sender, so replies go to that sender. Work or school accounts may block rules that forward mail outside your organization; ask your IT team if a forwarding rule doesn’t seem to work.
Be careful with Delete. A rule that deletes messages works silently. Use Move to a review folder for the first week, then switch to Delete once you’re sure the rule only catches what you expect. In classic Outlook, avoid permanently delete it unless you’re certain, because those messages skip the Deleted Items folder.
Rule order and Stop processing more rules
Outlook checks your rules from the top of the list to the bottom. When a message matches a rule that has Stop processing more rules turned on, Outlook ignores every rule below it for that message, even rules that would also match.
Here’s why that matters. Say rule 1 moves anything with invoice in the subject to Billing, and rule 2 flags every message from your manager. If your manager sends an invoice and rule 1 has Stop processing more rules checked, the message is moved but never flagged. Clear the option on rule 1, or move rule 2 above it, and both actions happen.
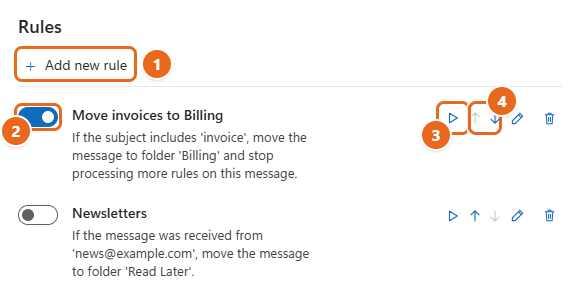
- New Outlook and the web: go to Settings > Mail > Rules, select a rule, and use the up arrow or down arrow to move it. To change the Stop processing setting, select Edit (the pencil icon), check or clear Stop processing more rules, and select Save.
- Classic Outlook: in File > Manage Rules & Alerts, select a rule and use the up and down arrow buttons, then select Apply. To change Stop processing, select Change Rule > Edit Rule Settings and check or clear stop processing more rules on the actions page. Rules made with the quick Create Rule box often include it already, so check the rule description.
A good habit: put narrow, specific rules at the top and broad catch-all rules at the bottom. Microsoft’s Stop processing more rules page has the steps for each version.
Run a rule on messages you already have
A new rule only acts on mail that arrives after you save it. To clean up what’s already in a folder:
- New Outlook: go to Settings > Mail > Rules and select the Run button (the play icon) next to the rule.
- Outlook on the web and Outlook.com: if you see a run option for the rule, use it. Microsoft currently says Outlook.com can’t run rules on existing messages, so use Sweep or move the messages yourself instead.
- Classic Outlook: select File > Manage Rules & Alerts > Run Rules Now. Check the rules to run, select Browse to choose a different folder if needed, check Include subfolders if you want, choose All messages, Read messages or Unread messages in Apply rules to, and select Run Now.
Running a rule by hand is also a handy test. Try it on a small folder first so a mistake only moves a few messages.
Edit, turn off or delete a rule
In new Outlook, Outlook on the web and Outlook.com
- Select Settings > Mail > Rules.
- To change a rule, select Edit (the pencil icon), make your changes, and select Save.
- To pause a rule, switch off the toggle next to its name. Switch it back on to turn the rule back on.
- To remove a rule for good, select Delete (the trash can icon).
In classic Outlook
- Select File > Manage Rules & Alerts.
- To change a rule, select it and choose Change Rule > Edit Rule Settings to walk through the wizard again, or select a blue underlined value in Rule description to change just that part. Rename Rule is in the same menu.
- To pause a rule, clear the check box next to its name. Check it again to turn it back on.
- To remove a rule, select it, select Delete, and confirm.
- Select OK to save.
Turn off before you delete. Deleting a rule can’t be undone from the rules list, and you’d have to build it again. Switching it off keeps it ready if you change your mind. Deleting or turning off a rule also doesn’t move any messages back; anything the rule already moved stays where it is.
Back up or move your rules
Rules in new Outlook, Outlook on the web and Outlook.com are stored in your mailbox, so they follow you to any device where you sign in. Server-side rules you made in classic Outlook are stored there too.
Classic Outlook can also export rules to a file, which is useful before you reset Outlook or set up a new PC:
- Select File > Manage Rules & Alerts > Options.
- Select Export Rules, choose a folder, type a file name, and select Save. Outlook saves a file with the .rwz extension.
- To restore, open the same Options box, select Import Rules, choose the .rwz file, and select Open. Imported rules are added to the end of your list.
Microsoft notes that .rwz files work only in classic Outlook, so you can’t import them into new Outlook. See Import or export a set of rules in classic Outlook.
Troubleshooting
The rule only works when my PC is on
It’s a client-only rule. Open File > Manage Rules & Alerts in classic Outlook and look for (client-only) after the name. Edit the rule to remove the client-only part, such as a sound or desktop alert, or keep classic Outlook open. If you need both, make two rules: a server-side rule to move the mail and a client-only rule for the alert.
New Outlook says “This rule can’t be edited or viewed”
The rule was most likely a client-only rule created in classic Outlook. New Outlook can’t run or edit it. Create a replacement rule in new Outlook. If the condition or action you used before isn’t in the list, new Outlook doesn’t support it yet.
I can’t find Rules for my Gmail or Yahoo account
New Outlook doesn’t support rules for third-party accounts such as Gmail, Yahoo and iCloud. Set up filters in that provider’s own settings, or use classic Outlook, which runs rules for those accounts on your PC while it’s open.
A rule isn’t catching some messages
- Check the rule is turned on (toggle on, or box checked in classic Outlook).
- Look for a rule higher in the list that matches first and has Stop processing more rules turned on.
- Check the condition wording. “Subject includes invoice” won’t match a subject that says “Bill #2214”. Add a second rule or broaden the condition.
- Rules act on incoming mail as it arrives. Messages that were already in your inbox need to be run by hand.
My rule broke after I deleted or renamed a folder
A rule that moves mail to a folder that no longer exists stops working. Classic Outlook shows broken rules in red, marked as an error, in Rules and Alerts. Edit the rule and choose the new folder. If you’re removing folders, read how to delete a folder in Outlook and get it back so you can fix the related rules at the same time.
Outlook says I’ve run out of space for rules
Exchange Online mailboxes, which includes Microsoft 365 work and school accounts, have a 256 KB limit for all inbox rules combined, according to Microsoft Learn. Mailboxes moved from an older Exchange server may have a lower limit. Delete rules you no longer use, combine similar rules (one rule can check for several words), and shorten long word lists.
A forwarding rule doesn’t send anything
Many organizations block automatic forwarding to outside addresses. If the rule forwards to a personal address and nothing arrives, ask your IT team rather than trying to work around the policy.
FAQ
Do Outlook rules work when Outlook is closed?
Server-side rules do. They run in your mailbox on the server, so they work with your PC off. Client-only rules in classic Outlook run only while classic Outlook is open on the PC where you made them.
Can I create a rule for emails I send?
In classic Outlook, yes. Start a blank rule with Apply rule on messages I send in the Rules Wizard. Microsoft describes rules in new Outlook and Outlook on the web as applying to incoming messages.
Will my rules work on my phone?
Server-side rules sort your mail on the server, so the results show up in the Outlook mobile app and any other device that uses the same account. Create and change rules on a computer or in Outlook on the web.
How do I create a rule in Outlook for Mac?
In the current Outlook for Mac, select Outlook > Settings > Rules > Add Rule, then name the rule and add a condition and an action. Microsoft says the current Mac app supports server rules only. Full steps are on Microsoft’s Create a rule in Outlook for Mac page.
Can one rule check for several words?
Yes. In classic Outlook, add several words or phrases in the Search Text box; the rule matches any of them. In new Outlook and the web, one Subject includes condition can hold more than one word. Microsoft’s own example rule matches a subject with “wedding” or “flower” or “groom”.
Why did my rule move a message I wanted in my inbox?
The condition is broader than you meant. Add an exception, such as “except if I’m the only recipient” or “except if it’s from” your manager, or make the condition more specific.
Does turning off a rule put messages back?
No. Turning off or deleting a rule only stops future actions. Move any misplaced messages back yourself. Outlook’s search box can help you find them in the folder the rule used.
Start with one simple rule, such as moving a newsletter to its own folder, and check it for a few days. Once it behaves the way you expect, add the next one and keep an eye on the order of your list.

Matt Jacobs has been working as an IT consultant for small businesses since receiving his Master’s degree in 2003. While he still does some consulting work, his primary focus now is on creating technology support content for SupportYourTech.com.
His work can be found on many websites and focuses on topics such as Microsoft Office, Apple devices, Android devices, Photoshop, and more.