Changing the number of columns in a document may not be something that you need to do very often, but it can be useful when a certain type of document calls for it.
Fortunately, you have the ability to add columns to a Google document, which we will discuss how to do in the tutorial below.
How to Insert a Column in Google Docs
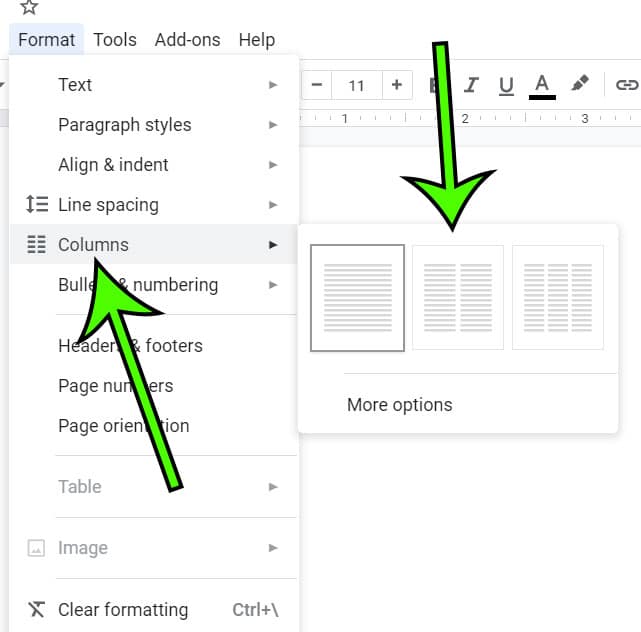
- Open your document.
- Select Format.
- Choose Columns, then click the desired number of columns.
Our article continues below with additional information on adding a second or third column in Google Docs, including pictures of these steps.
Related Guide: If you work with Microsoft Word, too, then read our how to make columns in Word Office 365 article and see how to perform this action in that application.
A new document in Google Docs is going to have one column by default.
It can seem a little odd to think of a regular document as having a column, but it’s an important distinction to consider if you need another column.
Fortunately, you can learn how to add a column in a Google Doc if you are writing an article or a newsletter and would prefer that layout.
Word processing applications like Microsoft Word have long offered the option to adjust the number of columns in a document, and Google Docs continues that tradition.
Google’s alternative to Word actually has most of the options and features that you would find in Microsoft’s application, and many users find Docs to be a very capable alternative to the paid option.
Whether you are working on a blank document or editing one that already has content in it, you have the ability to adjust the number of columns in the document. Our guide below will show you how to add a column in Google Docs using a short series of steps.
Are some of the columns too big or too small? This how to resize columns in Google Sheets article can help you to fix that issue.
How to Make a Two Column or Three Column Document in Google Docs (Guide with Pictures)
The steps in this article were performed in the desktop version of the Google Chrome Web browser, but will also work in other desktop browsers like Mozilla Firefox or Microsoft Edge.
Step 1: Go to Google Drive and open the document to edit.
Step 2: Select the Format tab at the top of the window.

Step 3: Click the Columns option from the menu, then click the image with the number of columns that you want.

Note that you can have a maximum of three columns in a Google Doc.
You can always experiment with ne column, two columns, or three columns if you are unsure about how many columns you want. Google Docs will simply adjust the content in the document based on your column number choice.
Adding additional columns to a document will typically make that document longer, as the added space between columns consumes quite a bit of page real estate.
The next section will show you where to locate the setting that controls the amount of space between columns if you would like to eliminate some of that white space in the document.
More Information on Adding Columns in Google Docs
Google Docs allows you to switch the number of columns at any time and will adjust the layout of the document appropriately.
However, changing the number of columns in a document that already has content can cause certain document objects to be moved to an unwanted location.
Be sure to proofread your document after adjusting the columns to ensure that everything is still in the correct location.
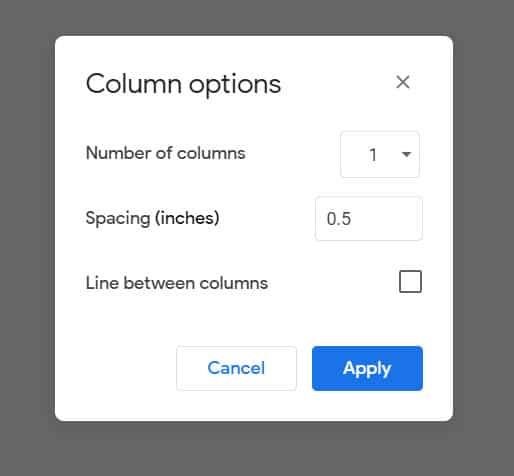
There is a More options button at the bottom of the menu where you select the number of columns. If you click More options you will see the menu below.

Here you can also select the number of columns, as well as adjust the spacing between those columns, or elect whether or not to include a line between the columns.
Google Docs Table Columns
This article has discussed how to change the number of columns in Google Docs, but it is focused mainly on the columns in the document itself. If you are working with a table, then any reference to the columns you want would be related to the table properties instead.
If you right-click on the table you will see a number of different options that allow you to edit information about the table. The Table properties option will let you specify the column width or minimum row height, table border, table alignment, and more.
There are also options on that right-click menu that allow you to add or delete columns and rows. If your mouse is inside a cell in the table you can press the Tab key to navigate to the cell in the next column more quickly. This can be really efficient for filling in table data.
If you want to add a table in Google Docs you can click Insert in the menu bar at the top of the window, choose the Table option, then specify the number of columns and rows.
Google Docs also has an option that lets you insert a column break into your document. To use a column break, simply click inside the column at the point where you want the break, then click Insert in the menu bar, choose Break, then Column break. This will force the content after the break into the next column.

Matt Jacobs has been working as an IT consultant for small businesses since receiving his Master’s degree in 2003. While he still does some consulting work, his primary focus now is on creating technology support content for SupportYourTech.com.
His work can be found on many websites and focuses on topics such as Microsoft Office, Apple devices, Android devices, Photoshop, and more.