The steps in this guide are going to show you how to change the date format for a date that you have entered into one of the cells in your Google Sheets spreadsheet. We will provide a quick overview of the process for making this change, then we will continue below with additional information, including pictures of the steps.
- Sign into your Google Drive and open a spreadsheet.
- Select the cell(s) containing the date(s) you want to reformat.
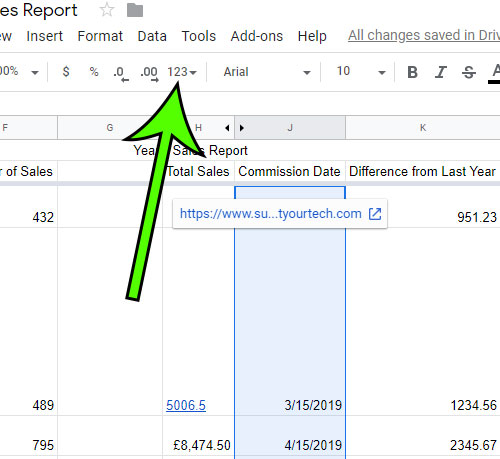
- Click the More formats button in the toolbar above the spreadsheet.
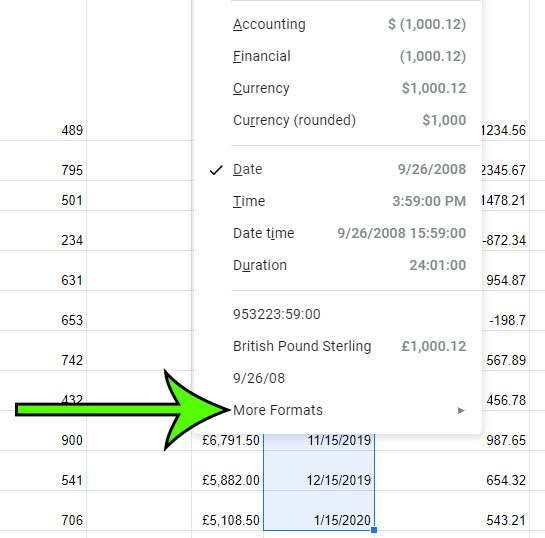
- Choose the More Formats option at the bottom of this menu.
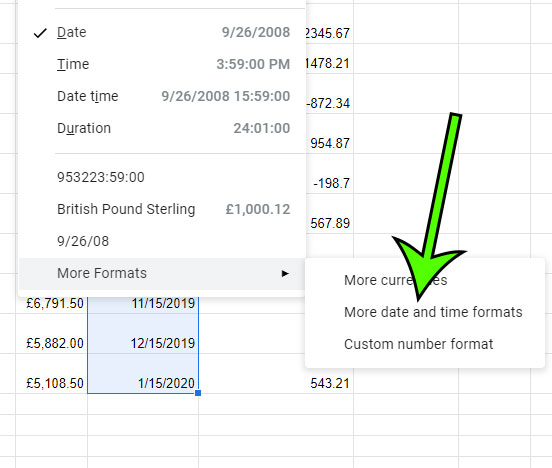
- Select the More date and time formats option.
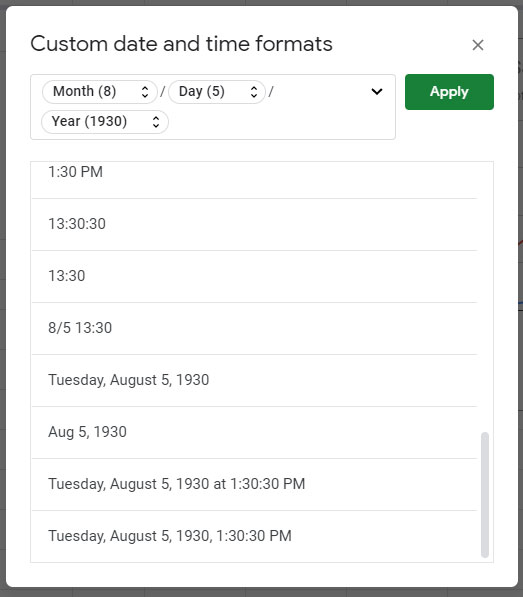
- Scroll through the list of options, click the one you want, then click the Apply button.
Google Sheets and Google Docs contain a lot of different formatting options for the data that you include in your documents. If you are creating a Google spreadsheet with Google Sheets, then some of the options that you can modify are related to date formatting.
If you’ve used another spreadsheet application like Microsoft Excel, then you may already know how to change some of your spreadsheet settings and format date information in the way that you need. But the method for making this change in Google Sheets is a little different. Our tutorial below is going to show you where to find the settings that controls the way your dates look.
How to Change the Date Format in Google Sheets
The steps in this article were performed in the desktop version of the Google Chrome Web browser, but will also work in other desktop browsers like Mozilla Firefox or Microsoft Edge.
Step 1: Sign into your Google Drive at https://drive.google.com and open the spreadsheet containing the dates that you want to format.
Step 2: Select the range of cells containing the dates that you want to reformat.
Step 3: Click the More Formats button (the one that says 123 on it) in the toolbar above the spreadsheet.

Step 4: Select the More formats option at the bottom of this menu.

Step 5: Click the More date and time formats item from the dropdown menu.

Step 6: Scroll through the list of options and select a date format that appeals to you. Click the Apply button when you’re done.

Now that you know how to change the Google Sheets date format, you can customize the way that date information is displayed in the cells of your spreadsheets.
More About Date Formatting a Google Spreadsheet
- If you’re in the United States, then the default format for a date you enter is dd/mm/yyyy. If you are in most other countries, then the default will be mm/dd/yyyy. Google determines which to use based on the localization settings in your Google Account.
- You can use a similar method to adjust the formatting options for many other types of data that you include in your spreadsheet as well. For example, there are many options available to change number format, such as adjusting the number of decimal places that are displayed, plus there are a handful of currency formatting options that can make monetary values easier to read or identify.
- If you are curious about how to convert an existing date value to a different format, then following the steps above should be your first step. Google is able to identify a lot of different types of date values, and may be able to perform the conversion when you switch the date format. If not, then you may need to manually edit the dates, unfortunately.
- Some of the date formatting options in Google Sheets are Date Time values as well. This means that Google can display a time along with the date, if that is something that you are interested in using.
Are you having trouble identifying cells as you scroll further and further down your spreadsheet? Find out how to freeze a row in Google Sheets so that it remains visible at the top of the spreadsheet even if it technically shouldn’t be visible anymore.

Matt Jacobs has been working as an IT consultant for small businesses since receiving his Master’s degree in 2003. While he still does some consulting work, his primary focus now is on creating technology support content for SupportYourTech.com.
His work can be found on many websites and focuses on topics such as Microsoft Office, Apple devices, Android devices, Photoshop, and more.