Many apps and gadgets, including the iPhone 13, include a feature that may automatically correct misspellings as you type.
One of the device’s settings is a feature that can read your text input and correct any typos.
This tool can be incredibly accurate, and you may be wondering how to use the iPhone 13 auto-correct setting.
Alternatively, you might find that it is fixing things that you don’t want it to, which can make typing more difficult.
On your iPhone 13, you may change the auto-correction setting by heading to Settings > General > Keyboard > then touching the button next to Auto-Correction.
You can continue reading below for additional information on this topic, including pictures of these steps.
Check out this video about how to enable or disable auto correct on iPhone 13 on YouTube for more information.
How to Turn Off or On Auto Correct on an iPhone 13 (Guide with Pictures)
The procedures in this post were carried out using an iPhone 13 running iOS 16.4. However, these procedures will also work for most other iPhone models and iOS versions.
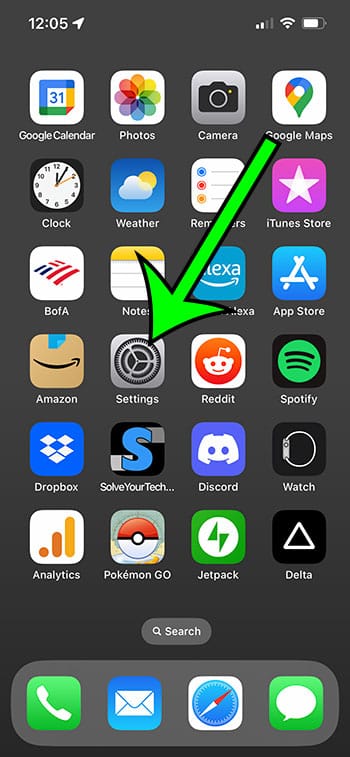
Step 1: On your Home screen, locate the Settings icon and tap it to access the menu.

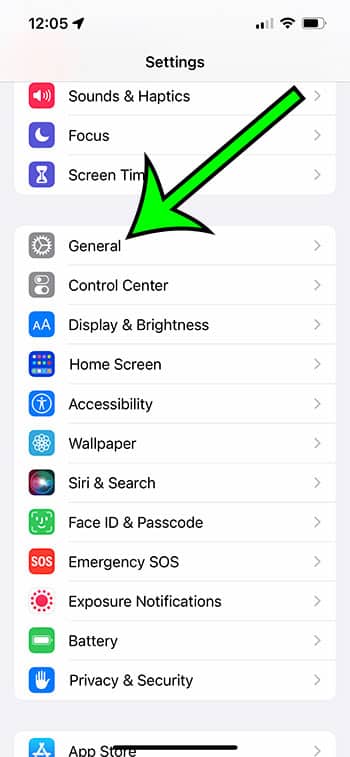
Step 2: Scroll down and select the General tab.

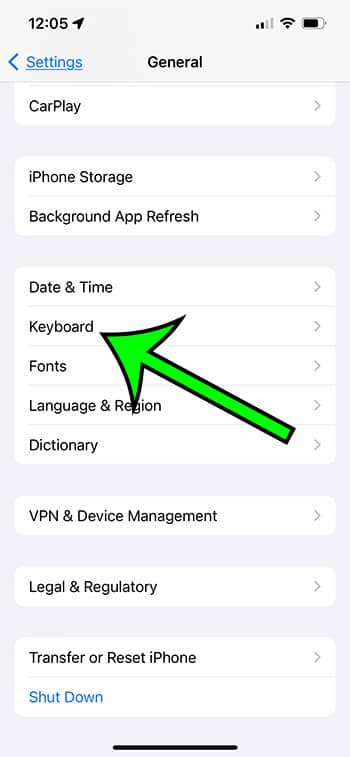
Step 3: From this option, choose Keyboard.

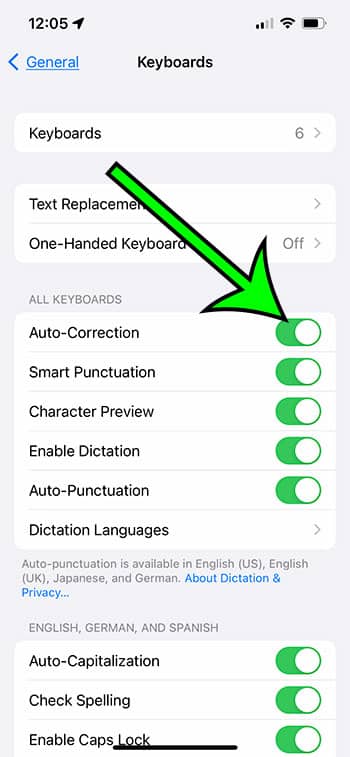
Step 4: Toggle Auto-Correction on or off by tapping the button to the right of it.
In the image below, I have it enabled.

If you open an app and the auto-correct setting does not appear to be in the state you requested, you may need to close and re-open the app.
This is accomplished by dragging your finger up from the bottom of the screen and then to the left, followed by pulling the app off the top of the screen.
Now that you know how to adjust the iPhone 13 auto-correct setting, you may experiment with it enabled or off until you find whatever option you like.
Related: How to Stop People from Knowing You Read Their Texts on iPhone 13
Video About Changing Auto Correct on iPhone 13
Summary – How to Turn on or Turn Off iPhone 13 Auto Correct
- Select Settings.
- Choose General.
- Select Keyboard.
- Tap the Auto-Correction icon to the right.
If you’ve noticed that some of your text messages are blue while others in the same discussion are suddenly green, you may wonder why. This is covered in greater detail in the following section.
Reasons Why iMessages Could Be Delivered as Text Messages
When you notice something strange on your iPhone, especially with a frequently used app like Messages, it can be concerning.
The blue messages in that app are known as iMessage, and they appear when you text other Apple users.
Green text messages are typically delivered to persons who use non-Apple devices, although they can also occur for a variety of other reasons.
Learn more about iMessages transmitted as text messages in this tutorial.
The following are some of the reasons why an iMessage might be transmitted as a text message:
- The recipient owns an Android or other non-Apple smartphone.
- You or the recipient have turned off iMessage.
- The phone of the recipient has been turned off.
- Either party’s Internet connection is weak, and they are unable to connect to the iMessage servers.
- There are issues with the iMessage service.
- You have been restricted.
In general, this issue resolves rapidly; therefore, it’s recommended to wait a few hours to ensure that an iMessage conversation remains with green messages and does not revert to blue.
Conclusion
When I’m typing on my iPhone, I find myself leaning heavily on auto-correct.
It can be difficult to type effectively on the iPhone keyboard due to its size, subtle differences in how you hold it, or other factors that can cause you to press the erroneous letter.
Fortunately, the auto-correct option can solve many of these issues, and many iPhone users have grown so accustomed to it that it is now part of their typing habits.
However, if you don’t use it frequently and find that it causes more difficulties than it solves, you might be interested in adjusting the device’s auto-correction option.
Our explanation above has provided further information on how to adjust the iPhone 13 auto correct setting, including screenshots.
Hopefully, this has allowed you to fix the problems that this feature was causing so that you can type more effectively on your phone.

Matt Jacobs has been working as an IT consultant for small businesses since receiving his Master’s degree in 2003. While he still does some consulting work, his primary focus now is on creating technology support content for SupportYourTech.com.
His work can be found on many websites and focuses on topics such as Microsoft Office, Apple devices, Android devices, Photoshop, and more.