When you print a spreadsheet in Microsoft Excel, it is going to be aligned to the left side of the page.
But if you don’t think this looks good and you want to change it, then you have the ability to make that sort of adjustment.
Our tutorial below will show you how to center horizontally in Excel spreadsheets by finding the Page Setup menu and changing a setting there.
How to Horizontally Center a Printed Spreadsheet in Excel 2013
- Open the spreadsheet.
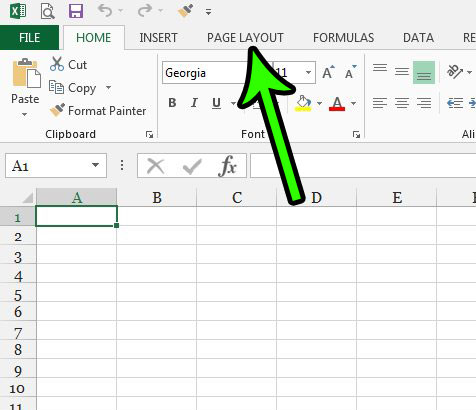
- Choose the Page Layout tab.
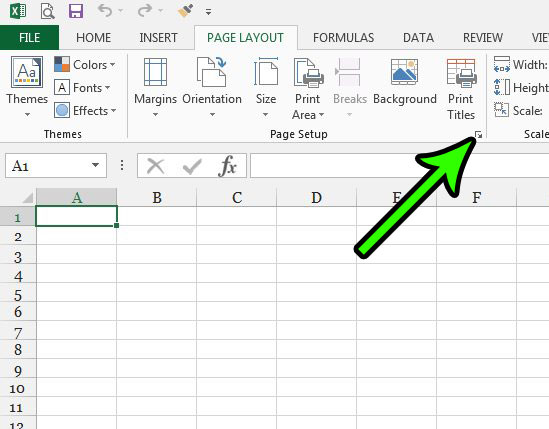
- Click the Page Setup button.
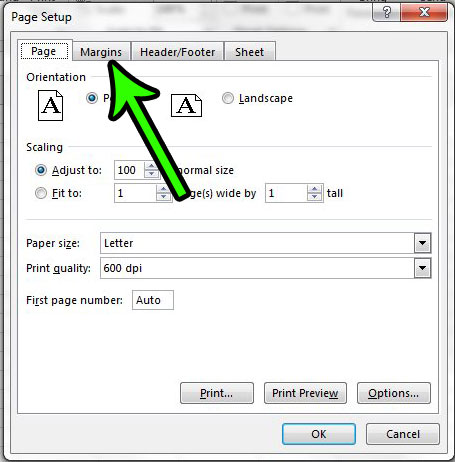
- Select the Margins tab.
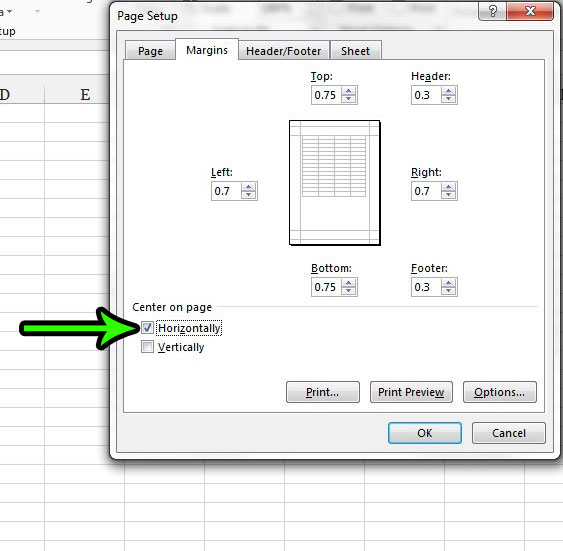
- Check the Horizontal box, then click OK.
Our guide continues below with additional information on how to center horizontally in Excel spreadsheets, including pictures of these steps.
When you build a spreadsheet in Microsoft Excel 2013, your initial concern is often with the data that you enter.
It’s important that the data is correct and in an understandable state so that it can be evaluated correctly by interested parties.
But sometimes you need to print that spreadsheet, and the default print settings for Excel 2013 typically need some adjustment if you want a spreadsheet that looks good and is easy to read.
One setting that can be beneficial to change for this purpose is the horizontal centering of the data. This puts your spreadsheet at the center of the page, which usually makes it look better. Our tutorial below will show you where to find this option.
Occasionally a spreadsheet will print extra pages that only have one column. Our guide on how to fit all columns on one page in Excel can prevent all of that extra printing.
How to Center a Page Horizontally in Excel 2013 (Guide with Pictures)
The steps in this article were performed in Microsoft Excel 2013, but will also work in a number of other versions of Excel as well.
By completing this guide, you will be centering your spreadsheet data on the page when you print.
We are focusing specifically on centering horizontally, but there is also a vertical centering option on the menu if you would like to do that instead or in addition to the horizontal centering.
Step 1: Open your spreadsheet in Excel 2013.
Step 2: Click the Page Layout tab at the top of the window.

Step 3: Click the small Page Setup button at the bottom-right corner of the Page Setup section of the ribbon.

Step 4: Choose the Margins tab at the top of the window.

Step 5: Check the box to the left of Horizontal at the bottom-right corner of the window, then click the OK button at the bottom of the window to apply the change.

Now that you know how to center horizontally in Excel spreadsheets, you can use this option whenever you need to print some data that would look better in the middle of the page.
This article will show you how to adjust your margins if you find that there is too much white space around your spreadsheet when you print it. This can be useful for fitting more information on a page and reducing the amount of pages that a single spreadsheet needs when it is printed.

Matt Jacobs has been working as an IT consultant for small businesses since receiving his Master’s degree in 2003. While he still does some consulting work, his primary focus now is on creating technology support content for SupportYourTech.com.
His work can be found on many websites and focuses on topics such as Microsoft Office, Apple devices, Android devices, Photoshop, and more.