How to Create Desktop Shortcuts in Windows 10

Mastering your Windows 10 desktop means making it work for you, and a big part of that is creating shortcuts. Think of a shortcut as a little signpost that quickly points to an app, file, or folder you use all the time, saving you clicks and time. You can easily make one by right-clicking an empty spot on your desktop, choosing “New,” then “Shortcut,” and telling Windows where your desired item is located. It is a quick and efficient way to declutter your workflow and keep your most important tools just a double-click away.

Tutorial – How to Create Desktop Shortcuts in Windows 10

Ready to make your desktop a powerhouse of productivity? Let’s walk through the simple steps to create desktop shortcuts that make your favorite applications, documents, or folders accessible with just a couple of clicks. No more digging through menus or file explorer windows, we are putting everything right where you need it.

Step 1: Right-click an empty spot on your desktop

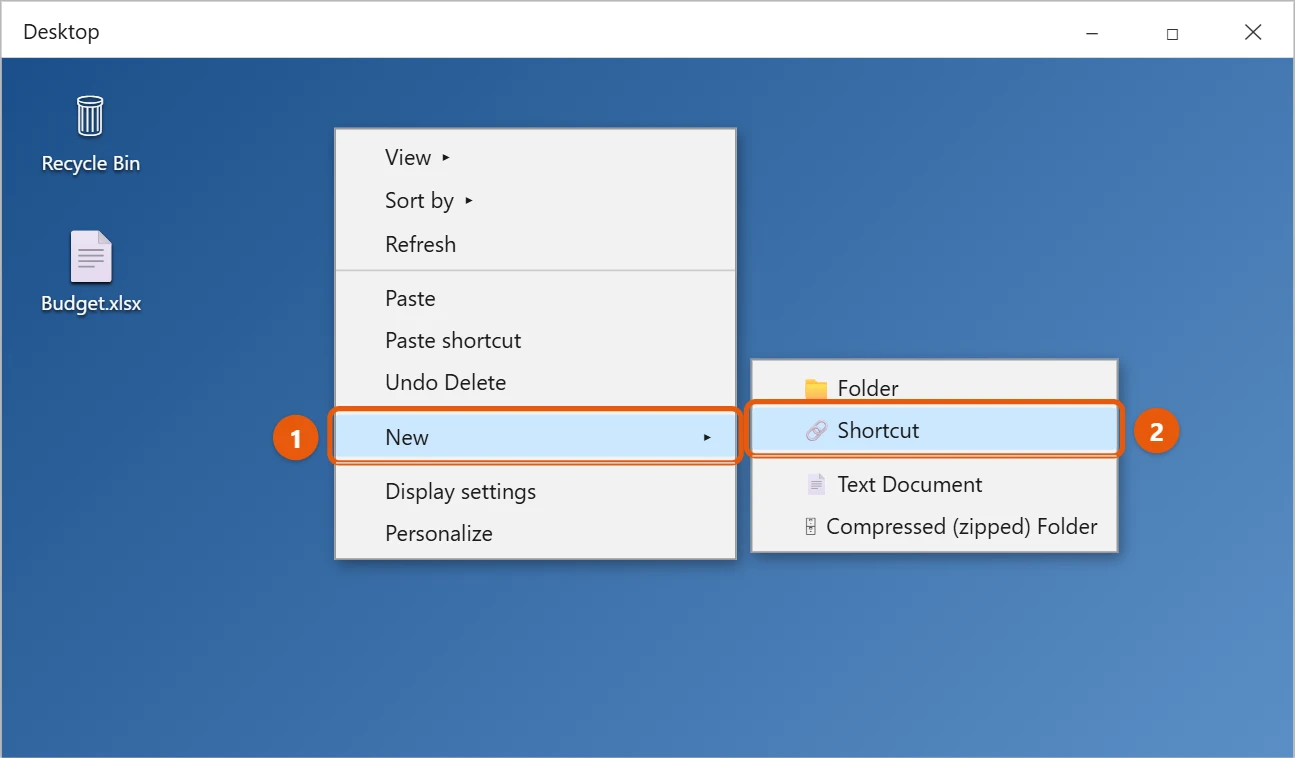
Find any open area on your desktop, a place with no icons or open windows. Now, take your mouse and click the right button. This action opens a special menu, often called a context menu, that gives you a bunch of options related to your desktop.

This initial right-click is your gateway to many desktop customization features, not just creating shortcuts. It is like opening a toolkit specific to your desktop, offering quick access to settings, display options, and, of course, the ability to add new items. So, make sure you are clicking on truly empty space, or you might end up with a menu for an existing icon instead!

Step 2: From the menu, hover over “New” and then click “Shortcut”

Once you have that context menu open, you will see an option called “New.” Move your mouse pointer over “New,” but do not click it yet. A new sub-menu will pop out to the side. In that sub-menu, you should see “Shortcut” listed. Go ahead and click on “Shortcut.”

Choosing “New” from the desktop context menu is how you create all sorts of new things, like new folders, text documents, or even fancy compressed (zipped) folders. By specifically selecting “Shortcut,” you are telling Windows that you want to create a special link, not a brand new file or folder itself.

Step 3: Type or browse for the item’s location

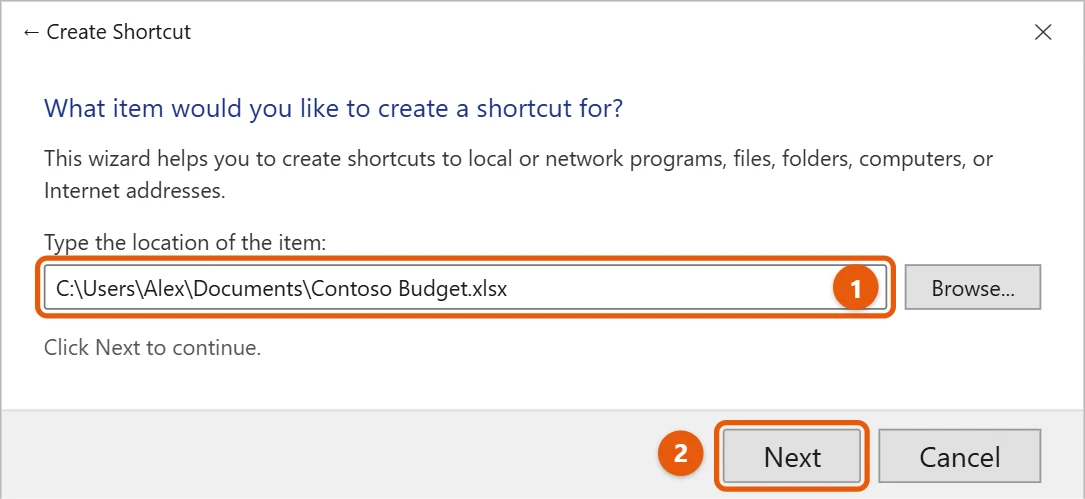
Windows will now open a small window asking you to “Type the location of the item.” If you know the exact path to your app, file, or folder, you can type it directly into the box. If you are not sure, which is totally okay, click the “Browse…” button to navigate through your computer’s files and folders until you find what you want.

When you use the “Browse” button, a standard File Explorer window will appear, letting you navigate your drives, folders, and network locations just as you normally would. Once you locate the item you want to link to, select it and then click “OK.” This action will automatically fill in the correct path in the location box for you, making things super easy.

Step 4: Click “Next” and then type a name for your shortcut

After you have entered or browsed to the location of your item, click the “Next” button. The wizard will then ask you to “Type a name for this shortcut.” This is where you get to decide what your shortcut will be called on your desktop.

It is a good idea to pick a name that clearly tells you what the shortcut does or where it goes. For instance, instead of “chrome.exe – Shortcut,” you might just call it “Google Chrome” or “My Important Documents.” A descriptive name makes your desktop much easier to understand at a glance, like labeling the drawers in a toolbox so you know exactly what is inside.

Step 5: Click “Finish”

Once you are happy with the name you have chosen, simply click the “Finish” button. Poof! Just like magic, your brand new shortcut will instantly appear on your desktop, ready for action.

Clicking “Finish” completes the whole process, applying all the choices you made in the previous steps. You will see the icon pop up right away, usually with a small arrow on its bottom-left corner, which is Windows’ way of telling you it is a shortcut, not the original file itself.

After you complete these steps, you will see a new icon appear on your desktop. This icon is your shortcut, and it will have a small arrow in its bottom-left corner, which is the universal sign for a shortcut in Windows. Now, whenever you double-click that icon, it will instantly open the application, document, or folder you linked it to, saving you valuable time and effort.

Tips for Creating Desktop Shortcuts in Windows 10

  • Organize your shortcuts: Do not just let them sprawl! Group related shortcuts together or put them in folders on your desktop to keep things neat and tidy.
  • Use descriptive names: Give your shortcuts clear, simple names so you know exactly what each one does without guessing.
  • Drag and drop for quick shortcuts: For programs in your Start Menu or files in File Explorer, you can often just drag the item directly to your desktop to create a shortcut instantly. This is a super fast way to do it.
  • Pin to Taskbar or Start Menu: If you use an app constantly, consider pinning it to your Taskbar or Start Menu instead of just the desktop. This offers even quicker access and keeps your desktop cleaner.
  • Change shortcut icons: Personalize your desktop by right-clicking a shortcut, going to “Properties,” and then clicking “Change Icon.” You can pick from built-in Windows icons or even use your own custom images.
  • Shortcuts for websites: You can create a desktop shortcut for your favorite websites too! Just open the website in your browser, then click and drag the small icon next to the web address (the URL) onto your desktop.
  • Shortcuts for network locations: If you frequently access files on a network drive, you can create a shortcut to that specific network folder or drive, making it feel like it is right on your local machine.

Frequently Asked Questions

Can I create a shortcut for a website?

Absolutely, you can! The easiest way is to open your web browser, navigate to the website you want a shortcut for, and then look at the address bar. You will usually see a small icon, like a padlock or the website’s logo, to the left of the web address. Simply click and drag that icon from the address bar directly onto your desktop, and a shortcut to that website will appear.

What is the difference between a shortcut and the actual file?

Think of a shortcut as a signpost or a map that points to a treasure, while the actual file is the treasure itself. The shortcut is just a small link, a few kilobytes in size, that tells Windows where to find the real program or document. The actual file is the full program data or the entire document content. If you delete a shortcut, you only remove the signpost, but the original file remains safe and sound. If you delete the actual file, then the shortcut will no longer work because its destination is gone.

How do I change a shortcut’s icon?

Changing a shortcut’s icon is a great way to personalize your desktop! Right-click on the shortcut you want to change, and from the menu, select “Properties.” In the Properties window, go to the “Shortcut” tab, and then click the “Change Icon…” button. You will see a selection of icons that Windows already has, or you can click “Browse…” to find an icon file (usually .ico, .exe, or .dll files) on your computer.

My shortcut is not working, what could be wrong?

If your shortcut stops working, it usually means the original file or folder it was pointing to has been moved, renamed, or deleted. Since the shortcut is just a pointer, if its target disappears or changes location, it can no longer find it. You might need to either delete the broken shortcut and create a new one, or right-click the shortcut, go to “Properties,” and update the “Target” path to the new location of the original item.

Can I create a shortcut to a specific document within a folder?

Yes, you definitely can create a shortcut that opens a specific document, not just a folder or an application. When you are going through Step 3 of the creation process, instead of selecting a folder or an .exe file, you would simply navigate and select the exact document you want the shortcut to open, such as a Word document, a spreadsheet, or a PDF file. This is super handy for files you access very often.

Summary of Creating Desktop Shortcuts

  1. Right-click an empty spot on your desktop.
  2. Hover over “New” and click “Shortcut.”
  3. Type or browse for the item’s location.
  4. Click “Next” and type a name for your shortcut.
  5. Click “Finish.”

Conclusion

Creating desktop shortcuts in Windows 10 is a simple, yet incredibly powerful way to streamline your daily computer use. It transforms a potentially cluttered and hard-to-navigate digital space into a highly efficient, personalized dashboard. Think of your desktop as a chef’s cutting board; you want your most-used tools and ingredients within arm’s reach, not buried in a drawer somewhere. Shortcuts are those essential tools, placed strategically for maximum efficiency.

We have explored the straightforward process of how to create desktop shortcut in Windows 10, from the initial right-click to giving your new pointer a clear, descriptive name. But beyond the mechanics, remember the philosophy behind them: saving time, reducing frustration, and making your digital life just a little bit easier. No one wants to hunt for an application or an important document every single time they need it. By taking a few moments to set up these digital signposts, you are investing in a smoother, more productive computing experience.

Do not be afraid to experiment with different types of shortcuts, whether they point to your favorite apps, crucial work folders, frequently visited websites, or even specific documents you edit daily. Play around with changing their icons to add a touch of personal flair. Consider creating folders on your desktop to group related shortcuts, preventing icon overload. Your desktop is your digital workspace, and you have the power to organize it to truly reflect your needs and preferences. So, go ahead, make your Windows 10 desktop truly yours, a place where everything you need is just a couple of clicks away, making your interactions with your computer more intuitive and enjoyable.

Get Our Free Newsletter

How-to guides and tech deals

You may opt out at any time.
Read our Privacy Policy