To empty the Recycle Bin in Windows 11, right-click the Recycle Bin icon on your desktop, select Empty Recycle Bin, and then select Yes to confirm. Everything in the bin is permanently deleted, and the space it used on your drive is freed up.
Applies to: Windows 11. No downloads or administrator rights needed. Checked against Microsoft Support and Microsoft Learn on September 29, 2026.
Before you empty it
When you delete a file in Windows 11, it isn’t gone yet. Windows moves it to the Recycle Bin, where it keeps using space until you empty the bin. That’s why deleting large files doesn’t always free up space right away.
Emptying the bin is permanent. Windows doesn’t have an undo for it. So take a quick look first:
- Double-click Recycle Bin on the desktop to open it.
- Select View > Details so you can see the Original Location and Date Deleted columns.
- If you see something you want to keep, right-click it and select Restore. It goes back to the folder it came from. For more on this, see how to restore items from the Recycle Bin in Windows 11.
Method 1: Empty it from the desktop
This is the quickest way.
- Go to the desktop. You can press Windows logo key + D to minimize everything.
- Right-click the Recycle Bin icon.
- Select Empty Recycle Bin.
- When Windows asks if you’re sure you want to permanently delete the items, select Yes.
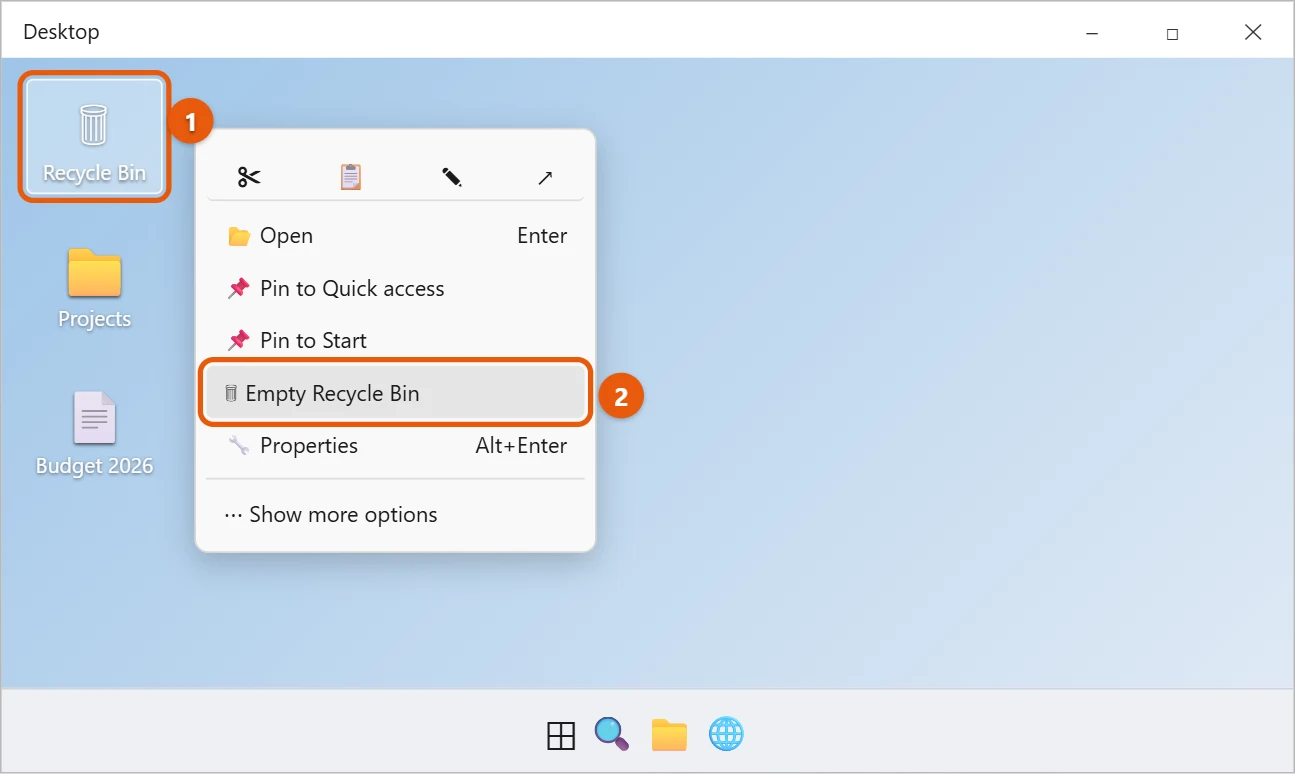
The icon changes from a full bin to an empty one when it’s done. If there’s nothing in the bin, Empty Recycle Bin is grayed out.
Method 2: Empty it from the Recycle Bin window
Use this method if you want to look through the bin first, or if the desktop icon is hidden.
- Open the Recycle Bin. If it’s not on your desktop, open File Explorer, type Recycle Bin in the address bar, and press Enter.
- Select Empty Recycle Bin in the command bar at the top. If you don’t see it, select See more (…) first.
- Select Yes to confirm.
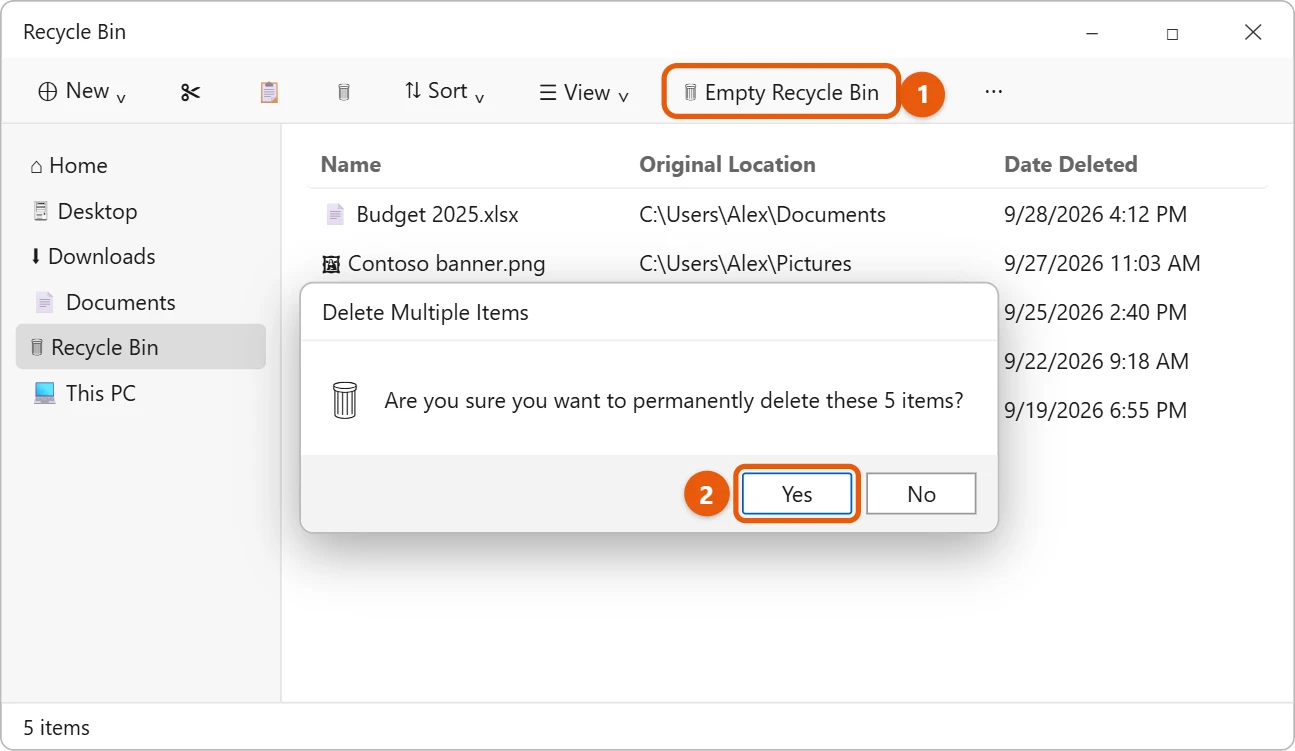
You can also right-click an empty area inside the Recycle Bin window and select Empty Recycle Bin.
Delete only some items
You don’t have to empty everything. To permanently delete just a few items:
- Open the Recycle Bin.
- Select the items. Hold Ctrl to pick several, or hold Shift to pick a range.
- Press Delete, or right-click and select Delete.
- Select Yes to confirm.
Everything else stays in the bin, so you can still restore it later.
Method 3: Empty it from Settings
The Storage page in Settings shows how much space the Recycle Bin is using, so it’s a good place to clean up if you’re low on space.
- Select Start > Settings > System > Storage.
- Select Temporary files. Windows scans your drive for a moment.
- Check Recycle Bin. Clear the check boxes for anything else you don’t want removed, especially Downloads.
- Select Remove files, then confirm.
The size next to Recycle Bin tells you how much space you’ll get back.
Method 4: Let Storage Sense empty it for you
If you often forget to empty the bin, Storage Sense can delete old items automatically. Microsoft explains that its settings apply only to you, so other people on the same PC choose their own.
- Select Start > Settings > System > Storage.
- Select Storage Sense.
- Turn on Automatic User content cleanup.
- Under Delete files in my recycle bin if they have been there for over, choose how long to keep items, such as 30 days.
- Under Run Storage Sense, choose how often it runs.
- To clean up right away, select Run Storage Sense now.
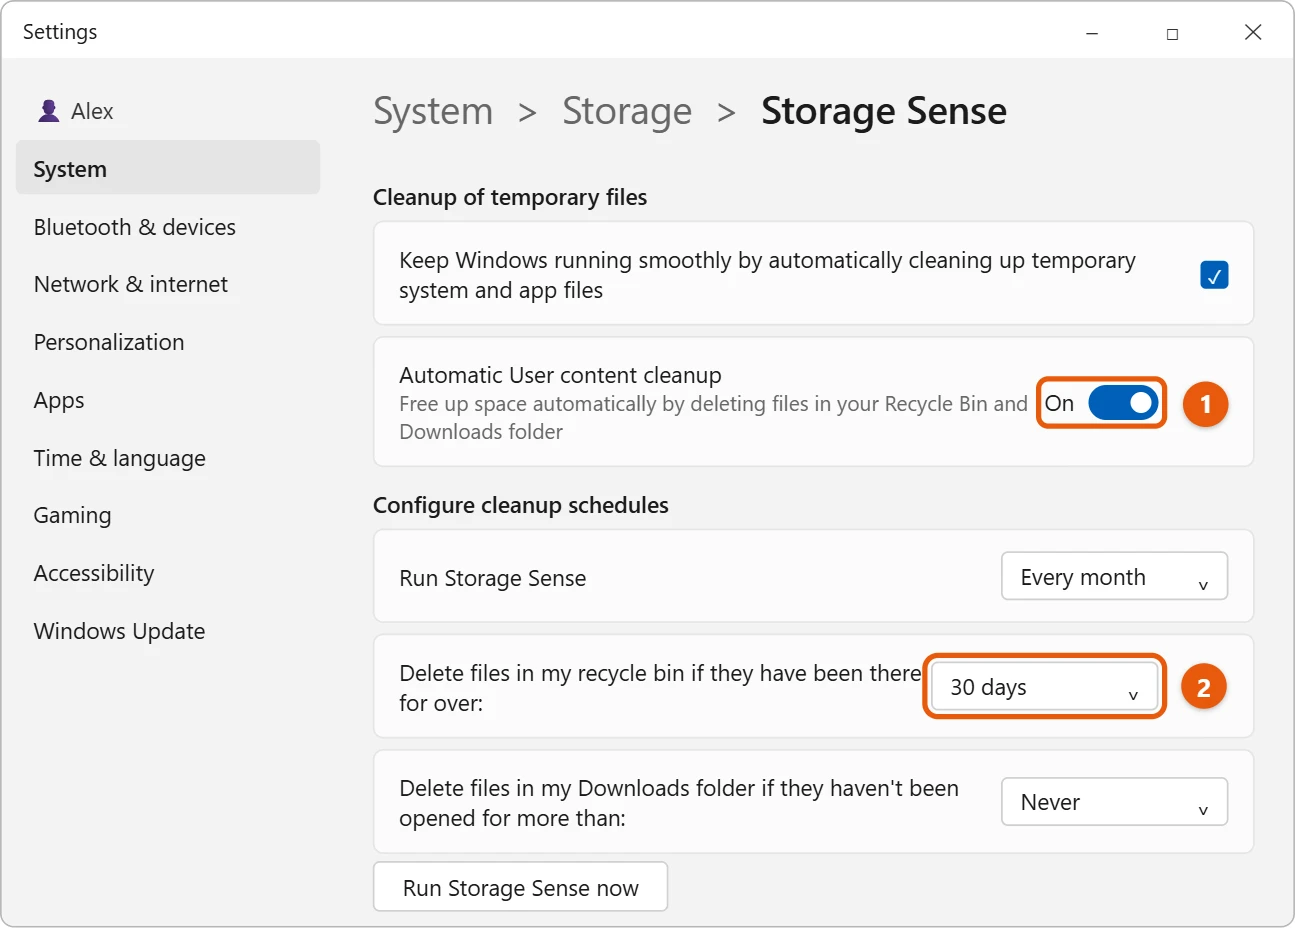
Storage Sense only removes items that have been in the bin longer than the time you chose. It also only works on your system drive, usually C:. Choose Never if you don’t want it to touch the Recycle Bin at all.
Method 5: Use Disk Cleanup
Disk Cleanup is the older built-in cleaning tool. It can empty the bin along with other temporary files.
- Select Start, type Disk Cleanup, and open it.
- Choose the drive, usually C:, and select OK.
- Check Recycle Bin in the list, and clear anything else you want to keep.
- Select OK, then Delete Files.
Skip the Clean up system files button. It asks for administrator rights and isn’t needed to empty the Recycle Bin.
Method 6: Use PowerShell
If you’re comfortable typing commands, PowerShell has a built-in command for this. Microsoft describes it as working just like Empty Recycle Bin, for the person who’s signed in.
- Right-click Start and select Terminal.
- Type Clear-RecycleBin and press Enter.
- Type Y and press Enter to confirm.
To empty the bin for just one drive, type Clear-RecycleBin -DriveLetter D, replacing D with the drive’s letter. You don’t need to run Terminal as an administrator.
If you’d like a one-click button, you can make a desktop shortcut that runs this command. Right-click the desktop, select New > Shortcut, and enter powershell.exe -NoProfile -Command Clear-RecycleBin -Force as the location. The -Force part skips the confirmation, so only do this if you’re sure you’ll never click it by mistake.
How the Recycle Bin works
Knowing a few rules helps you avoid surprises:
- Each drive has its own bin. Files deleted from a second internal drive or an external hard drive are kept on that drive. Emptying the Recycle Bin clears all of them at once.
- USB flash drives and memory cards don’t have one. Files you delete from them are removed right away.
- Each person has their own bin. Emptying yours doesn’t touch anyone else’s files.
- Very large files may skip the bin. If a file is bigger than the space set aside for the bin, Windows warns that it’s too big to recycle and offers to delete it permanently.
- Shift + Delete skips the bin. Select a file and press Shift + Delete to delete it permanently in one step. Windows asks you to confirm.
Change the Recycle Bin’s settings
You can decide how much space the bin can use and whether Windows asks before deleting:
- Right-click the Recycle Bin icon and select Properties.
- Select a drive in the list.
- Under Custom size, set the Maximum size in megabytes. Smaller means old items are removed sooner when the bin fills up.
- Check Display delete confirmation dialog if you want Windows to ask before moving files to the bin.
- Select Apply, then OK.
Avoid Don’t move files to the Recycle Bin. Remove files immediately when deleted. With that on, every deleted file is gone for good, with no second chance.
Files synced with OneDrive
If you delete a file from your OneDrive folder, it also goes to the OneDrive recycle bin online. Emptying the Windows Recycle Bin doesn’t empty that one. According to a Microsoft moderator on Microsoft Q&A, files in a personal account’s OneDrive recycle bin are kept for up to 30 days. To remove them sooner, sign in at onedrive.com and empty the Recycle bin there. To find your OneDrive files on the PC, see how to find the OneDrive folder in Windows 11.
If you can’t empty the Recycle Bin
- Empty Recycle Bin is grayed out. The bin is already empty. Items you deleted from a USB drive, or with Shift + Delete, never went to the bin.
- The Recycle Bin icon is missing. Right-click the desktop, select View, and check Show desktop icons. If only the Recycle Bin is missing, go to Settings > Personalization > Themes > Desktop icon settings, check Recycle Bin, and select OK. See where the Recycle Bin is in Windows 11.
- An item won’t delete. It may still be open in an app. Close your apps, or restart the PC, and try again.
- Windows says the Recycle Bin is corrupted. The usual fix needs administrator commands, so ask whoever manages your PC for help if you aren’t an administrator.
- Your drive is still full afterward. The bin may not have been the problem. Check Settings > System > Storage to see what’s using the most space.
Emptied it by mistake?
Windows can’t undo emptying the Recycle Bin, and Ctrl + Z won’t bring items back after that. Your best options are a backup, such as File History or OneDrive. See how to recover deleted files in Windows 11. Stop saving new files to that drive until you’ve tried, so you don’t overwrite what you’re trying to recover.
Frequently asked questions
Does emptying the Recycle Bin free up space?
Yes. Deleted files keep using space until the bin is emptied. The space is freed as soon as you empty it.
How often should I empty it?
Whenever you need the space, or let Storage Sense do it every 30 days. Keeping a few weeks of deleted files gives you time to change your mind.
Can I restore files after emptying the Recycle Bin?
Not from the Recycle Bin itself. You’ll need a backup, such as File History or OneDrive.
Is there a keyboard shortcut to empty the Recycle Bin?
Not by default. You can make a desktop shortcut that runs Clear-RecycleBin, as shown in Method 6, and give it a key combination in its Properties.
Why is my Recycle Bin using so much space?
Windows sets aside a share of each drive for the bin, and on a large drive that can be many gigabytes. Big deleted items like videos, installers and old backups fill it quickly. Empty the bin, or lower its Maximum size in Properties so Windows removes old items sooner.
Will emptying the Recycle Bin delete files for other users?
No. Each person has their own bin, and you only empty yours.
Next steps
If you’d rather not see the icon at all, see how to hide the Recycle Bin from the desktop in Windows 11. Microsoft explains the automatic cleanup settings in Manage drive space with Storage Sense.

Matt Jacobs has been working as an IT consultant for small businesses since receiving his Master’s degree in 2003. While he still does some consulting work, his primary focus now is on creating technology support content for SupportYourTech.com.
His work can be found on many websites and focuses on topics such as Microsoft Office, Apple devices, Android devices, Photoshop, and more.