To use Storage Sense in Windows 11, select Start > Settings > System > Storage and turn on the Storage Sense switch under Storage management. Select Storage Sense to choose how often it runs and how long files can sit in the Recycle Bin and Downloads folder before they are deleted. To clean up right away, select Run Storage Sense now at the bottom of that page.
Applies to: Windows 11, version 24H2 and 25H2 (Home, Pro, Enterprise and Education). Most steps are the same on earlier Windows 11 versions. Checked against Microsoft Support on October 12, 2026.
In this guide
- What Storage Sense does (and what it leaves alone)
- Before you start
- Turn on Storage Sense
- Choose what Storage Sense cleans and when
- Recommended settings for common situations
- Free up space from OneDrive files
- Run Storage Sense now
- What Storage Sense doesn’t clean, and where to find it
- How to turn Storage Sense off or undo a change
- Storage Sense on work and school PCs
- Troubleshooting
- FAQ
What Storage Sense does (and what it leaves alone)
Storage Sense is a cleanup tool built into Windows 11. Once it’s on, Windows deletes files you no longer need, on a schedule you pick, so your main drive doesn’t quietly fill up. It replaces most of what people used to do by hand with Disk Cleanup.
| What it can clean | What happens by default | Can you change it? |
|---|---|---|
| Temporary system and app files | Cleaned up automatically when Storage Sense runs | Yes, with the Cleanup of temporary files checkbox |
| Recycle Bin | Files older than 30 days are permanently deleted | Yes: Never, 1, 14, 30 or 60 days |
| Downloads folder | Never touched | Yes: files not opened for 1, 14, 30 or 60 days can be deleted |
| OneDrive files stored on your PC | Files not opened for 30 days become online-only (Windows 11, version 22H2 and later) | Yes, per OneDrive account |
Storage Sense does not delete your documents, photos, music or videos from your personal folders, and it doesn’t uninstall apps. The only places where your own files can be removed are the Recycle Bin and, if you turn it on, the Downloads folder.
Is it already on? According to Microsoft, Storage Sense is off by default. However, if your PC runs low on disk space and you’ve never changed the Storage Sense settings, Windows may turn it on to clean up some temporary files and then notify you. Some PCs, especially ones managed by a workplace or school, have it switched on by policy. The steps below show you how to check.
Before you start
- It only cleans your system drive. Storage Sense works on the drive that holds Windows, usually C:. It won’t free up space on a second internal drive, an external drive or a USB stick.
- Your settings are just for you. If several people use the PC, each person sets up Storage Sense in their own account, and it cleans that person’s Recycle Bin and Downloads folder.
- It runs only while you’re signed in. Microsoft says Storage Sense needs you to be signed in and online for more than 10 minutes before it can run on its own schedule.
- Check your Downloads folder first. Many people keep installers, PDFs and receipts in Downloads for years. If you plan to let Storage Sense clean that folder, move anything you want to keep to Documents or another folder before you turn the option on.
- You may see a User Account Control prompt. In January 2026, Microsoft added a User Account Control (UAC) prompt when you open Settings > System > Storage. A May 2026 update moved that prompt so it appears only when you choose to view temporary files. If a prompt appears, select Yes, or ask someone with an administrator account to approve it.
Turn on Storage Sense
- Open Settings. Select Start > Settings, or press Windows key + I.
- Go to the Storage page. Select System in the left pane, then select Storage on the right. Windows takes a moment to add up how your drive is being used, then lists categories such as Installed apps and Temporary files.
- Find Storage management. Scroll down to the Storage management heading. The first item is Storage Sense, described as a way to “automatically free up space, delete temporary files, and manage locally available cloud content.”
- Turn it on. Set the Storage Sense switch to On. From now on, Storage Sense runs with its default settings: it cleans temporary files when your drive is low on space and empties Recycle Bin items that are more than 30 days old.
- Open its settings. Select the arrow next to the switch, or the Storage Sense name itself, to open the Storage Sense page. You’ll customize it in the next section.
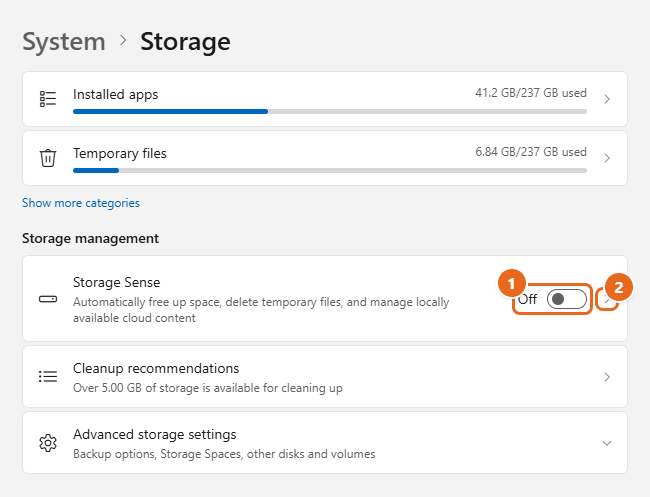
If the switch is grayed out, Storage Sense is controlled by your organization. See Storage Sense on work and school PCs.
Choose what Storage Sense cleans and when
The Storage Sense page is at Settings > System > Storage > Storage Sense. It has four parts. Work through them from the top.
- Keep temporary file cleanup on. Under Cleanup of temporary files, leave Keep Windows running smoothly by automatically cleaning up temporary system and app files checked. These are leftover files that apps and Windows create while they work, and you won’t miss them.
- Turn on automatic cleanup. Under Automatic User content cleanup, set the switch to On. This is the same setting as the Storage Sense switch on the Storage page, so it may already be on. Below the switch, Windows tells you when Storage Sense runs and how much space it cleaned up in the past month.
- Pick a schedule. Under Configure cleanup schedules, open the Run Storage Sense menu and choose Every day, Every week, Every month or During low free disk space (default). “Low free disk space” isn’t a fixed number. Microsoft says it depends on the size of your drive, and you’re in that state when the bar on the Storage page turns red.
- Choose how long files stay in the Recycle Bin. Open Delete files in my recycle bin if they have been there for over: and pick Never, 1 day, 14 days, 30 days or 60 days. The default is 30 days. When a file passes that age, it’s deleted for good, so pick a period long enough to notice a mistake.
- Decide what happens to old downloads. Warning: this option permanently deletes files from your Downloads folder, including ones you may still want. Open Delete files in my Downloads folder if they haven’t been opened for more than: and leave it on Never (default) unless you treat Downloads as a temporary space. If you do, 30 or 60 days is a safer choice than 1 or 14.
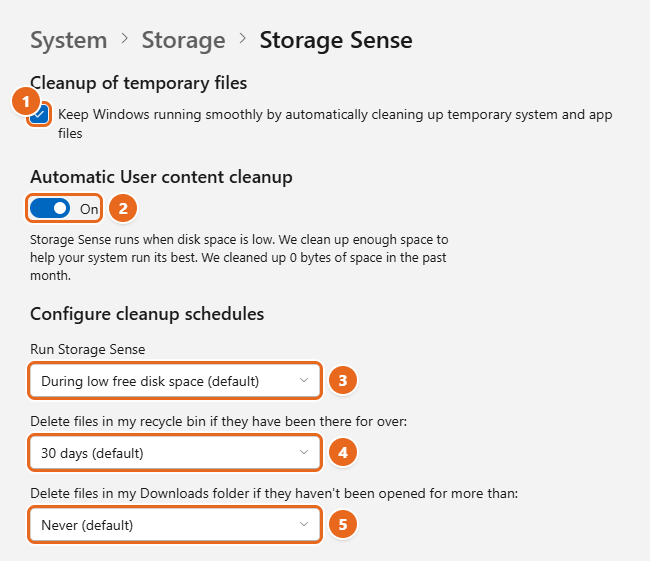
Changes save as soon as you make them. There’s no Save or Apply button, so you can close Settings when you’re done.
Recommended settings for common situations
There’s no single right setup. Use this table as a starting point, and adjust it after a few weeks based on how much space you have.
| Your situation | Run Storage Sense | Recycle Bin | Downloads | OneDrive files |
|---|---|---|---|---|
| Laptop with a small drive (128 GB or 256 GB) | Every week | 14 or 30 days | 60 days, after moving files you want to keep | 14 or 30 days |
| Desktop with plenty of free space | During low free disk space | 30 or 60 days | Never | Never or 60 days |
| Shared family PC | Every month | 30 days | Never (other people may keep files there) | Each person chooses |
| You often delete things by mistake | Any | 60 days or Never | Never | Any |
| You travel or work offline | Any | Any | Any | Never, or mark key folders as Always keep on this device |
Free up space from OneDrive files
If you’re signed in to OneDrive, the Storage Sense page also has a Locally available cloud content section. This is often where the most space can be recovered, and it doesn’t delete anything.
Here’s how it works. OneDrive files can be stored two ways: as a full copy on your PC, or as “online-only,” where File Explorer still shows the file but its contents stay in the cloud until you open it. Storage Sense can switch files you haven’t opened in a while to online-only, which frees the space they were using on your drive.
- On the Storage Sense page, scroll down to Locally available cloud content. You’ll see one heading for each OneDrive account, such as Jordan – Personal. This section only appears when you’re signed in to a cloud account.
- Under Content will become online-only if not opened for more than:, choose Never, 1 day, 14 days, 30 days or 60 days. Microsoft notes that starting in Windows 11, version 22H2, the default for OneDrive is 30 days.
- To protect files you need without an internet connection, open File Explorer, right-click the file or folder in OneDrive, and select Always keep on this device. Storage Sense skips anything marked this way.
Files that become online-only are not removed from OneDrive. When you open one, it downloads again, as long as you’re online and there’s enough free space. You may also see a similar entry for other cloud-backed locations on some PCs, such as content from a linked phone.
Run Storage Sense now
You don’t have to wait for the schedule. Running Storage Sense manually is useful when Windows warns you that space is low, or before installing a large update or game.
- Go to Settings > System > Storage > Storage Sense.
- Check the schedule menus first. A manual run uses the same Recycle Bin, Downloads and OneDrive settings as a scheduled one.
- Scroll to the bottom and select Run Storage Sense now.
- Wait for the check mark. When it finishes, Windows shows a short message with how much disk space was freed. It can take a minute or two on a PC that hasn’t been cleaned in a while.
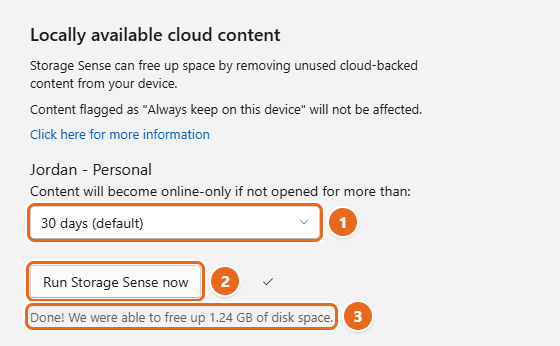
If the result is only a few megabytes, that’s normal on a PC that Storage Sense already cleans regularly. The next section covers the bigger items it skips.
What Storage Sense doesn’t clean, and where to find it
Storage Sense focuses on routine clutter. A few of the largest space users need a separate step, and they’re all on the same Storage page.
- Previous Windows installations. After a big Windows update, the old version can be kept in a Windows.old folder for a while so you can go back. To remove it, go to Settings > System > Storage, select Temporary files, check Previous Windows installation(s), and select Remove files. Once it’s gone, you can’t roll back to the earlier version.
- Other temporary files. The Temporary files page lists more categories, such as Delivery Optimization files and, on some versions, Windows Update cleanup, with a checkbox for each. Leave Downloads unchecked there unless you’re sure. Our guide on how to delete temporary files in Windows 11 explains each option.
- Cleanup recommendations. Under Storage management, Cleanup recommendations suggests large or unused files, files already synced to the cloud, and apps you haven’t used. You choose what to remove.
- Your own large files. Videos, game installs and old backups often take far more space than temporary files. To track them down, see how to find large files in Windows 11.
- Other drives. To see what’s using space on a second drive, select Advanced storage settings > Storage used on other drives.
For a full cleanup plan that combines these steps, read how to free up disk space in Windows 11.
How to turn Storage Sense off or undo a change
To stop Storage Sense from running automatically, go to Settings > System > Storage and set the Storage Sense switch to Off. Nothing it already cleaned comes back, but it won’t delete anything else on a schedule.
If you only want to stop one kind of cleanup, leave Storage Sense on and change that one setting instead:
- To keep your Recycle Bin until you empty it yourself, set the Recycle Bin menu to Never.
- To stop cleaning the Downloads folder, set the Downloads menu to Never.
- To keep OneDrive files on your PC, set the menu under each account to Never. To bring back files that were already made online-only, right-click them in File Explorer and select Always keep on this device.
Getting back a file Storage Sense deleted: files that Storage Sense empties from the Recycle Bin are permanently deleted, and you shouldn’t count on finding cleaned-up Downloads files in the Recycle Bin either. Your best options are a backup, OneDrive’s own recycle bin (if the file was in OneDrive), or File History. See how to recover permanently deleted files in Windows 11 for the steps.
Storage Sense on work and school PCs
On PCs managed by an organization, IT administrators can control Storage Sense with Group Policy or Microsoft Intune. According to Microsoft Learn, they can turn Storage Sense on or off for the whole device, control temporary file cleanup, set the Recycle Bin, Downloads and cloud content thresholds (from 0 to 365 days), and set how often it runs.
If a setting is managed this way, the matching switch or menu on your Storage Sense page is usually grayed out and you can’t change it. Ask your IT department if you need a different setup.
On your own PC running Windows 11 Pro, Enterprise or Education, the same policies are in the Local Group Policy Editor (gpedit.msc) under Computer Configuration > Administrative Templates > System > Storage Sense. Setting Allow Storage Sense to Enabled keeps it on for every account on the PC, and Disabled keeps it off. Most home users don’t need this; the Settings app is enough.
Troubleshooting
The Storage Sense switch or menus are grayed out
A policy is controlling the setting. On a work or school PC, contact your IT department. On a personal PC, check whether you or an app set a Storage Sense policy in the Local Group Policy Editor, and set Allow Storage Sense back to Not Configured.
Storage Sense never seems to run
- If Run Storage Sense is set to During low free disk space, it only runs when your drive is nearly full. Choose Every week or Every month if you want regular cleanups.
- Storage Sense needs you to be signed in and online for more than 10 minutes. A PC that’s only switched on briefly may not reach that point.
- Check the line under Automatic User content cleanup. It shows how much space was cleaned in the past month.
It ran, but freed very little space
Storage Sense only removes the categories you allowed. If Downloads and OneDrive are set to Never, it mostly clears temporary files and old Recycle Bin items. Look at Cleanup recommendations and the Temporary files page, and check for large personal files, as described in What Storage Sense doesn’t clean.
My second drive is still full
Storage Sense works on the system drive only. To clean another drive, select Advanced storage settings > Storage used on other drives, choose the drive, and remove or move files yourself.
A file I needed is gone from Downloads
Set the Downloads menu to Never right away so nothing else is removed, then follow the recovery options in How to turn Storage Sense off or undo a change.
A User Account Control prompt appears on the Storage page
This is expected on current Windows 11 versions. After the May 2026 update, the prompt appears when you choose to view temporary files. Select Yes if you’re an administrator, or have an administrator approve it. You can still set up Storage Sense itself.
I keep getting low disk space notifications
Microsoft says these appear when your drive is running out of free space, which can slow the PC and make it hard to install Windows updates. Turn on Storage Sense, select Run Storage Sense now, and then work through the extra cleanup steps above.
FAQ
Is it safe to turn on Storage Sense?
Yes, with the default settings. It only removes temporary files and Recycle Bin items older than 30 days. The only setting that can surprise people is the Downloads cleanup, which is off unless you turn it on.
Does Storage Sense delete my personal files?
Not from Documents, Pictures, Desktop or your other personal folders. It can delete files from the Recycle Bin and, if you allow it, the Downloads folder. OneDrive files it manages are made online-only, not deleted.
Is Storage Sense the same as Disk Cleanup?
They overlap. Disk Cleanup (cleanmgr.exe) is the older, manual tool. Storage Sense is the newer, automatic one built into Settings. Most people only need Storage Sense plus the Temporary files page.
Does Storage Sense slow down my PC?
It runs in the background for a short time and isn’t meant to affect normal use. Freeing space on a nearly full drive usually helps performance and leaves room for Windows updates.
How often should Storage Sense run?
For most people, Every week or Every month works well. If your drive has lots of free space, During low free disk space is fine.
Will Storage Sense remove Windows.old?
Don’t count on it. Remove it yourself from Settings > System > Storage > Temporary files > Previous Windows installation(s) once you’re happy with the update.
Where did Storage Sense go in Settings?
In Windows 11 it’s under Settings > System > Storage, in the Storage management section. You can also type Storage Sense into the search box in Settings.
Next step
Turn on Storage Sense, set the Recycle Bin to 30 days, and select Run Storage Sense now once to see how much space you get back. If you still need more room, open Temporary files and Cleanup recommendations on the same Storage page.

Matt Jacobs has been working as an IT consultant for small businesses since receiving his Master’s degree in 2003. While he still does some consulting work, his primary focus now is on creating technology support content for SupportYourTech.com.
His work can be found on many websites and focuses on topics such as Microsoft Office, Apple devices, Android devices, Photoshop, and more.